Besides attaching the band around chest level, you can also use a higher attachment point and bend your upper body forwards, so it is perpendicular to the band. This way you will still have a straight chest press without an incline or decline, and in addition the stance will be more stable.
Reminder:
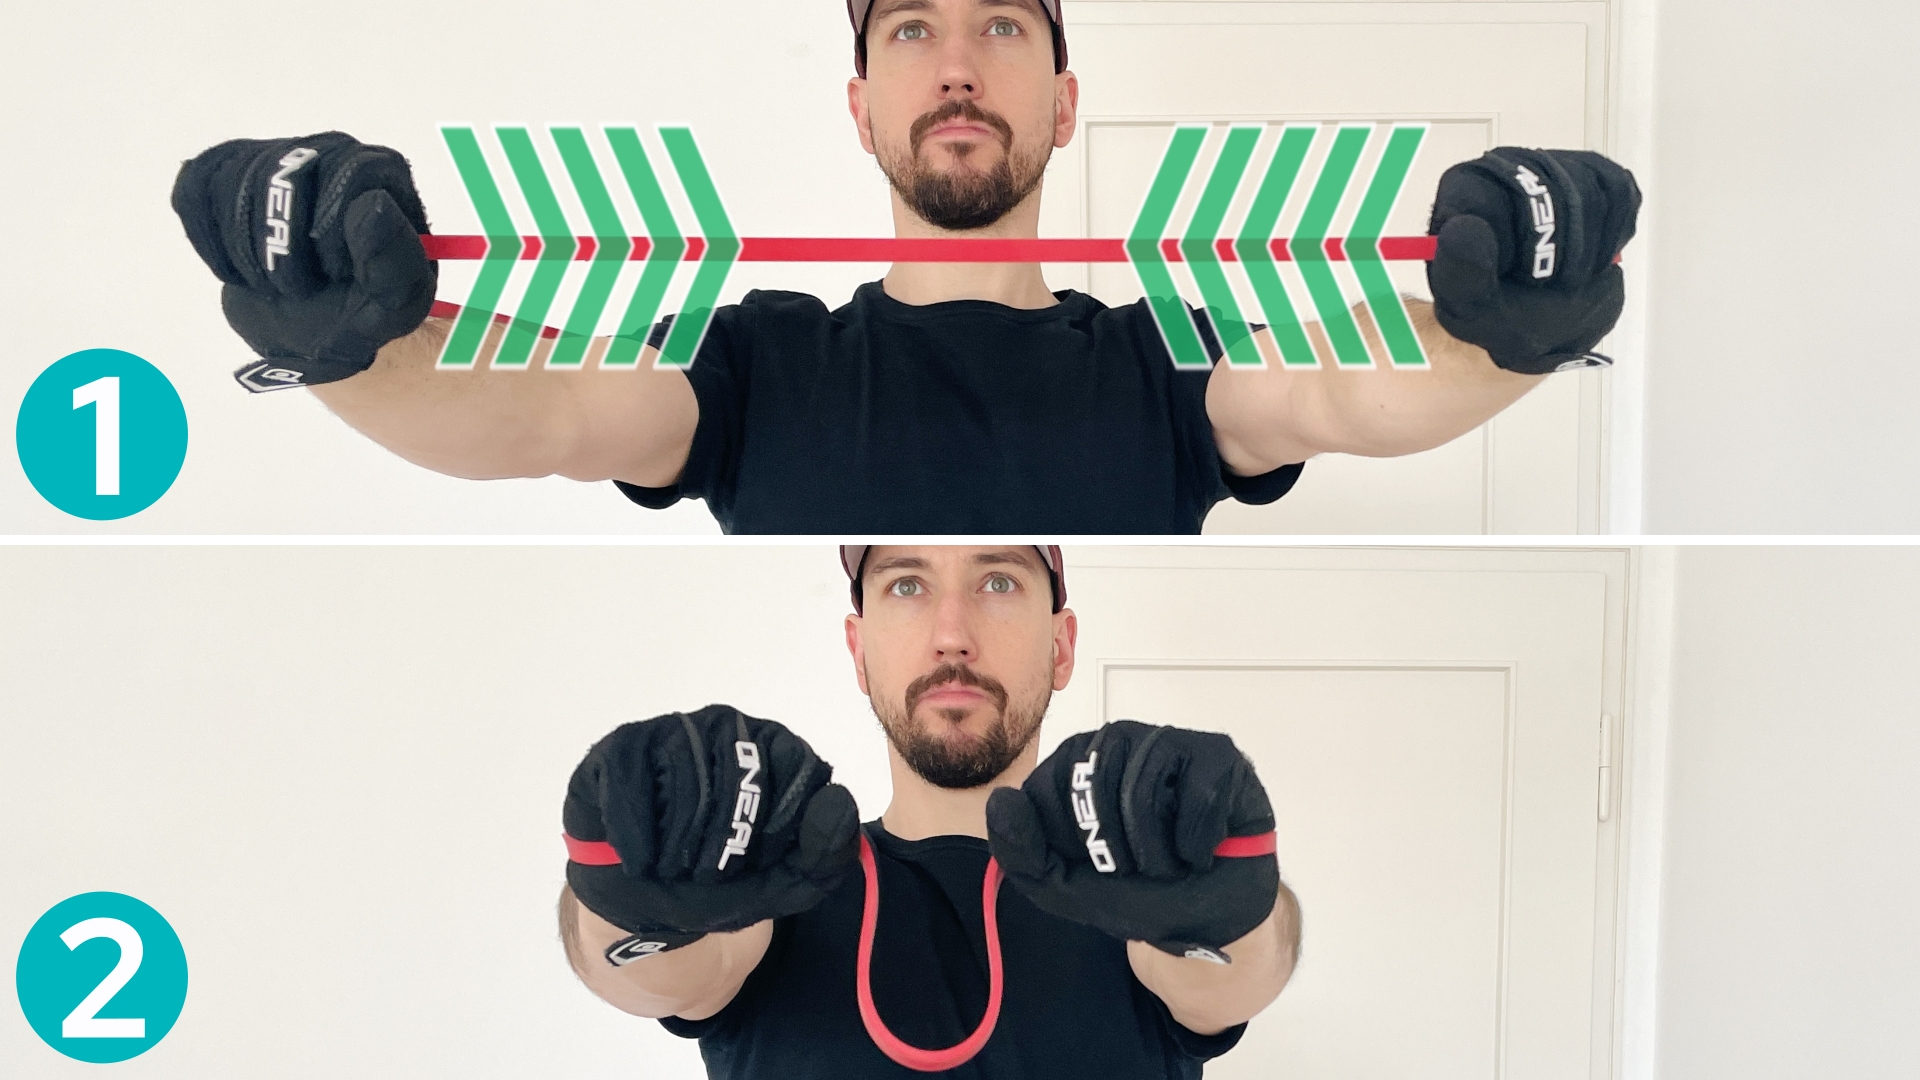
Don’t forget to bring your hands together at the end of the extension. This will activate the chest muscles to a greater degree.
Form Mistakes to Avoid
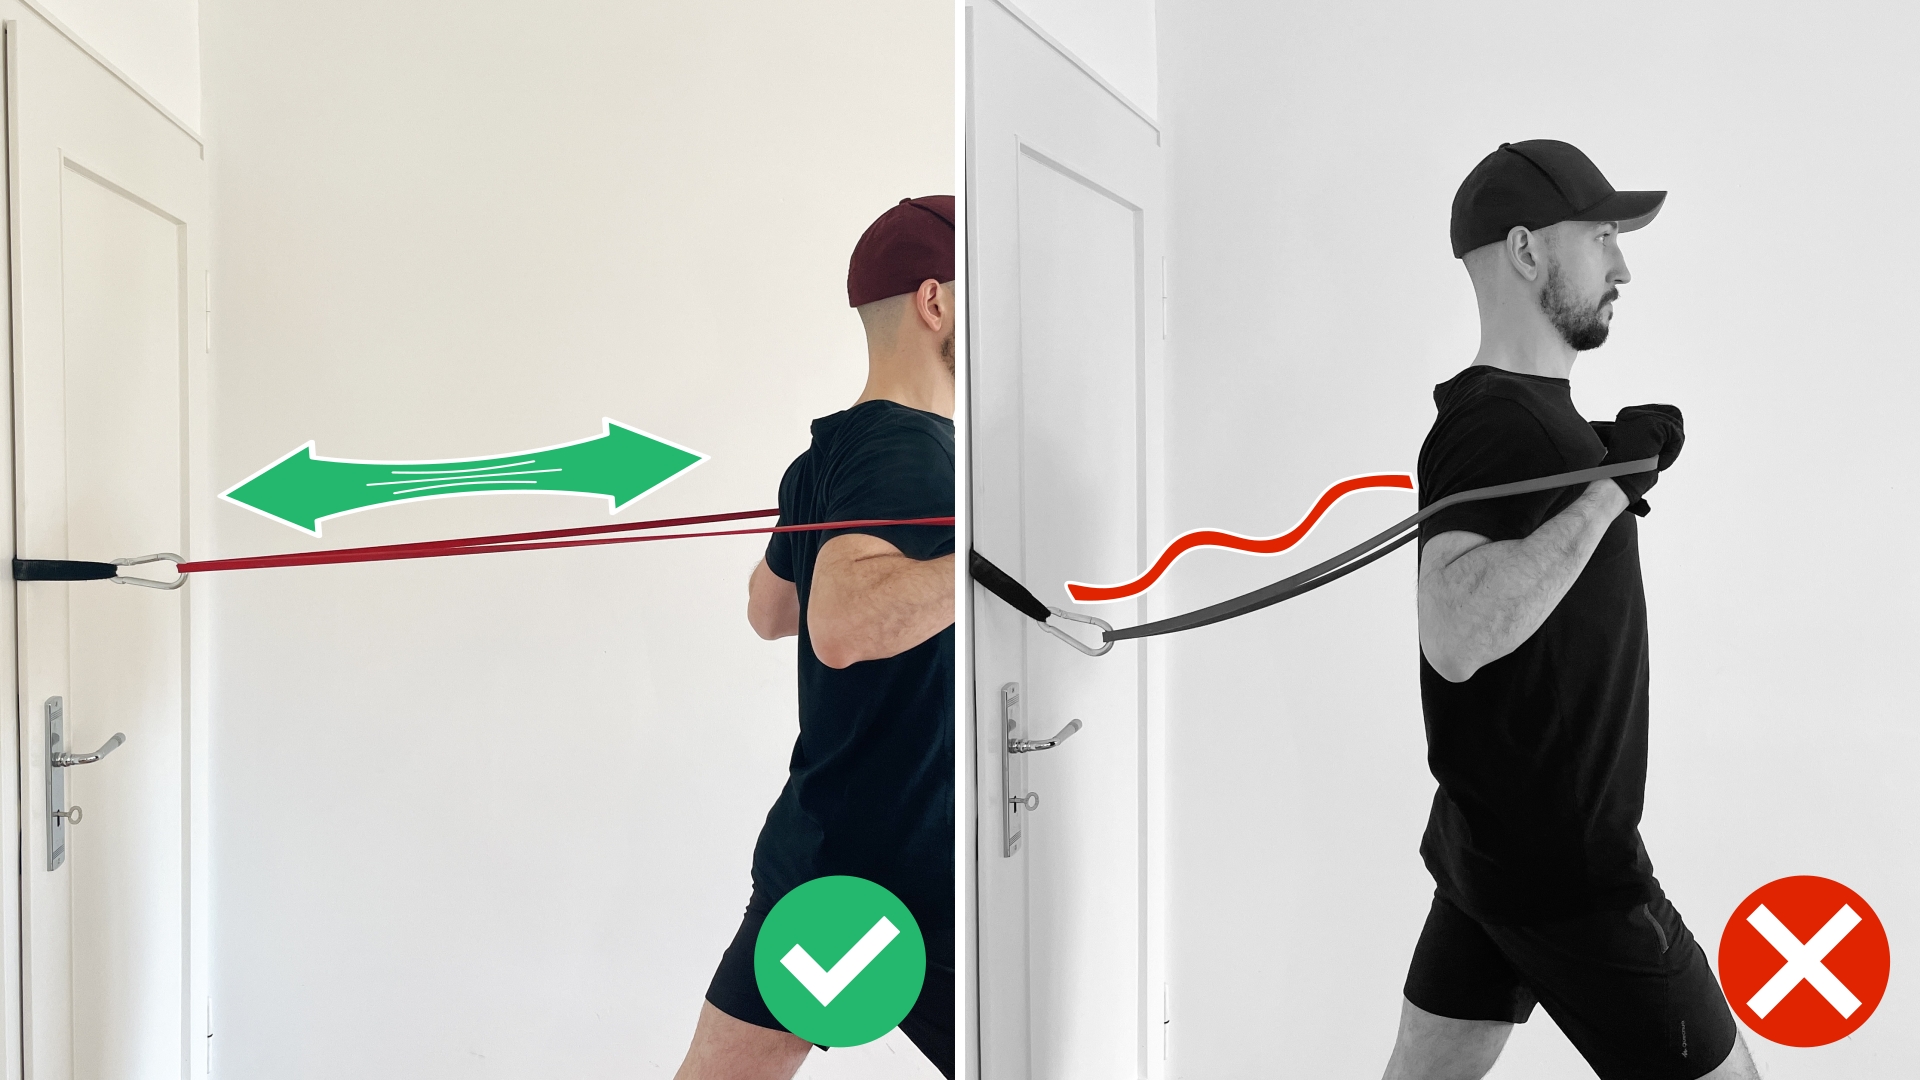
⓵ No Tension = No Resistance! – If you have slack in the band in the starting position of the chest press, you are leaving progress on the table. Resistance bands generate the load through the elastic force when they are stretched. Therefore, it is the most important thing to have tension in the band in every position of the movement you are doing.
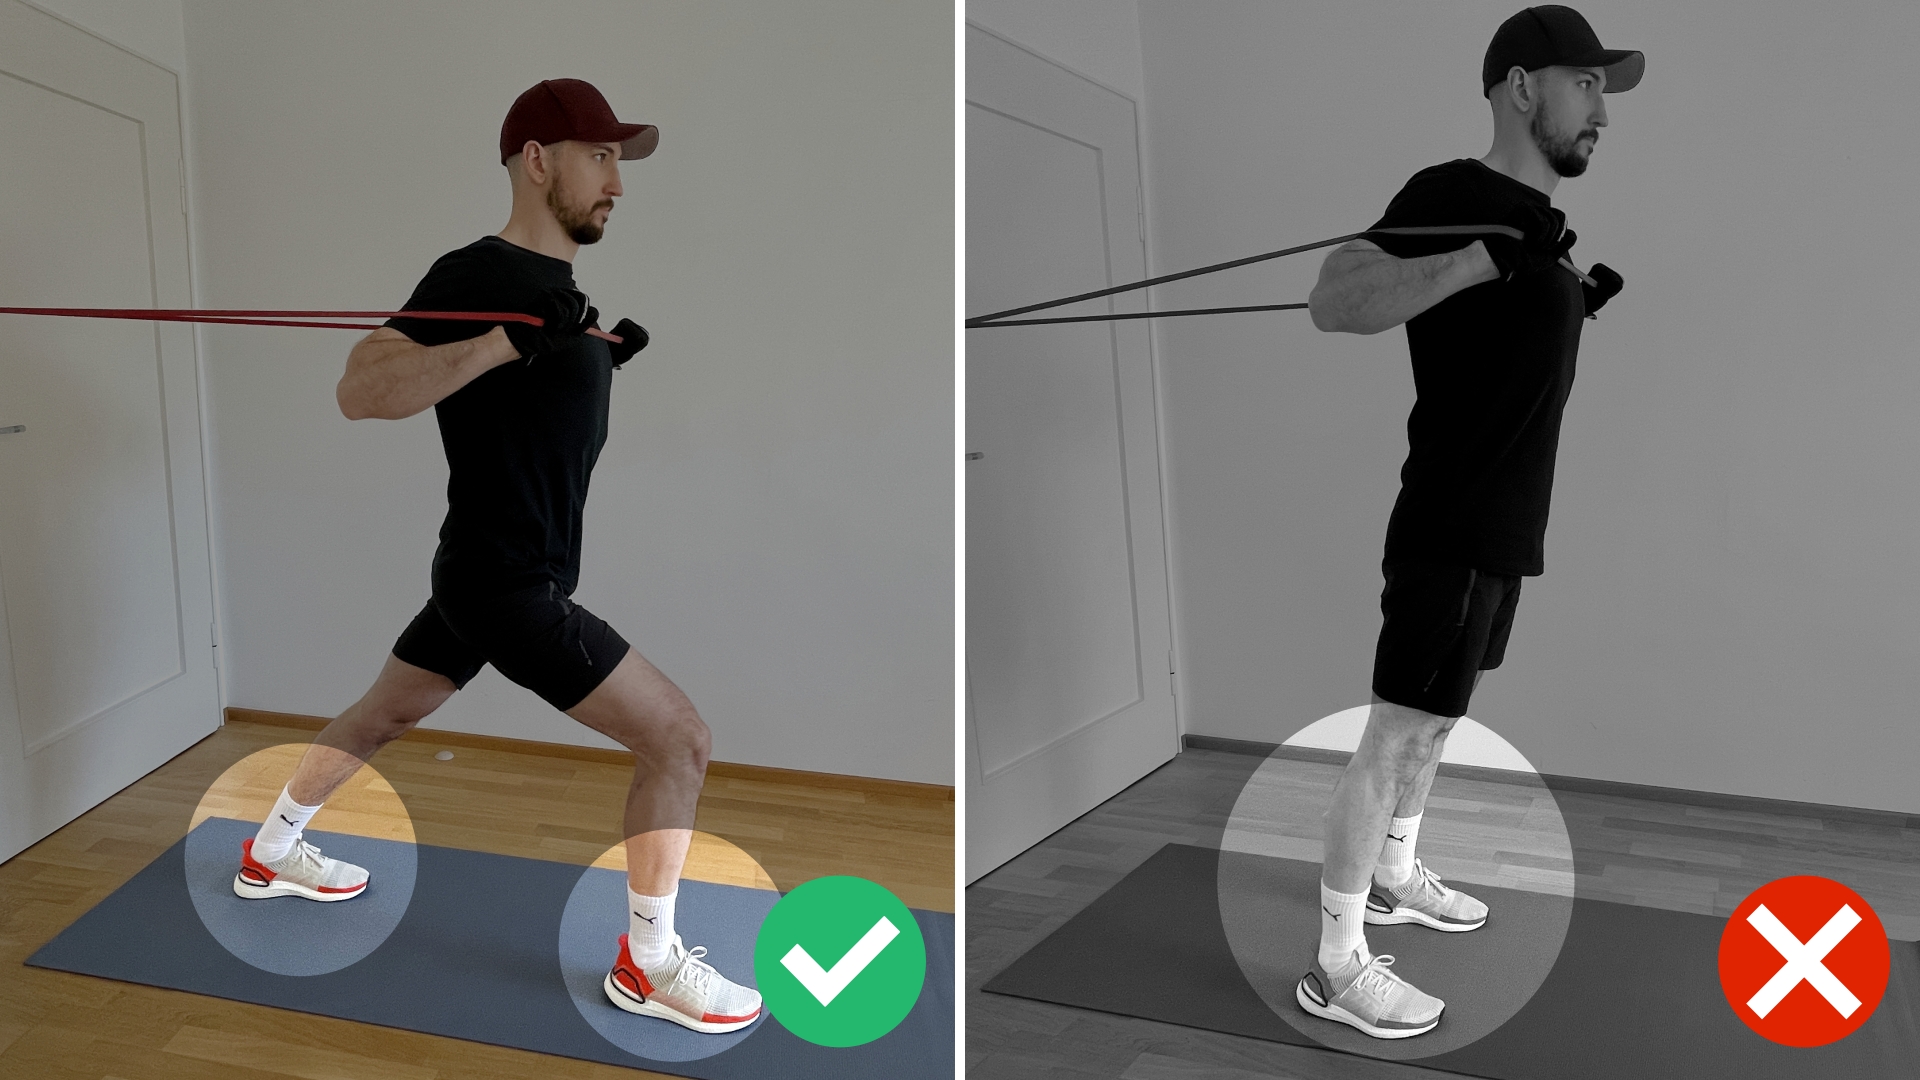
⓶ Don’t internally rotate your shoulders and keep the back straight! – I see this quite often happening to beginners. The usual reason is a load which is too high for the strength level of the person. To compensate the lagging strength in the chest, shoulders and triceps, the body recruits other muscle groups to somehow move the load. This is not a good thing, since you are not in control and this can result in injuries, which are completely avoidable.
Therefore, stick your chest out, this will automatically bring the shoulders in an externally rotated position. Now also lower the shoulders and relax your neck. Keep a focus on having your shoulders stay in this position during the whole range of motion.
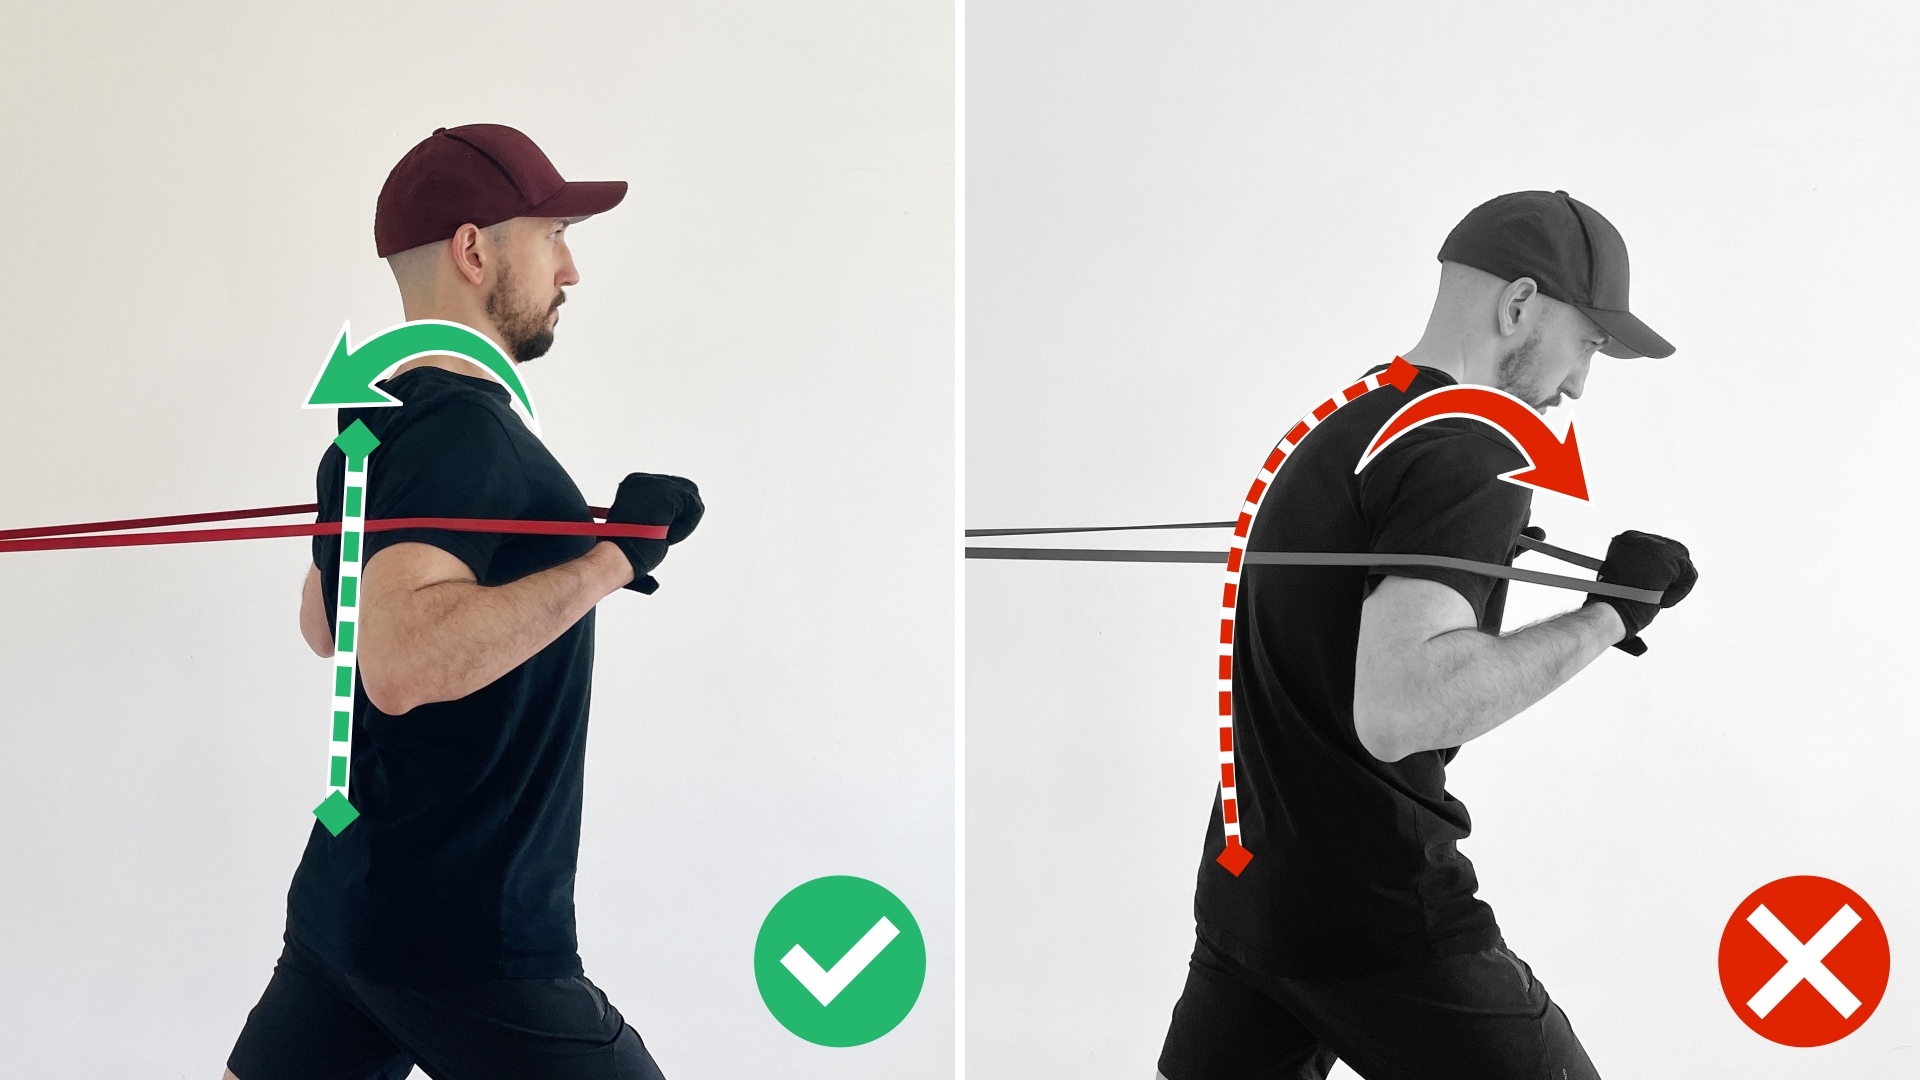
Especially keep a very close look at what happens in the pressing part of the exercise. Here is often the moment the form gets compromised, and the shoulders rotate inwards to compensate the lagging chest muscle strength.

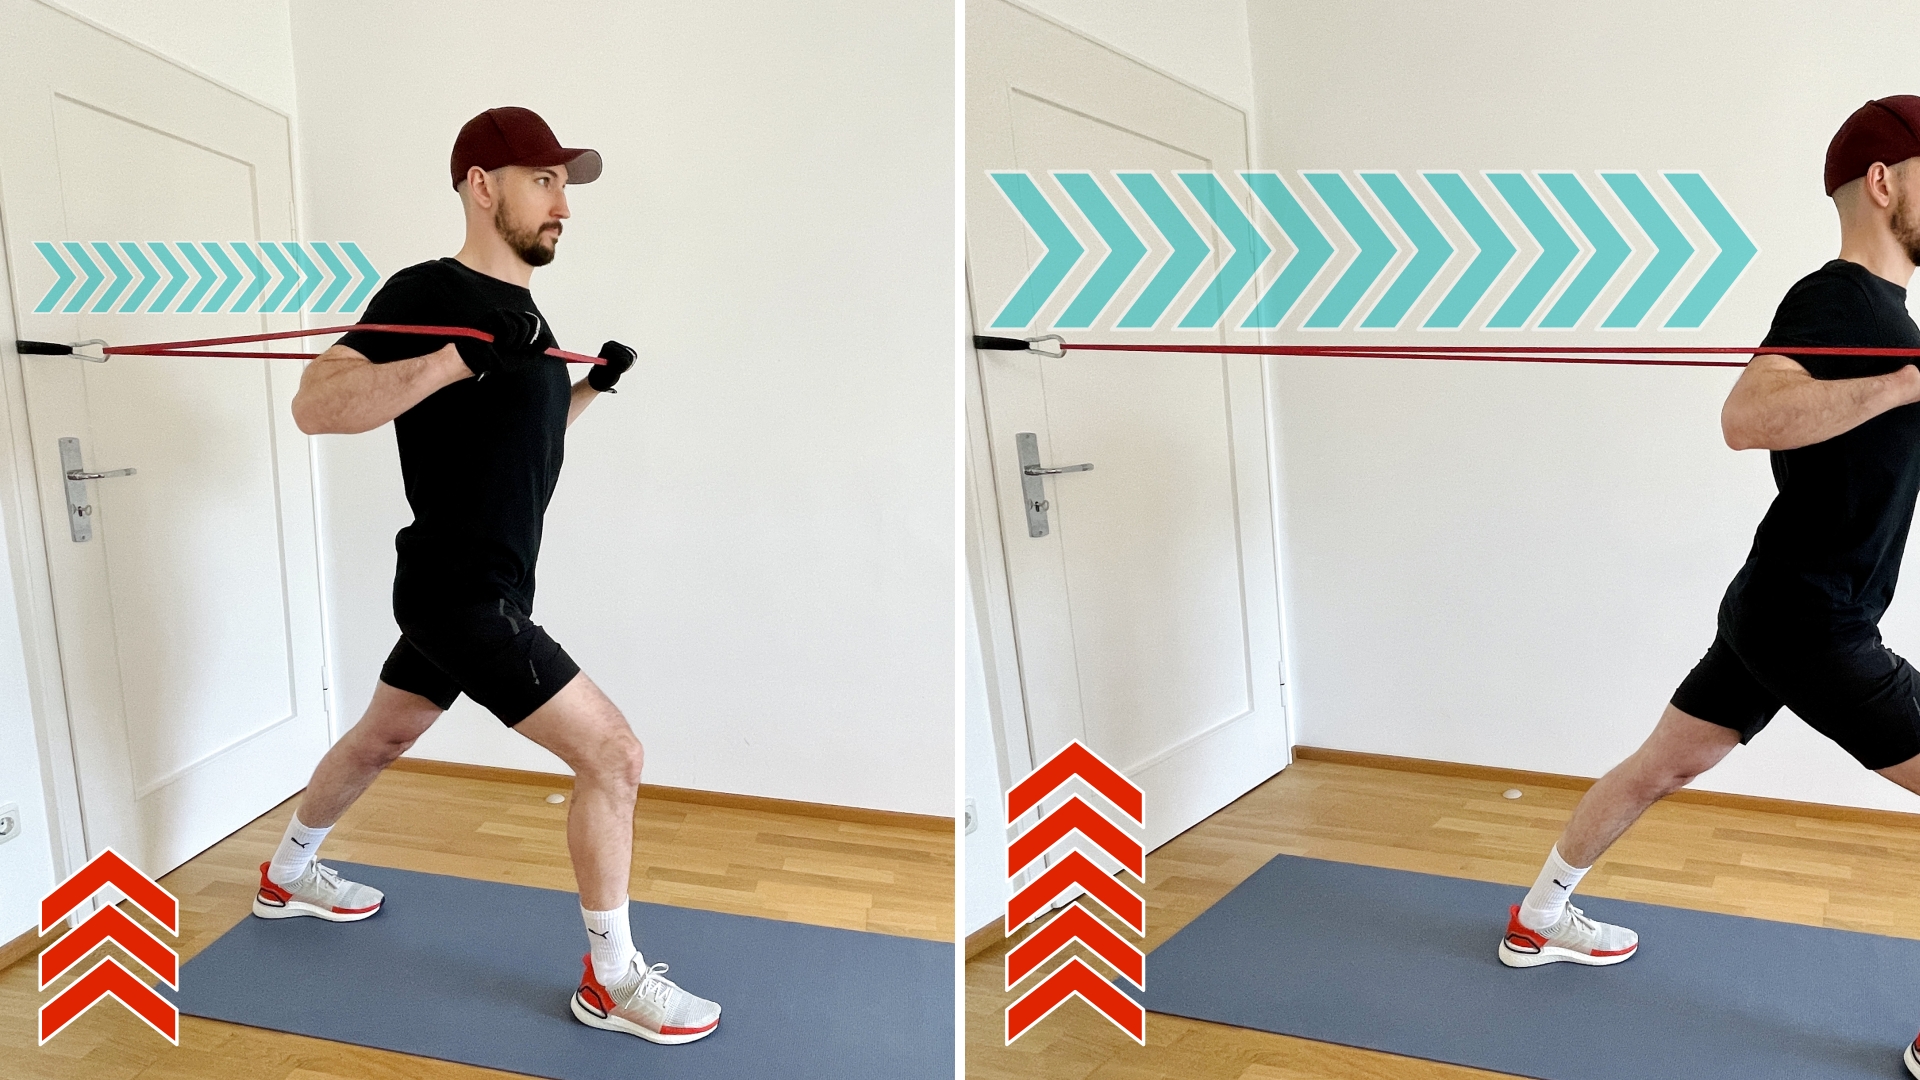
⓷ Control the band and don’t let the band control you! –The further you stretch a resistance band, the more tension and therefore more resistance it generates. The same logic is valid in reverse. The more the band is returned to its unstretched state, the less resistance it generates. Due to this reason, controlling the negative part of the chest press is there the money is.
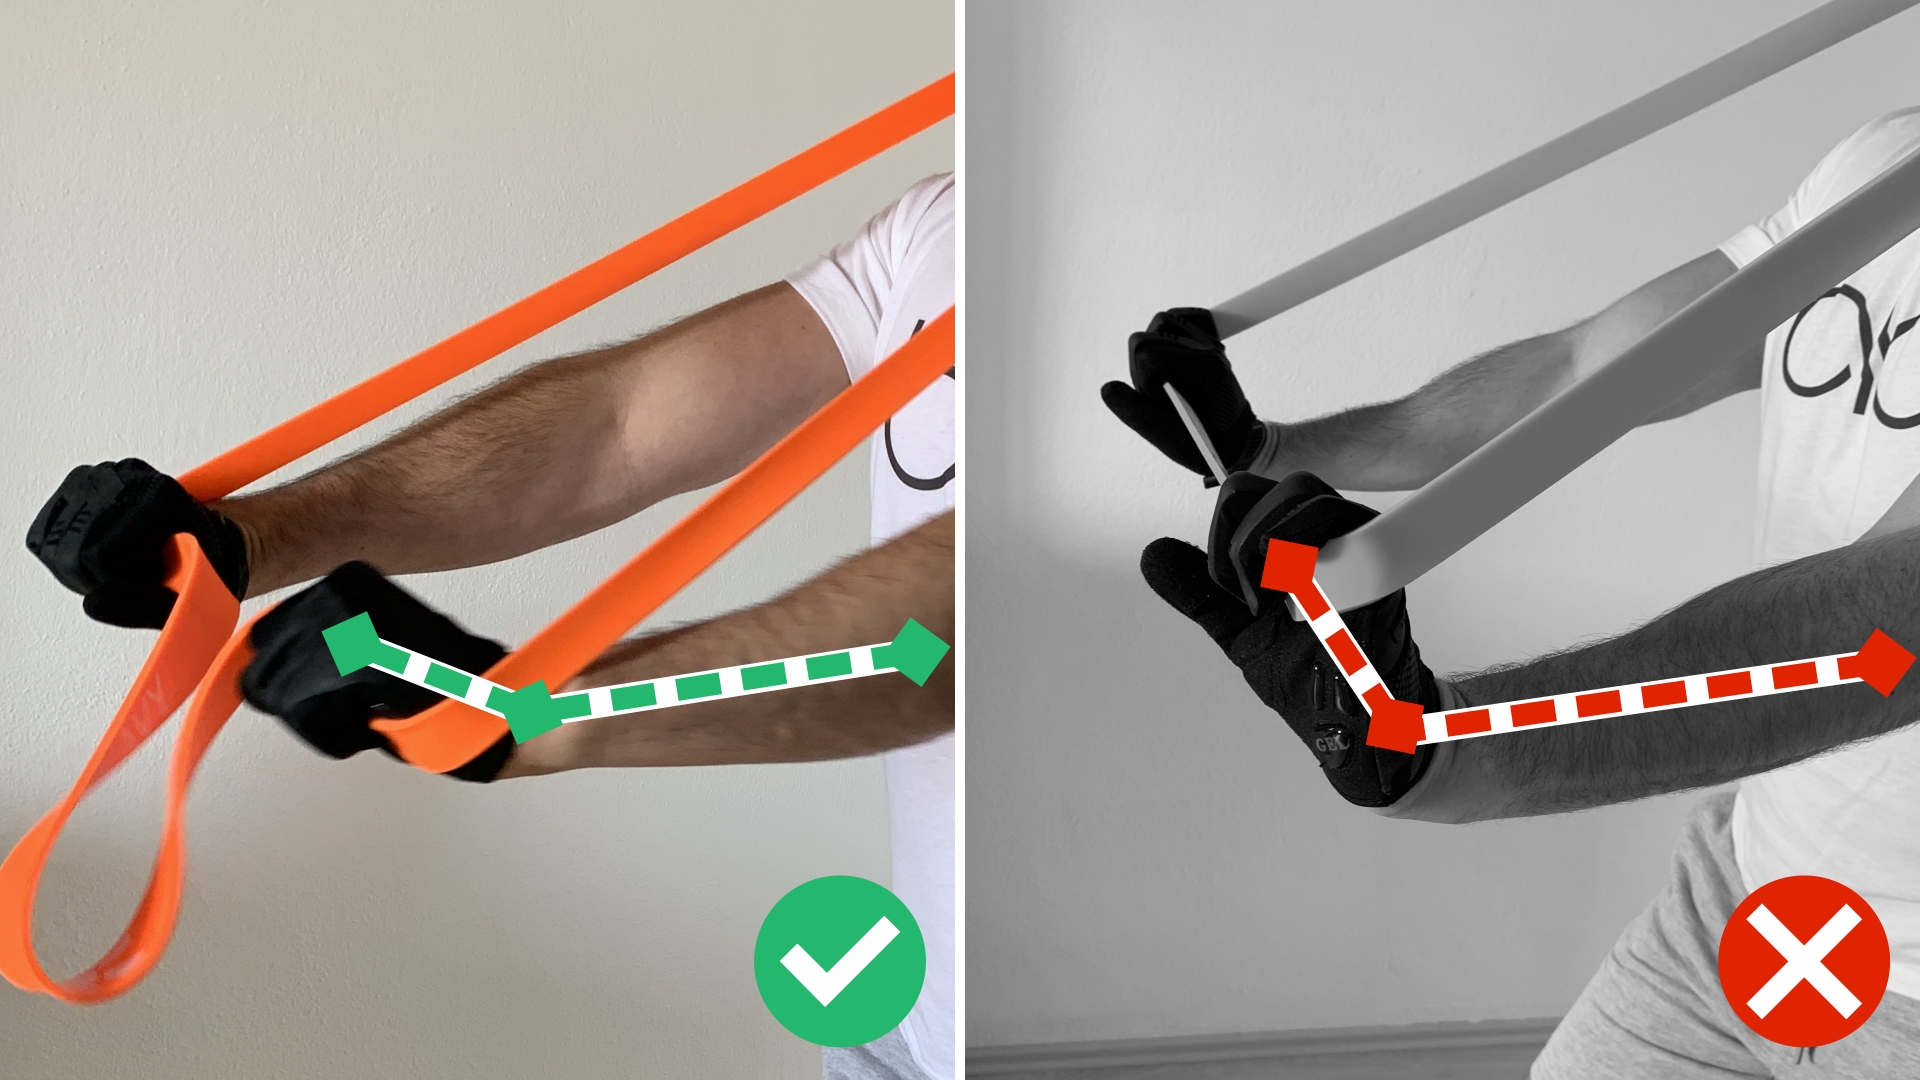
⓸ Shallow angle in the wrists – By maintaining your wrists as straight as possible, you will achieve the most effective transfer of force from your muscles to the band. Of course, you will still have some bending in your wrist, because you have to hold the band. Simply keep the angle to a minimum and have a firm grip around the band.
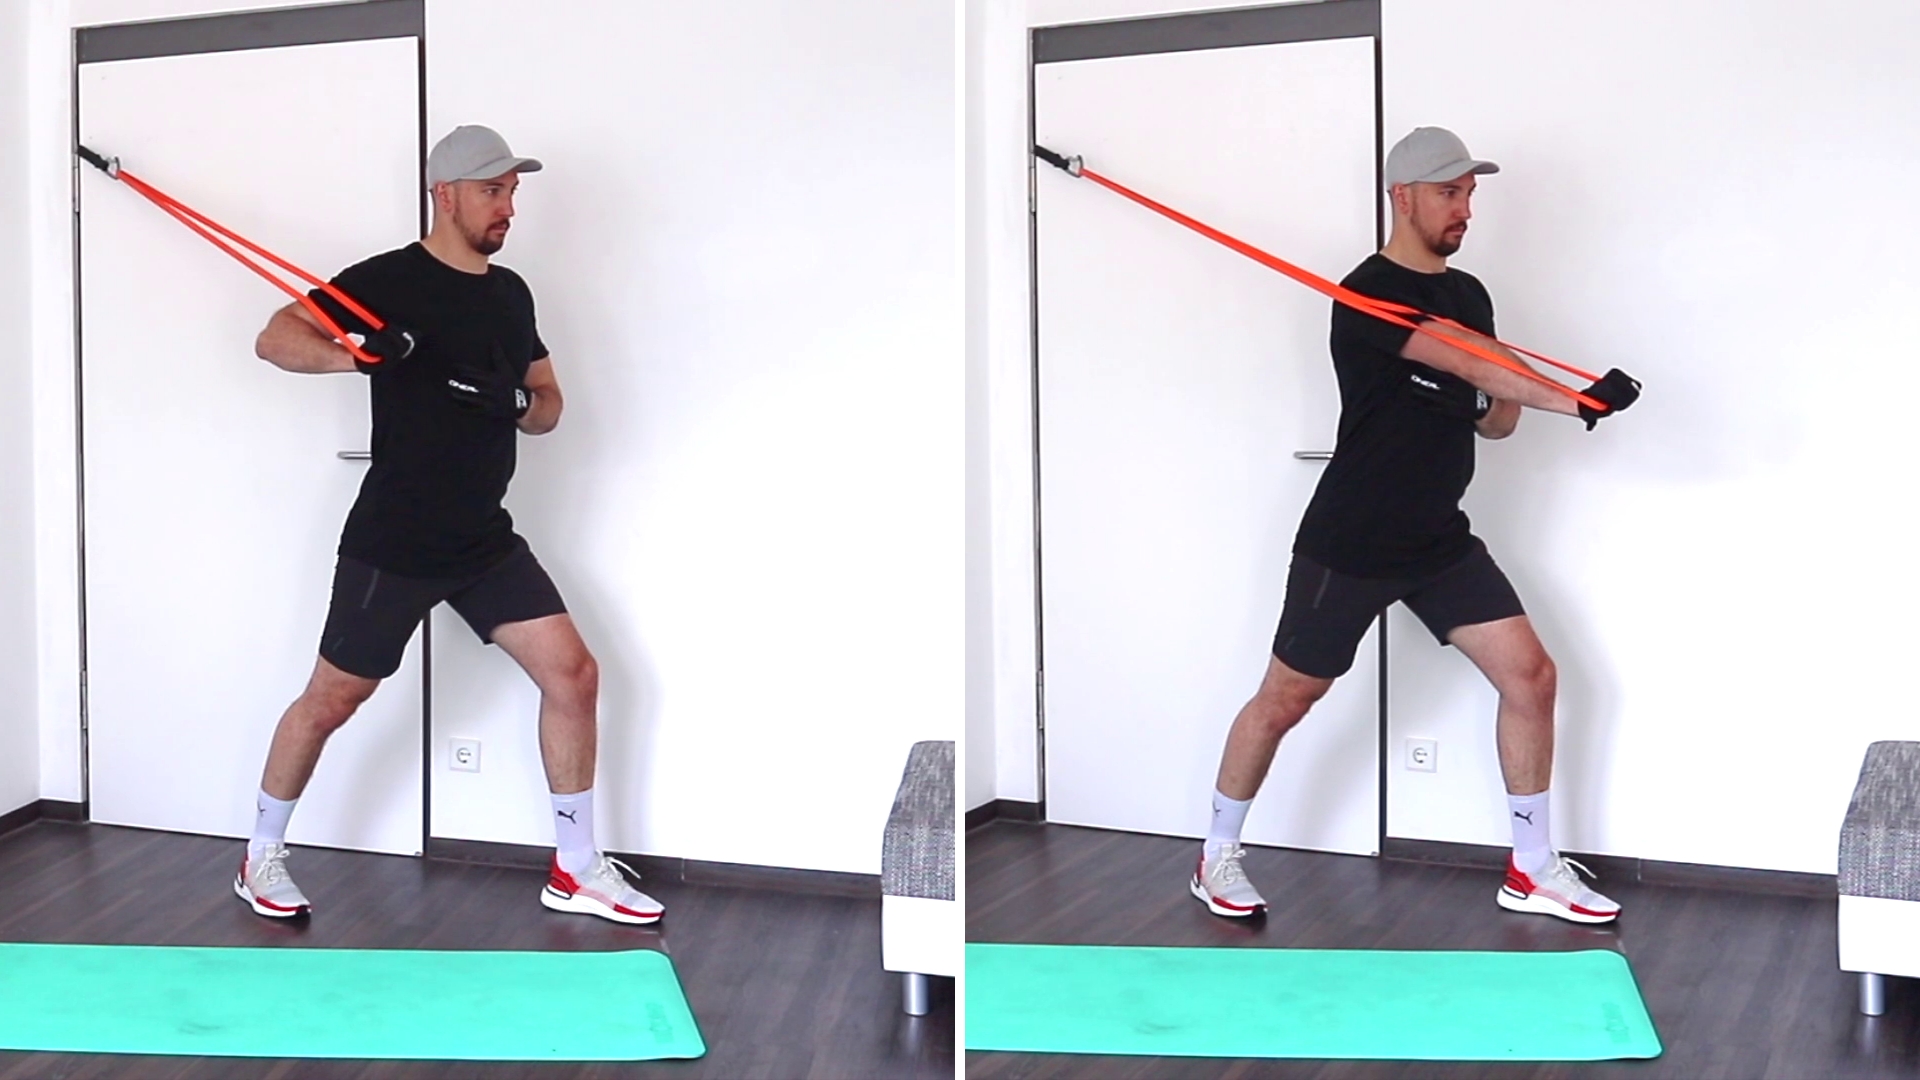
⓹ Stable Split Leg Position – The stronger the resistance band, the harder it will be to stay in place and avoiding the tension of the band pull you back. Placing your feet parallel will give you an unstable position. By placing your feet in a split stance, you will have a much more stable base and will be able to really focus on the pressing and not the stabilising.
By following these simple form tips, you will have a much stronger chest press and will be able to progress much faster. In addition to the specific mistakes to avoid, there are some general points to keep in mind when it comes to working out with resistance bands. Make sure to check our full article on this topic: The Worst Mistakes You Can Do When Training With Resistance Bands
Ways To Adjust The Resistance
One of the biggest advantages resistance bands have over weights is the possibility to change the resistance output the bands has. Weights have a constant resistance: 10 kg are 10 kg, and you can’t change that. Resistance bands in the other hand have a linear variable resistance, that is basically a fancy way of saying “the more you stretch a band, the more resistance it generates”.
Unfortunately, not many people really capitalize this advantage. I see way too often that instead of using the potential of a band, especially beginners, use a thicker band once a movement gets a little easier. Such a jump in resistance is more often than not too great. This can then lead to a compromised exercise form, which reduces progress and increases the risk of injury.
But we have you covered, the following methods will show you how you can adjust the resistance when it comes to the chest press and use the full potential of bands.
Changing the Distance to the Anchor point – This is the true reason anchored chest press is my favorite alternative. By using a door anchor, you can change the distance between the point where you stand and the anchor point. We learned that the further you stretch a band, the more resistance you will have to work against. And you can even do that in the middle of a set. Start with a greater distance and once you can’t perform any clean reps anymore, take a step backwards. This will reduce the resistance, and you will be able to knock out some more repetitions.
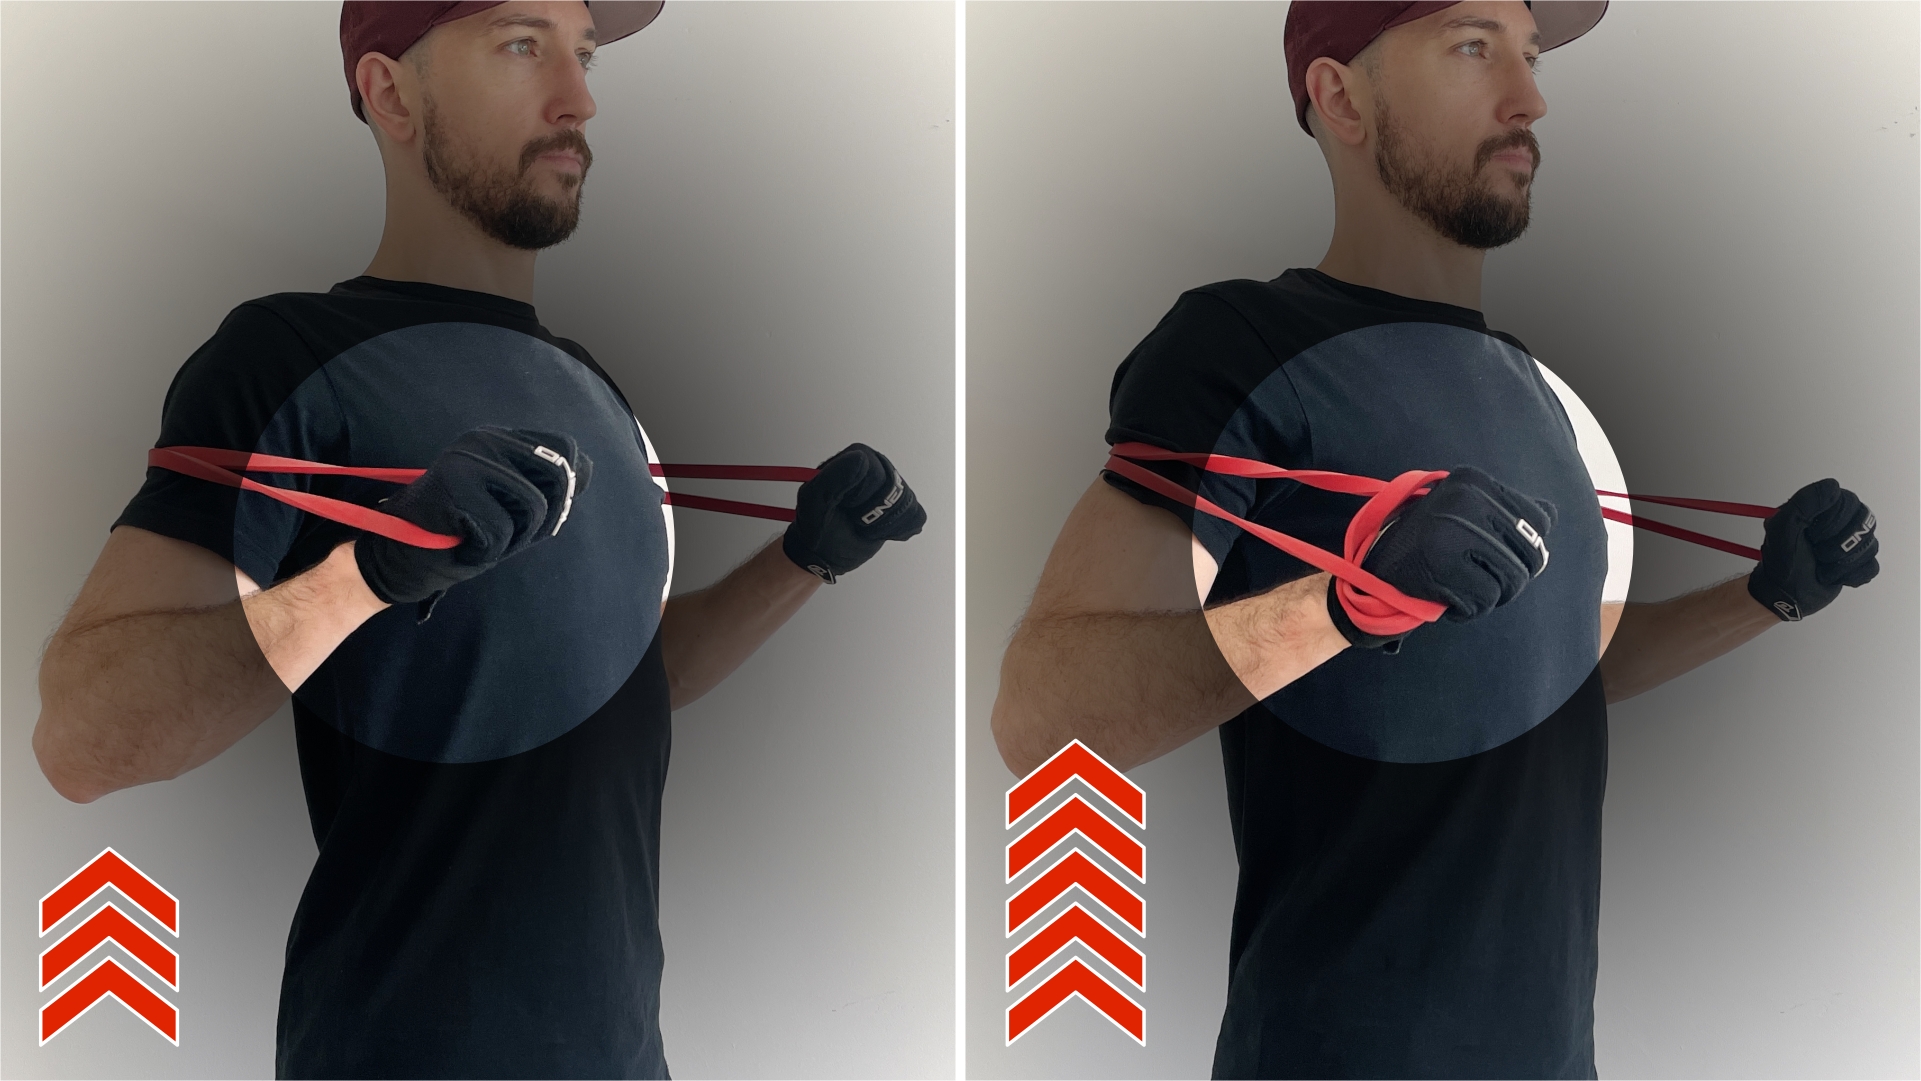
Adjusting the length of the band – Wrap the band around one or both of your hands to make it shorter. This will reduce the effective length of the band and result in a heavier load once you stretch it. This method is especially good for variations where you don’t use an anchor point (we will see some later) or if you have limited space available and can’t create much distance between you and the anchor point.
Using 2 Bands – I hope you have gotten yourself a set of resistance bends with different strength levels. Then you can use this method to adjust the resistance. I like to take the lightest band in the set and add it as a second band. This will usually be enough to make the set more challenging, but won’t take it overboard. If you still don’t have as set… you should really get one straightaway right here: Resistance Bands Set
Doubling the Band – By doubling the band, each side will have to work against the resistance generated by 2 stings of the band and not only one. This will drastically increase the resistance. Due to the linear variable resistance profile of bands, doubling a band will result in more than double the resistance it generates. Therefore, you will need to use a much lighter band, if you use this method.
Slowing down the reps – Changing the exercise speed, won’t change the effective resistance, but it will increase the intensity of a set dramatically. This method is often forgotten or overlooked when it comes to resistance training in general. However, your joints and tendons aren’t getting stronger as quick as your muscles do. By keeping the resistance the same and only increasing the total time under tension, you will give your body time to adjust and make much greater and safer progress in the long run.
Adding Pauses – Another approach to adjusting the exercise speed are paused reps. What you will do, is adding a pause in the fully contracted position. So you press to full extension and pause in this position for 1-2 seconds before reversing the movement.
Combining Methods – All the methods we discussed so far, can be combined to really fine tune the resistance. You can double up the band and make it shorter, or increase the distance to the anchor point and combine it with a slower executing speed. Try all the methods and get familiar with them.
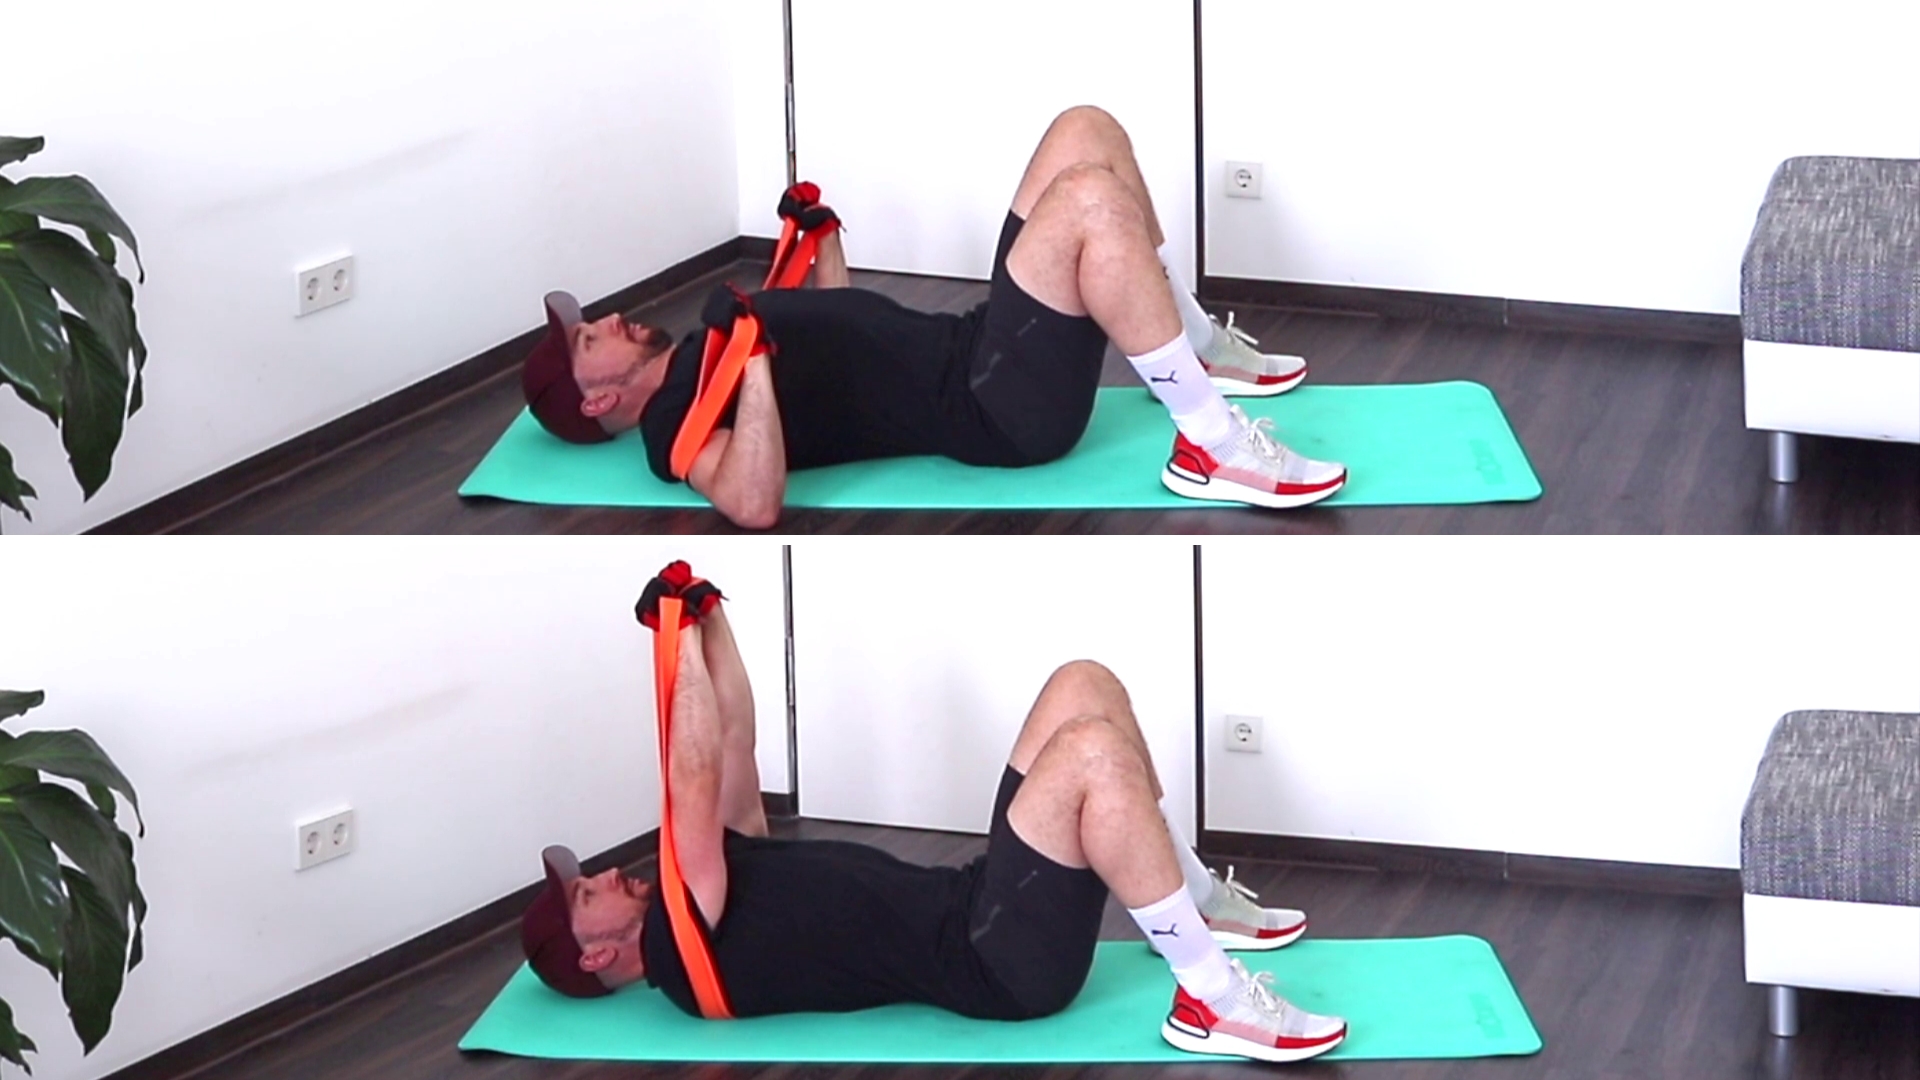
Lying Chest Press (Behind the Back Setup) – this is basically the resistance band version of the bench press done with weights. By lying down, you will have a stable base underneath you. One disadvantage is the limited range of motion, when you’re doing this version on the floor. You will only be able to move your elbows backwards until you hit the floor. In the standing variation, you don’t have this limiting factor. If you have access to a bench, use it – or simply do the standing chest press.
Single Arm Chest Press – by training one side at a time, you will have to use a much lighter band. Therefore, the stabilization part won’t be as demanding, and you can really put all your focus on the chest muscle contraction. In addition, you can slightly rotate your upper body towards the working side. This way, the chest muscle will have an even greater activation.
Grip Variations
By changing the orientation or distance of your hands, you will get another level of adjustments and therefore many more variations to try. The great thing about doing chest pressing with resistance bands is, that you can change the grip without changing your setup at all.
Hand orientation:
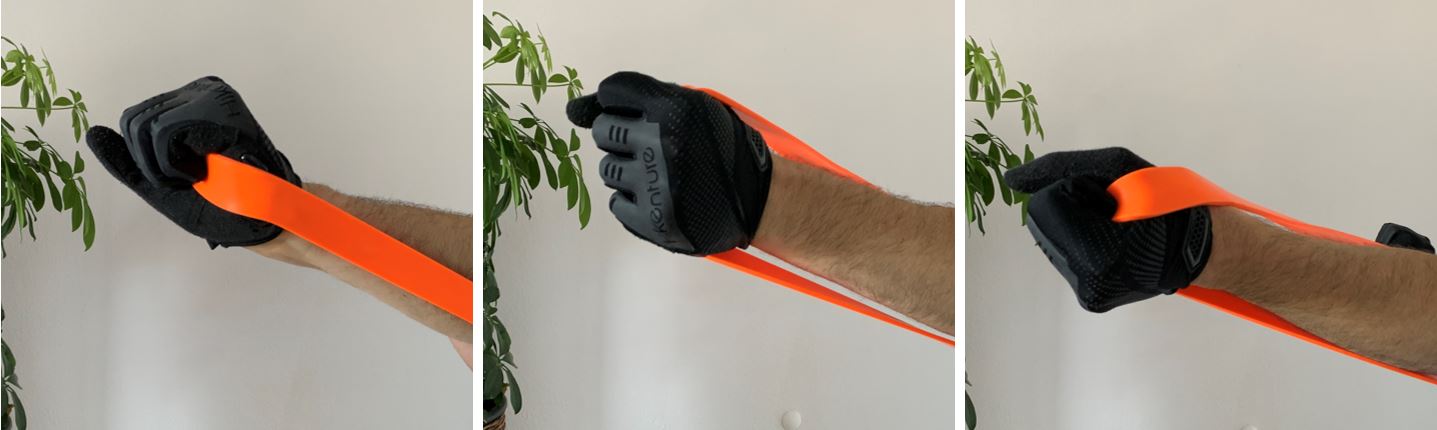
Basically, there are 3 grips.
- The pronated grip (left) – is the most common grip when it comes to chest pressing. The back of your hand is facing up and the thumbs towards each other.
- The neutral grip (middle) – here the thumbs will point up. This grip will result that you will have your elbows much closer to your upper body during the exercise. Therefore, the triceps will be more involved in the movement.
- The supinated grip (right) – in this grip, the back of your hand will be oriented down. This grip is easier in the shoulders. So if you have any discomfort in your shoulders during the chest press, you might try this one.
Hand distance:
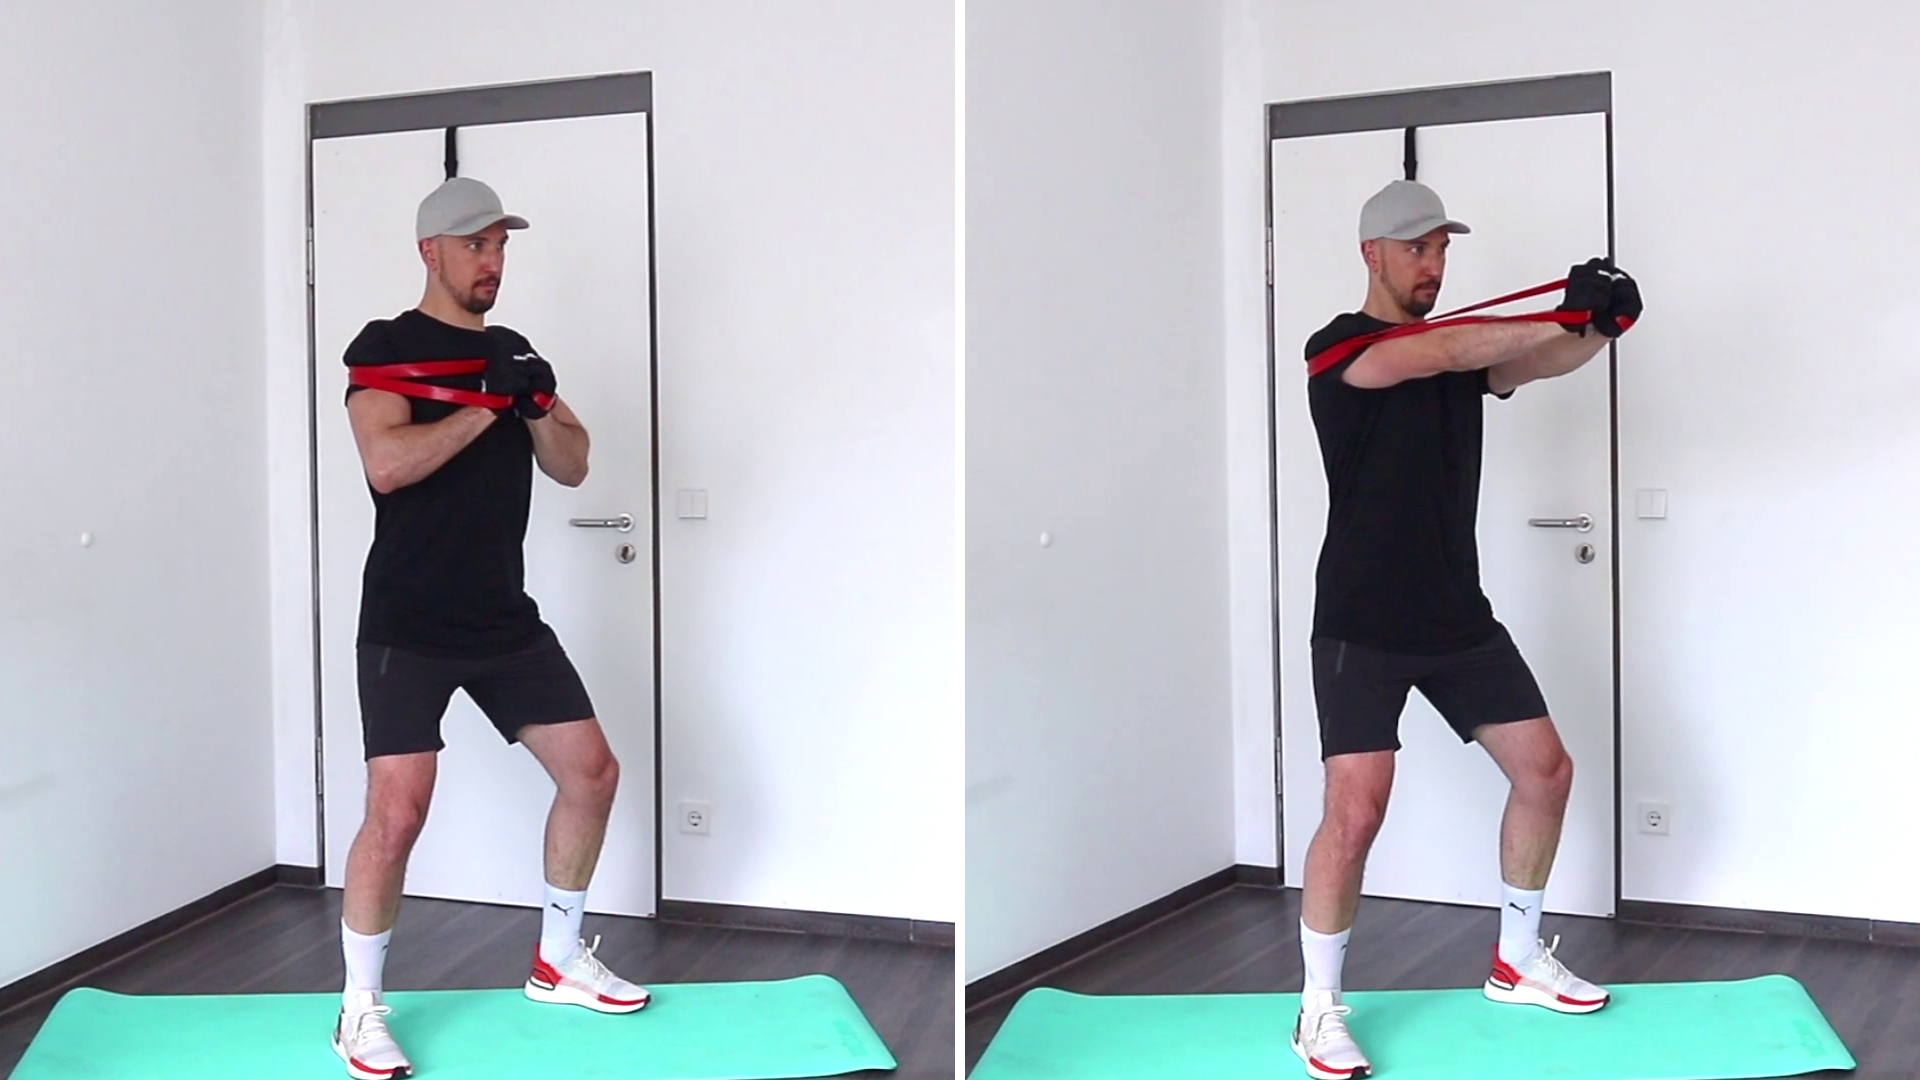
Besides changing the orientation of your hands, you can change the distance of your hands to each other during the movement. I especially like the close grip chest press. This setup is really gentle to your shoulders and will get your triceps working much harder.
Arm Angle
By changing the arm angle, you will shift the muscle focus of the pressing movement. The incline chest press has a greater focus on the upper part of the chest as well as the shoulders.
Decline pressing emphasizes the lower chest, and the shoulders will be involved to a smaller degree.
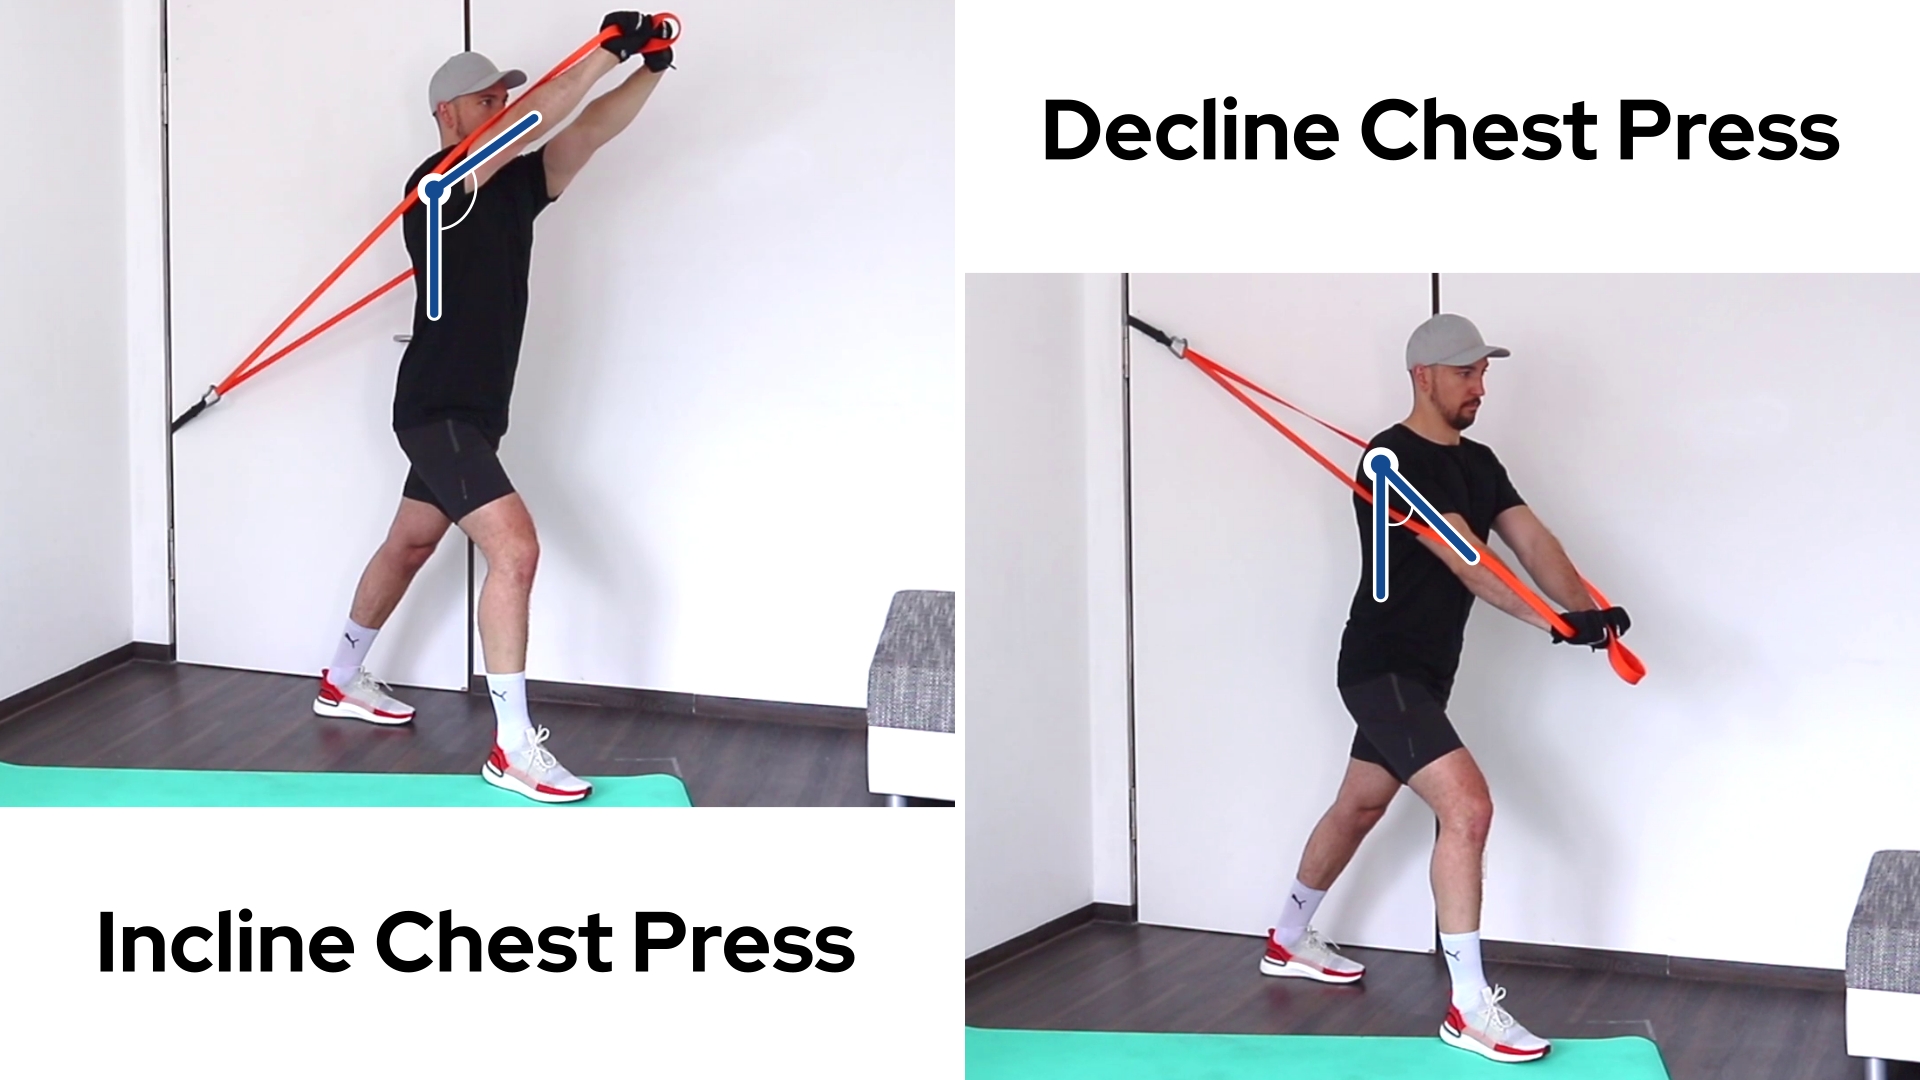
If you want to get more into these chest press variations, have a look at the full articles about the Incline Chest Press and the Decline Chest Press.
One Response
A bit of fan mail. I have your app and I also enjoy the content on your website — you’ve got a really nice layout of the different exercises, how to do them, all the pointers etc. It’s really really helpful!