Pullover With Resistance Bands

Looking for an exercise that builds the chest and the lats at the same time? Then don’t look further. You found it. The pullover is what you’re looking for. This old school exercise from the era of Arnold get slowly back into the gym after being neglected for years. And this is great!

The great thing is that the only piece of equipment you need is a set of resistance bands. Not a lot of weight, no gym membership or expensive machines. Simple resistance bands. In case you still need a set to get started, check out the set right here: Resistance Bands Set

This article will give in depth information about the pullover with resistance bands. Including as step-by-step explanation of how to perform the exercise, as well as important Dos and Don’ts. We will learn about methods of adjusting the resistance of a given band and have a look at what variations exist.

In the last section, you can really dive deep into additional information about effectivity of resistance band training and muscles used in a pullover. Followed by how to incorporate this exercise into a workout routine.

MuscleMapPullOver-Overview

How To Pullover The Right Way With Resistance Bands?

For a correct pullover you will need to fix the band above your head. You can either use a door anchor or fix it to a pull up bar at home or in the park. Make sure that the surface of the object you attach the band to is smooth to prevent any damage to the band.

If you still don’t have a door anchor get it one here – it is dirt cheap, and it enables you to do a ton of additional exercises with resistance bands. While you’re at it get a pair of Workout Gloves to protect your hands.

Always have a proper warm-up before doing any resistance training. This will lower the chance of injury, and you will be able to make progress quicker!

There are 7 steps to the perfect pullover:

  1. Attach the band towards the top of a door with a door anchor
  2. Step back until there is tension on the resistance band
  3. Set your feet shoulder width apart (Keep a straight lower back and brace your core)
  4. Bend over with your upper body and align with the band path (Bend your knees for more stability)
  5. Bring your hands towards your hips while having almost straight arms
  6. Return slowly to the starting position (resist against the pull of the band)
  7. Repeat for reps
This is the standard version of a pullover with resistance bands. Don’t forget to read the following Dos and Don’ts section to get the technique right. Further below we will also show you some alternative ways to perform this exercise.

Important Dos & Don’ts!!!

⓵ No Slack – when you’re in the starting position of your pullover, there shouldn’t be any slack in the band. The band should already be stretched a little bit and pulling your hands towards the anchor point.

PullOverSlack Dos and Donts

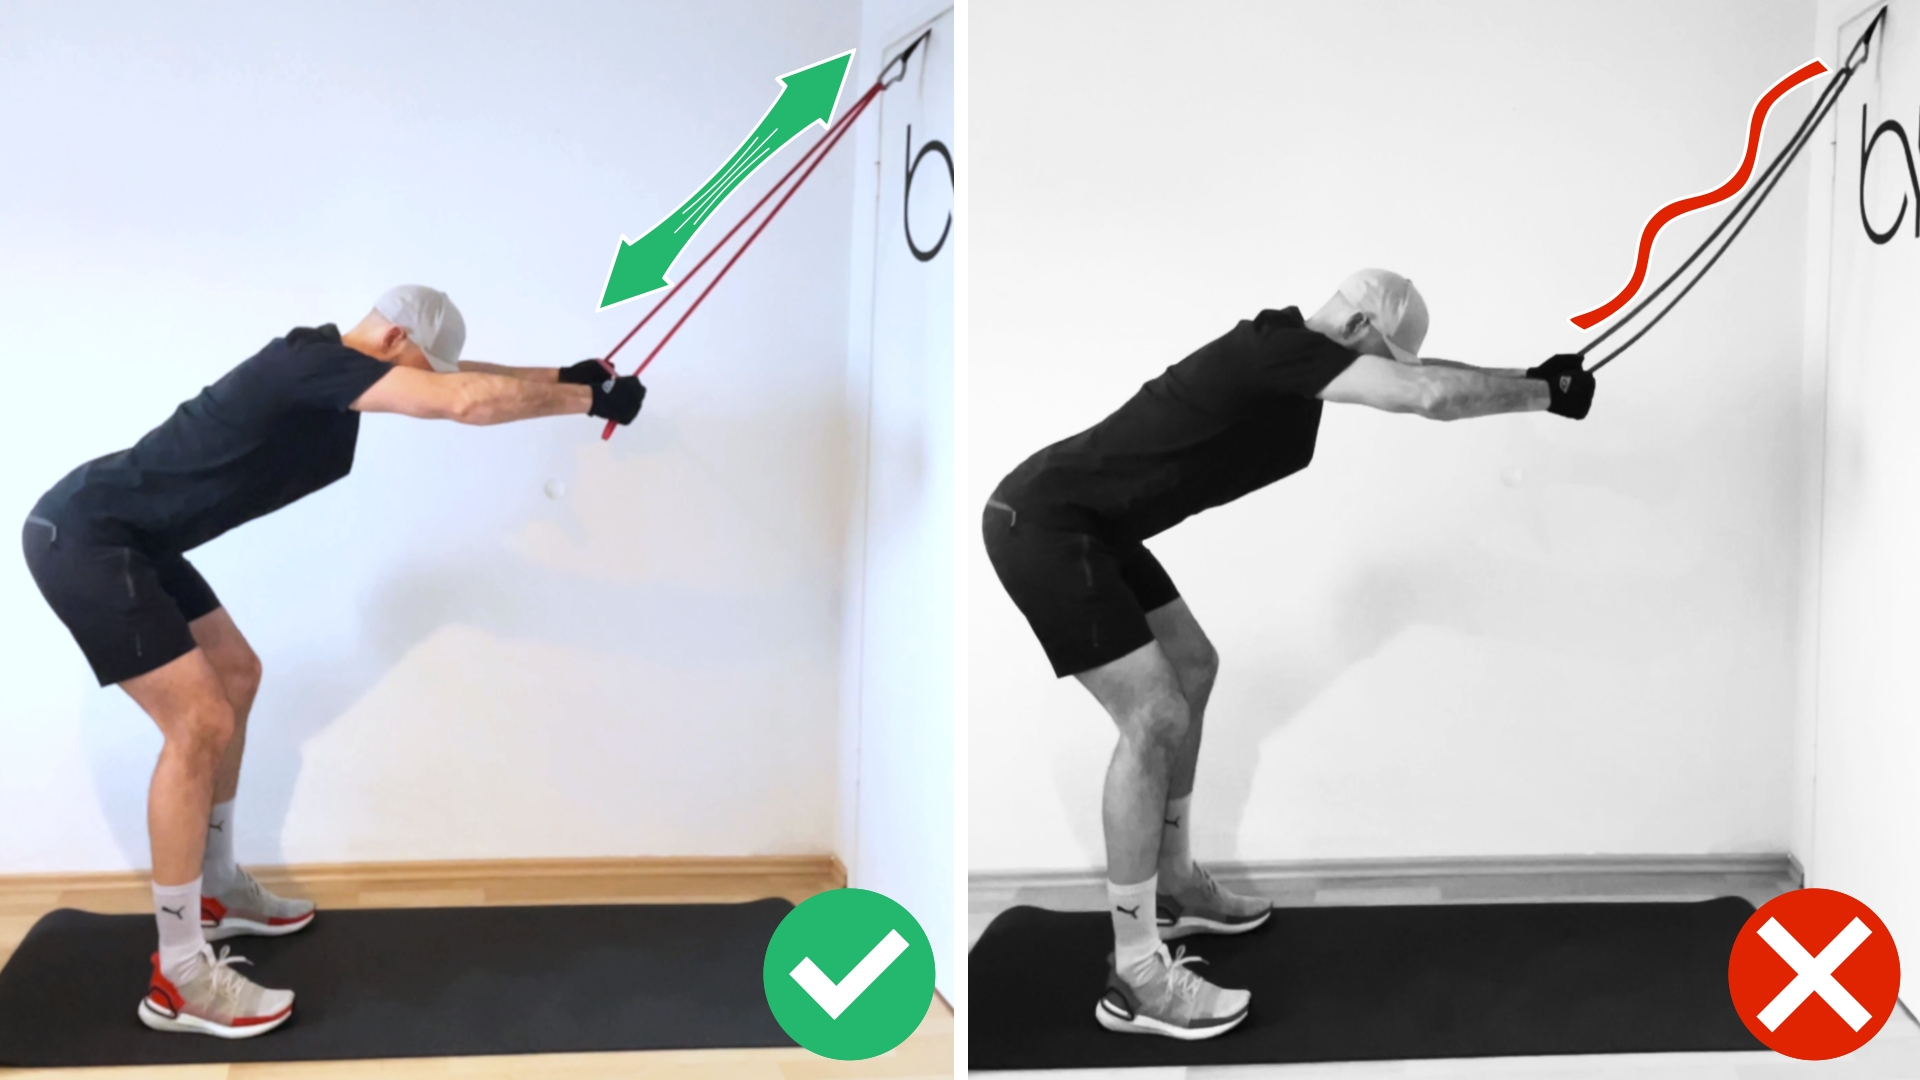
⓶ Control The Reps! – Remember to control the band throughout the movement. Don’t let the band snap back, then you’re on your way back to the top position. You will leave progress on the table!

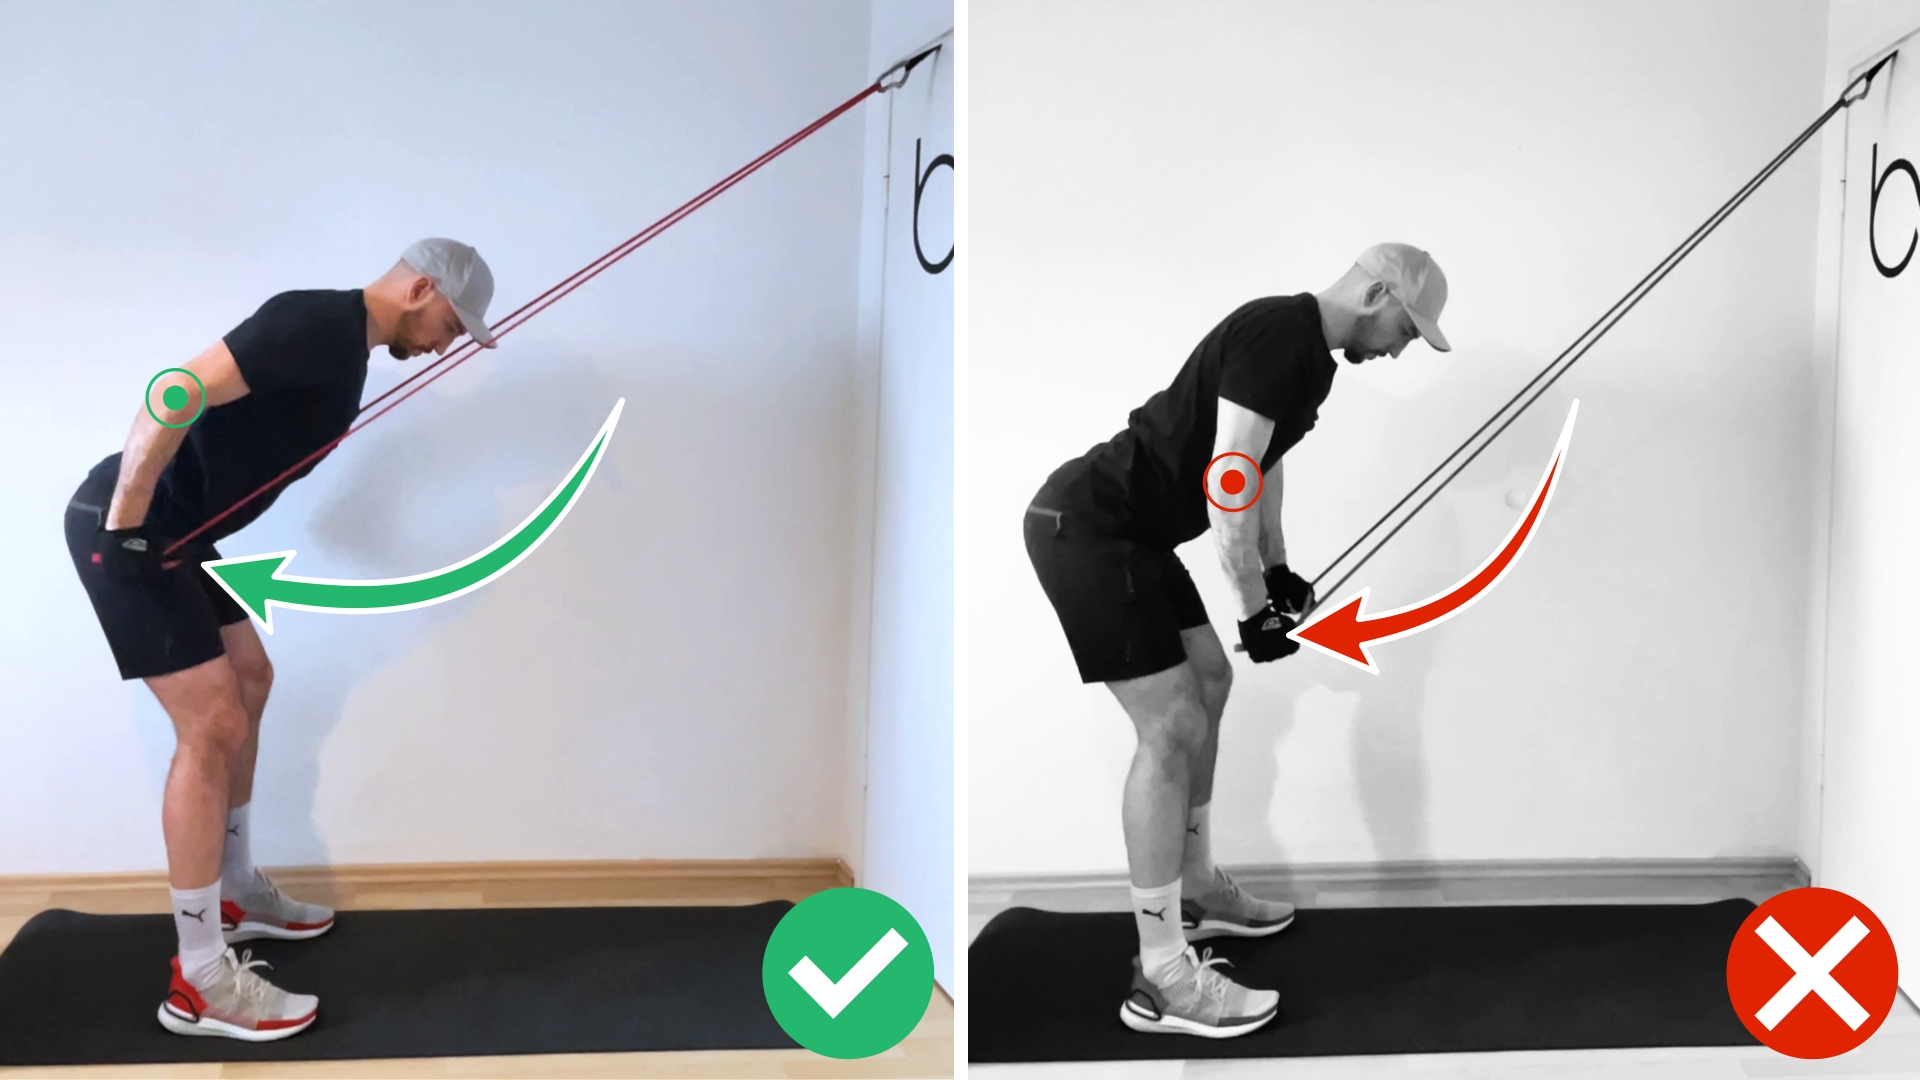
⓷ Bring The Elbows Behind Your Body – to reap the most from this exercise, aim to get your elbows behind your body at the end position. This will activate the lats and your chest the most.
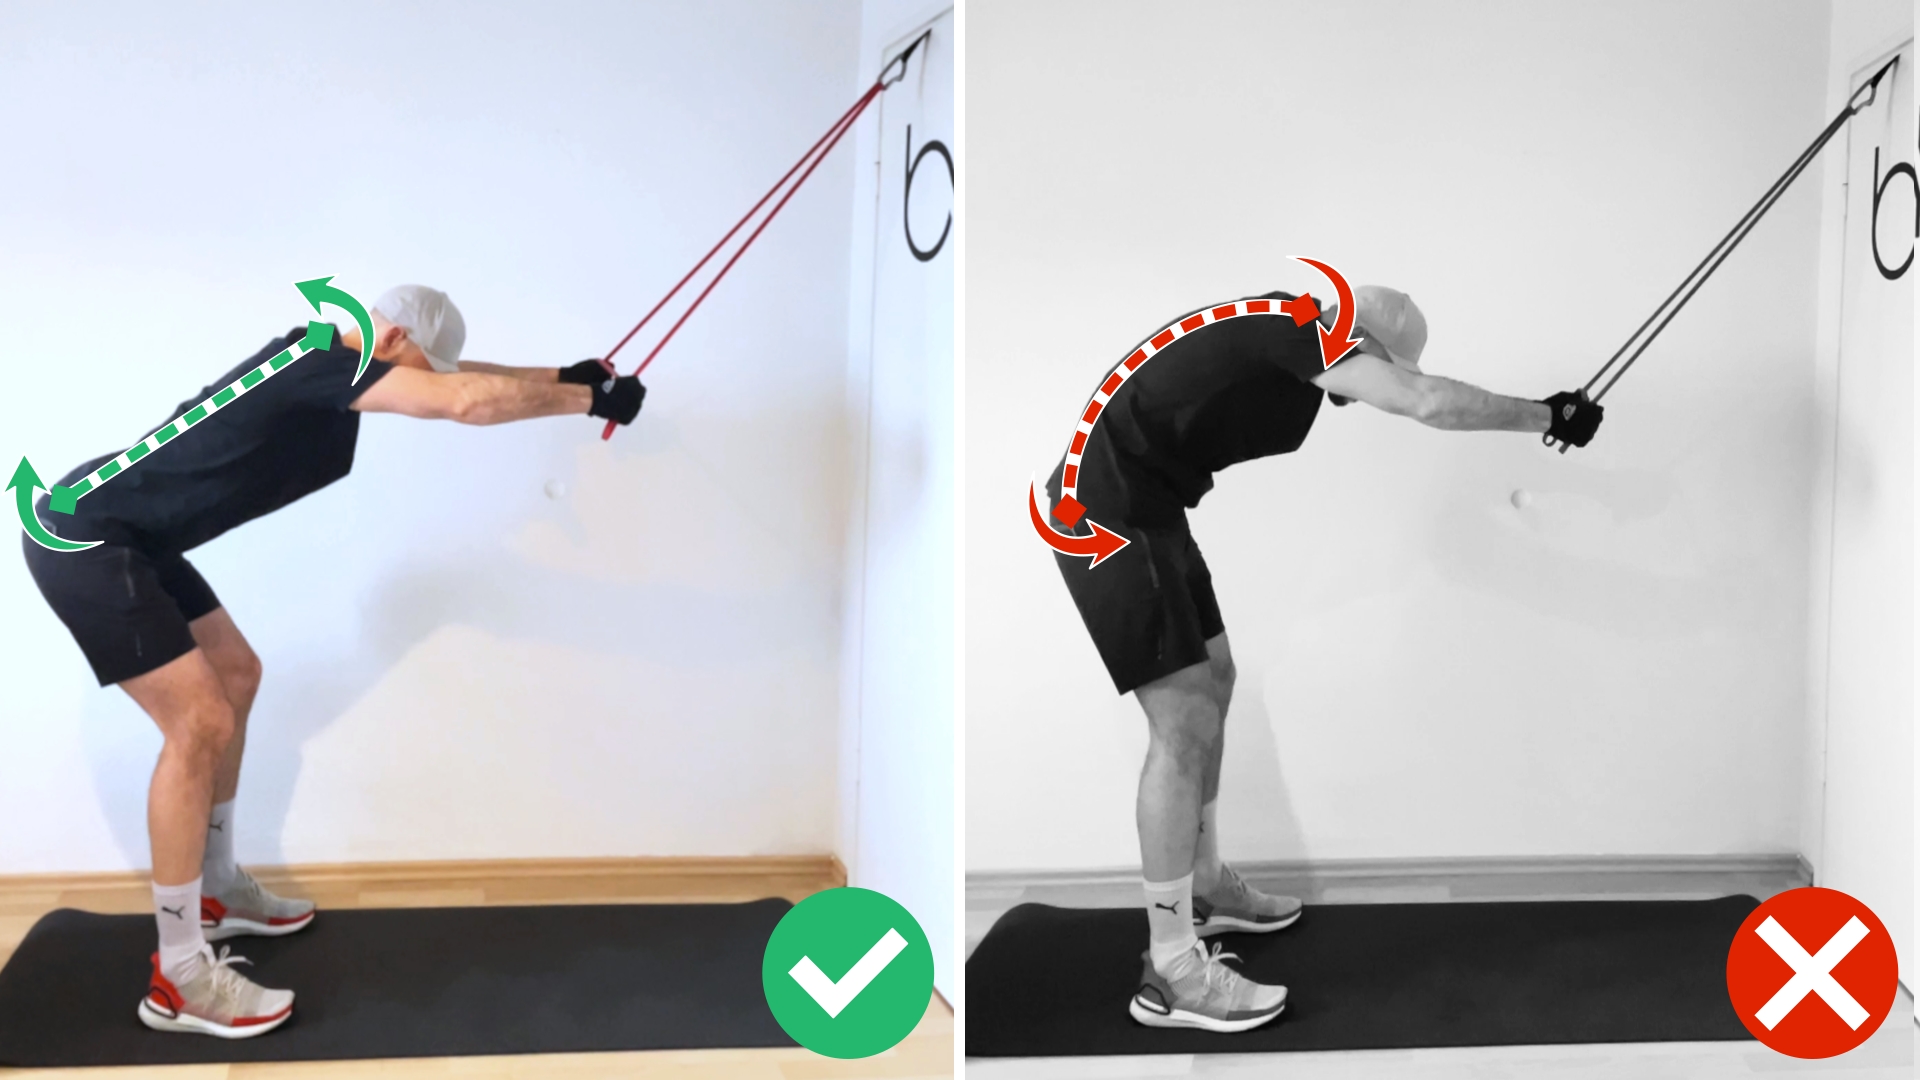
PullOverElbowEndpoint Dos and Donts

Back and Shoulder Position – Don’t round your back! This will put a lot of stress on your spine and can lead to unnecessary injuries. The same goes for your shoulders. Stick your chest and butt out. Rotate your shoulders back and keep your arms as straight as possible throughout the exercise.

PullOverRounding Dos and Donts

These are specific Dos and Don’ts for perfect pullovers. But there are also some general mistakes to avoid when it comes to working out with resistance bands. To really get everything right, check out our article on this topic:
The Worst Mistakes You Can Do When Training With Resistance Bands

The BIQ App

Take training with resistance bands to the next level with our free app.

  • 800+ Exercises
  • all band types
  • different training goals & workouts
  • challenges
  • much more

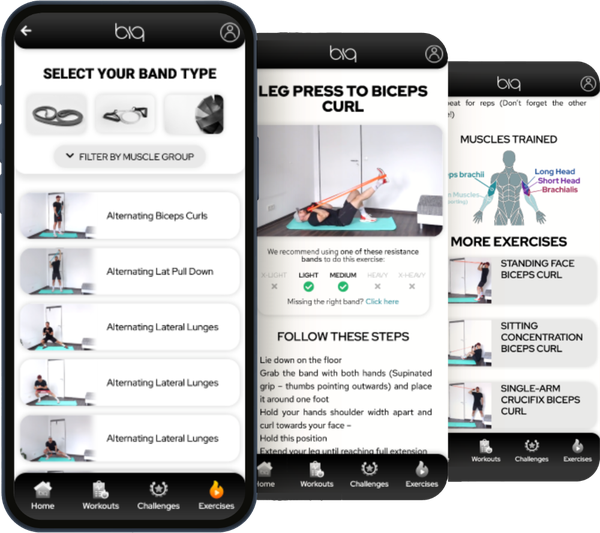
How To Adjust The Resistance

One of the biggest mistakes people do when training with resistance bands is taking the next heavier band too quickly. Once an exercise gets easier we want to progress and make it more challenging. With weights, it is easy – just grab the slightly heavier dumbbell. With resistance bands it is not that simple, because the next heavier band is usually a jump that is simply too large. This leads to form breakdown and sometimes to injury. We want this to happen.

Resistance bands have linear variable resistance which means the further a band is stretched the more resistance it will have. Since that is the case you can use one band to get a bunch of different resistance levels out of it. And this is also the beauty of bands.

We collected various methods how you can change the resistance of a given band to make it more challenging and get the most out of one resistance band!

For pullovers the best are:

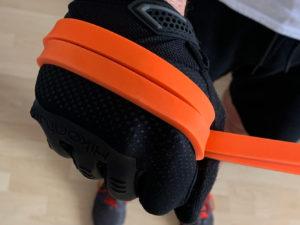
Adjust the length of the band – This method is the base of adjusting resistance of resistance bands. Make it shorter. The shorter the band is the higher the resistance will be. How to do that? Simple – Wrap it!

Pull-Over-hand-wrap

Change the Distance to Anchor point – for exercises where you use an anchor point you can simply change the distance to that point to change the resistance. When it comes to pullovers there are two great methods to do that.

#1-Take A Step Backwards – you can adjust the resistance simply by taking a step back. This will stretch the band further and add resistance. The best thing about this tip is… You can do it mid set. Want more resistance? Take a step back! You are at the end of your set and the form starts to get fishy? Take a step forward!

#2-Get On Your Knees – a great way to increase the resistance and the stretch you feel in your lats is by simply getting on your knees. You will be further away from the anchor point and therefore the band is stretched more. You can make little adjustments mid-set by lowering your butt further towards your feet or elevating it. With this you can adjust the resistance in the middle of a given set.

Combine bands – simply grab a second band and add to the exercise. This is especially great if you feel that today you can handle a little more resistance. Get the lightest band and add to the one you usually use. Of course, you need a set of resistance bands to do that. So safe yourself the trouble and get a set right in the beginning. You will also be saving money!

Slow it down – adding resistance is not the only way to make an exercise harder. Simply slowing your reps down will increase the intensity drastically. Your muscle will have to work harder and this will result in training progress.

Of course, you can combine all the techniques as well. Get creative and simply try these methods. You will see straightaway what feels right for you!

Alternative Ways To Pullover With Resistance Bands

To change it up we have 2 variations for you of the version we showed above. Make sure to give them a try as well! Pullover Lying Down – this version is great to really feel the stretch in your lats. You will fix the band at a point around knee level and lie down on the floor. To get an even greater stretch you can use a bench or a chair to elevate your upper body. Using a bench will also allow you to use greater range of motion by bringing your elbows even further behind your body. From here you will perform the pullover with the same steps as in the standing version. Another advantage of the lying version is that you don’t have to stabilize your body as much as in the standing version.
Play Video

Uni Lateral Pullover – the uni lateral variation of the pullover is great if you want to focus on one side at a time and really feel your muscles working. The steps remain the same as in the version with both hands. I like to double up the band in my hand to get a better grip. You can also wrap the band around your hand for an even better grip.
This version is especially great when you feel like you’re unstable when moving the band with both arms at the same time. By using only one arm you will be using a lighter band and therefore your body will have to do less stabilizing work to keep you in position.

Play Video

Can You Train Pullovers Effectively With Resistance Bands?

Especially for pullovers I think resistance bands are way superior to weights and cable machines. It is so easy to set up – door, door anchor, resistance band…Go! But the greatest thing about doing pullovers with bands is the option to adjust the resistance at any time, by simply taking a step backwards or forward. Try it, and you will know what I’m talking about.

And don’t listen to people who tell you that resistance bands are simply for warming up and are not enough to get real results. Often these people never really tried working out with resistance bands, don’t know how to manipulate the resistance correctly and simply never experienced how hard it is to work against the tension of a heavy band.

So don’t let be fooled! Resistance bands are a great tool to become more fit and make progress. Keep on reading, and you will find out why and benefits you can reap by using them.

Why Does Training With Resistance Bands Work

Our body doesn’t know the difference between weights, resistance bands, machines, body weight, groceries, furniture …. you get the idea. The only thing our body knows is resistance. And it is quite smart – is the resistance great enough your body will react to that by becoming stronger – over time of course 😉

So as long as your muscles have to work against a load they will get a stimulus to grow and will with time be able to handle greater and greater loads.

To get in depth information about this topic check out our full article: Why Does Training With Resistance Bands Work

Benefits Of Training With Resistance Bands

Why use resistance bands for your fitness training? Some reasons are as following:

  • No Cheating! Due to the specific strength curve of resistance bands it is almost impossible to use momentum and cheating in your workouts.
  • Fewer Injuries! Resistance bands are easier on the joints compared to weights. This will reduce the chance of injury.
  • Mobile! Simply pack them in your bag and bring a whole gym anywhere your go with you!
  • Affordable! Compared to a gym membership or expensive equipment for a home gym, bands are very cheap!

Want to know what other advantages there are by working out with resistance bands? – Find out in the full article: Benefits Of Resistance Band Training

What Muscles Are Used In A Resistance Band Pullover

The main working muscles group in a pullover are the lats. They will be working the hardest throughout the movement. Just right behind the lats come the chest muscles (pecs).
Since we are doing a rotational movement in a pullover there is a lot of stabilization work to be done by your whole body. The main secondary muscles which will be working are the delts and the triceps. The core will be active throughout the exercise as well to keep your upper body stable.

Main Working Muscles:

  • Latissimus Dorsi
  • Pectoralis

Support Muscles:

  • Triceps
  • Deltoids (Shoulder Muscles)
  • Core
MuscleMapPullOver-Details

Workout Plan

The Pullover is a great exercise to target your back and chest muscles in a single exercise, but it won’t be enough to make real progress. It’s just one exercise. What you need is to have a workout program which you follow week by week and target every muscle in your body. This will make sure that you develop a balanced and functional body!

Since construction a good workout routine is not that simple and can sometimes be quite annoying, we did it for you. This way you can dive straight into working out instead of reading through a lot of text or watch a bunch of videos.

In our BIQ Training App we have several workout routines you can follow along. You can customize your routines depending on your goals. With this app you will also have a library of all resistance band exercises with a step by step description and a how-to video in your pocket – available at all times. Find out more here: BIQ Training App

The BIQ App

Take training with resistance bands to the next level with our free app.

  • 800+ Exercises
  • all band types
  • different training goals & workouts
  • challenges
  • much more

Leave a Reply

Your email address will not be published. Required fields are marked *

Log In

Forgot password?

Forgot password?

Enter your account data and we will send you a link to reset your password.

Your password reset link appears to be invalid or expired.

Log in

Privacy Policy

Add to Collection

No Collections

Here you'll find all collections you've created before.