Push-Ups With Resistance Bands

The Push-Up is the king of the upper body push exercises, but unfortunately, people often don’t use the full potential of this exercise. It is great to develop the muscles of your chest, shoulders and triceps as well as your upper body strength in general. In addition, it is a very functional movement, since holding the push-up position requires quite some core work and a lot of other muscles will be active and supporting the movement. This will transition in more stability in your every day life and your sport activities where it gets more dynamic.

However, the push-up movement is often done with a very bad form and usually these individuals aren’t aware that they are doing something wrong. This can result in losing interest in the exercise because “it just doesn’t feel right” and choosing something like a chest press instead. This is such a pity and a lot of potential for growth left on the table. Our main mission in this article will be to learn how to do a 100% correct push up and how resistance bands can help.

After learning the general push-up form and what mistakes to avoid, we will discuss how resistance bands can be used to increase the resistance and make the exercise more challenging or how they can be applied to make the movement less demanding and support the push-up. The next section will be all about variations and ways to adjust the intensity of the movement. Last but not least, we will discuss the effectivity of resistance band training for the chest, look at the muscles used in a push-up and talk about how this exercise can be implemented into a workout program.

How To Do A 100% Correct Push Up (Without Bands)

Before introducing any additional equipment into the exercise, let’s first take care of how to do a perfect push-up with your body weigh only. Probably everybody on this planet knows, or rather thinks he/she knows, how a push-up is done. I mean, it’s a push-up, it’s easy. Place your hands on the floor. Get into a push-up position. Go down. Come up. Done.

Well, that’s only that easy on paper. Often I see people performing this exercise with such bad form, that it doesn’t even deserve to be called push-up anymore. Usually the cause is at least one of the following 5 form mistakes. So let’s have a good look at what to do and what not to do.

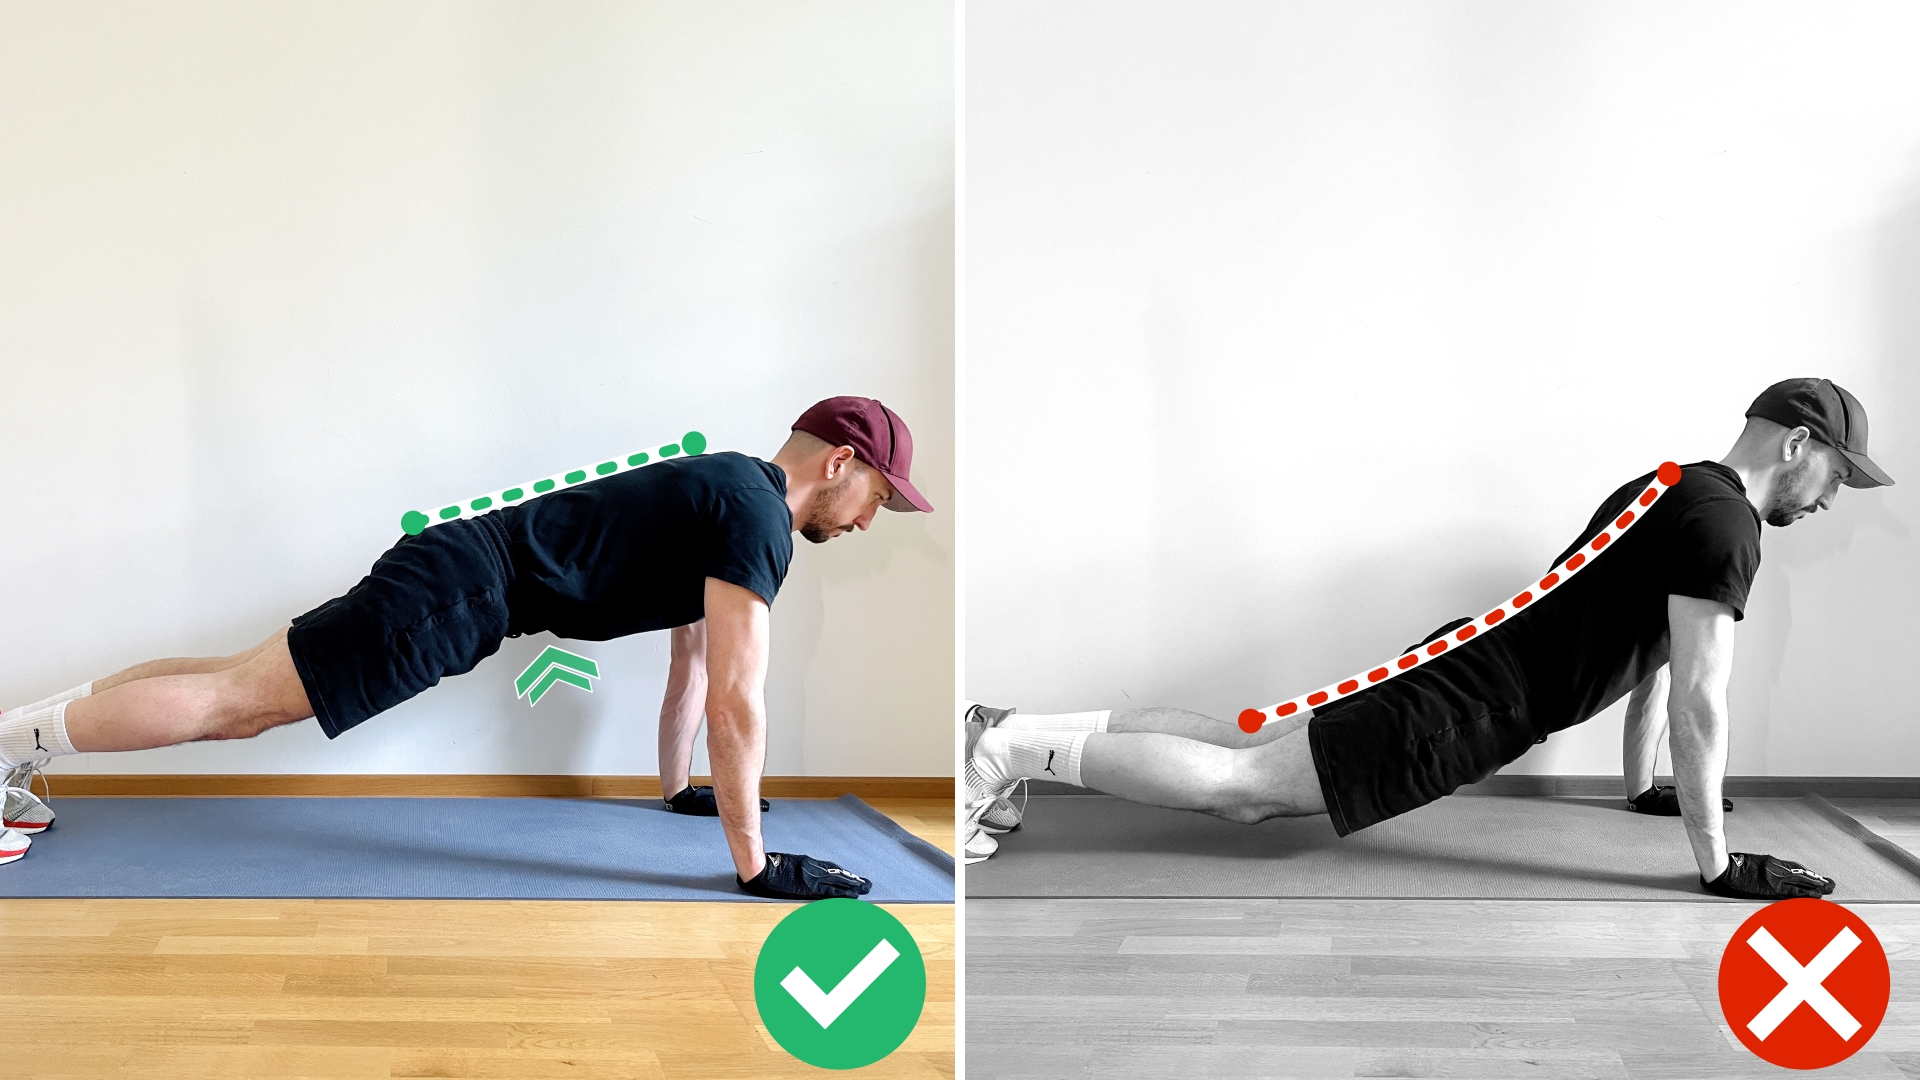
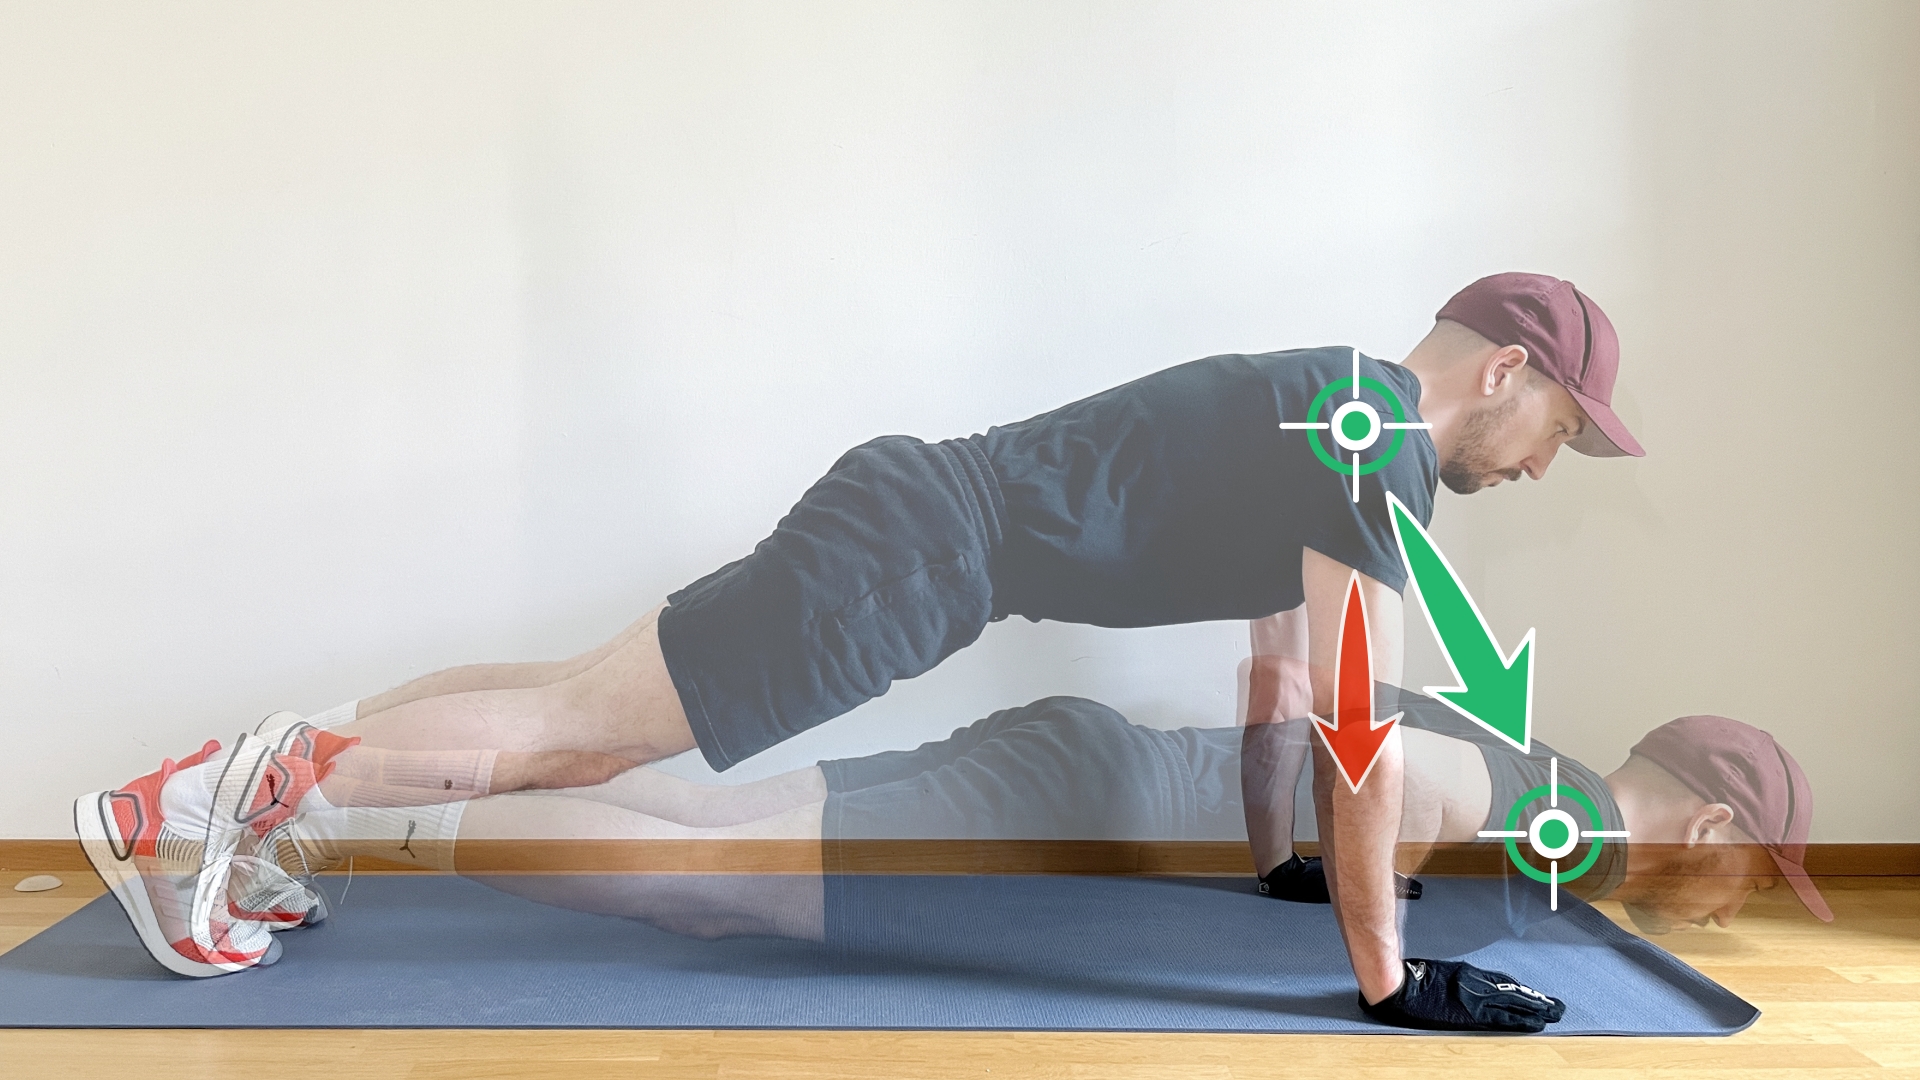
⓵ Active Core and Straight Back – I often see this happening in the top position of the push-up. Don’t let your hips hang through. If you do this, the core isn’t active and the whole orientation of the upper body in regard to your arms changes. By performing push-ups in this position, you won’t effectively target your pushing muscles and in addition you will have an increased chance of snapping something up. Instead, flex your abs – this will result in your hips going up, and this will give you the right position for push-ups.

PushUpDDRoundBack

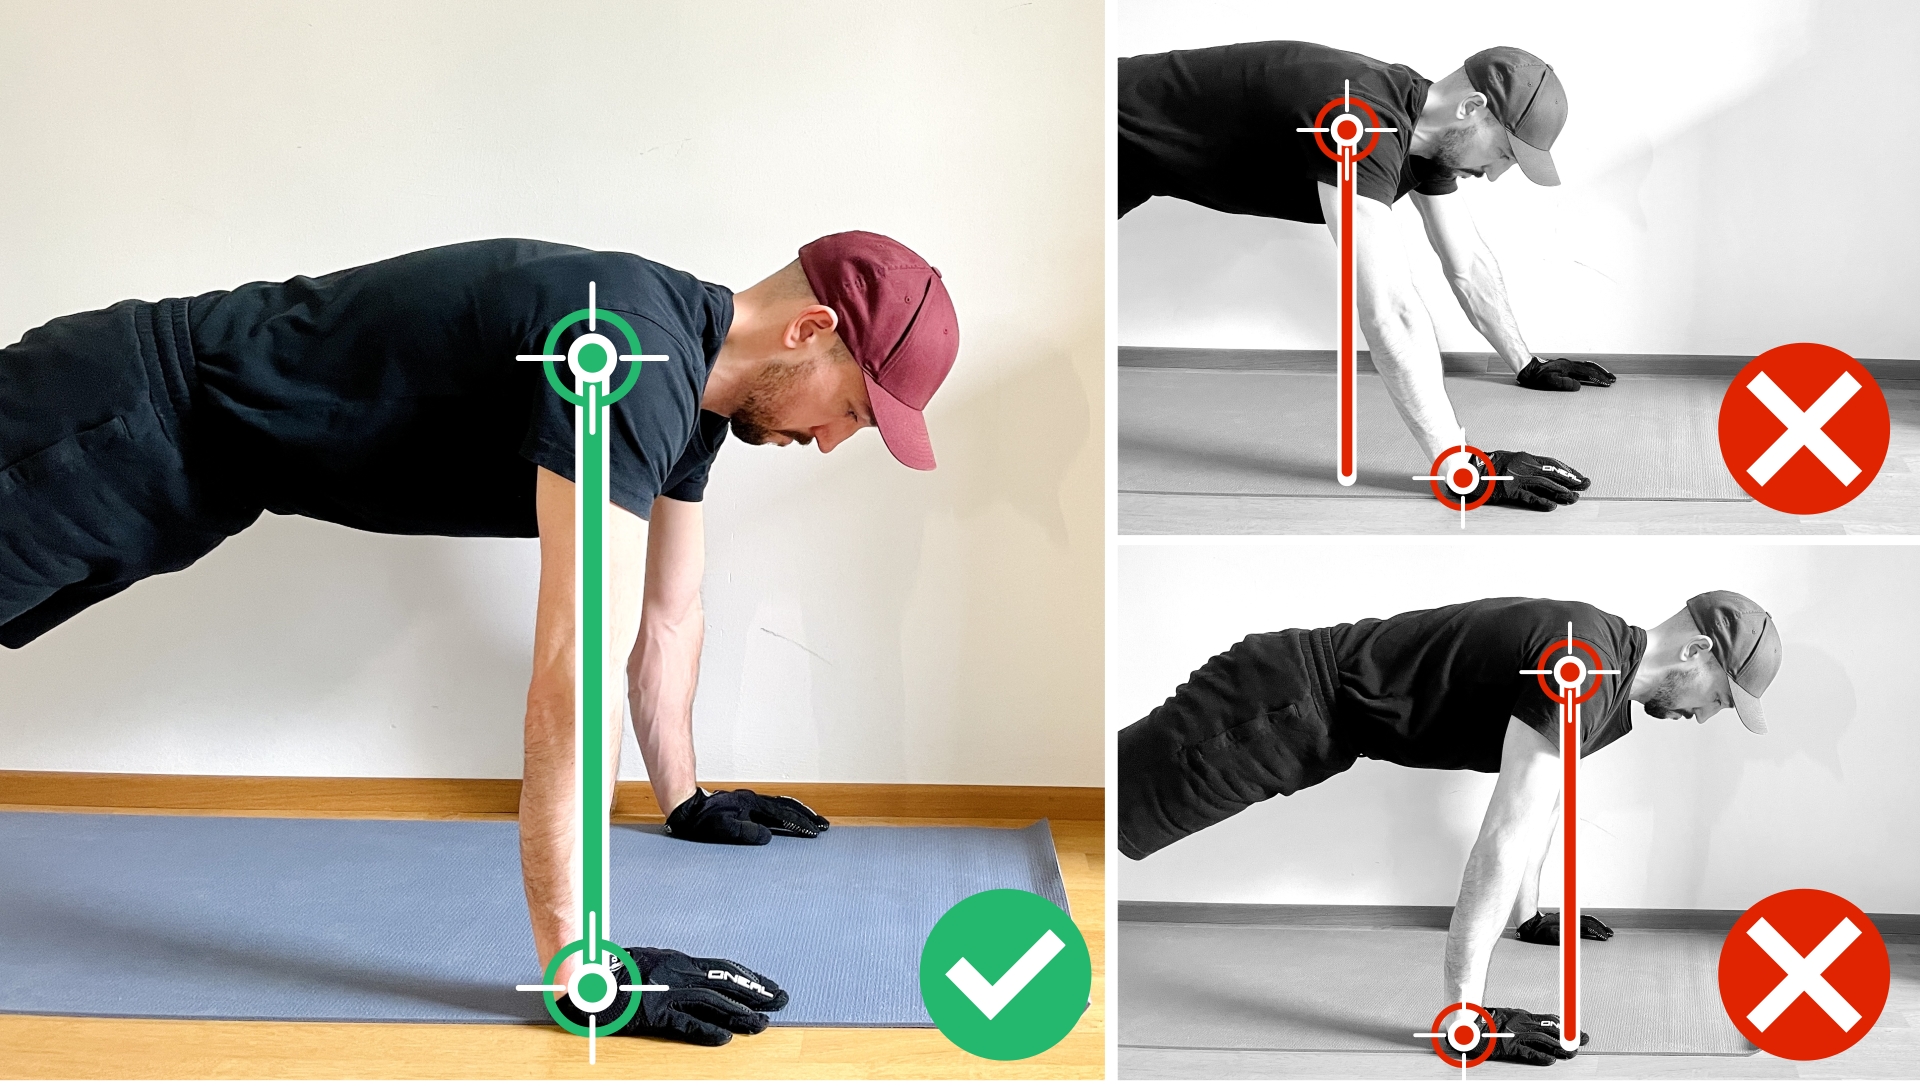
⓶ Hands under Shoulders – let’s have a look at the hand position in relation to the shoulders in the top position next. Since your contact points with the floor – hands and feet – aren’t moving while going up and down, it is important to set them up correctly. From a side view, your hands shoulder be right under your shoulders. Having the hands in front of your shoulders will result in a compromised form on the way down and less chest activation. The opposite – hands behind shoulders – will result in a very high shoulder involvement and is rather an advanced variation and should only be used if it is intentional.

PushUpDDHandsOverShoulders

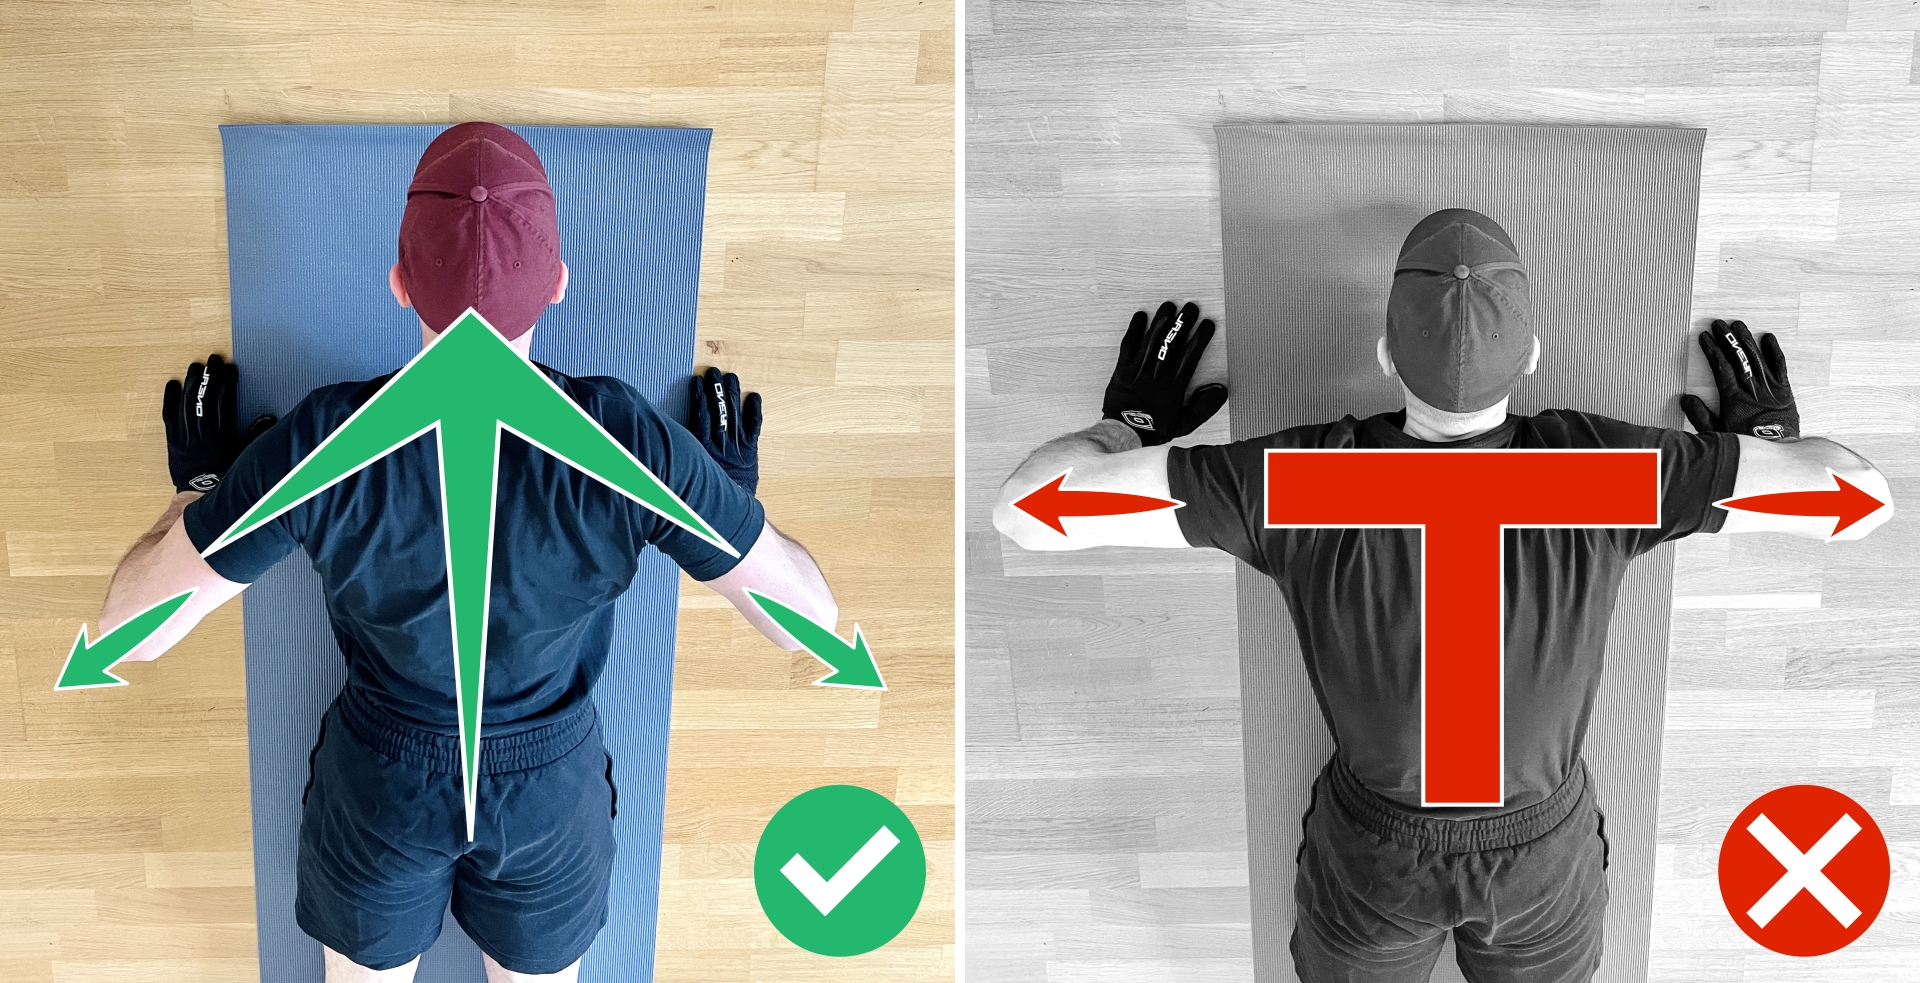
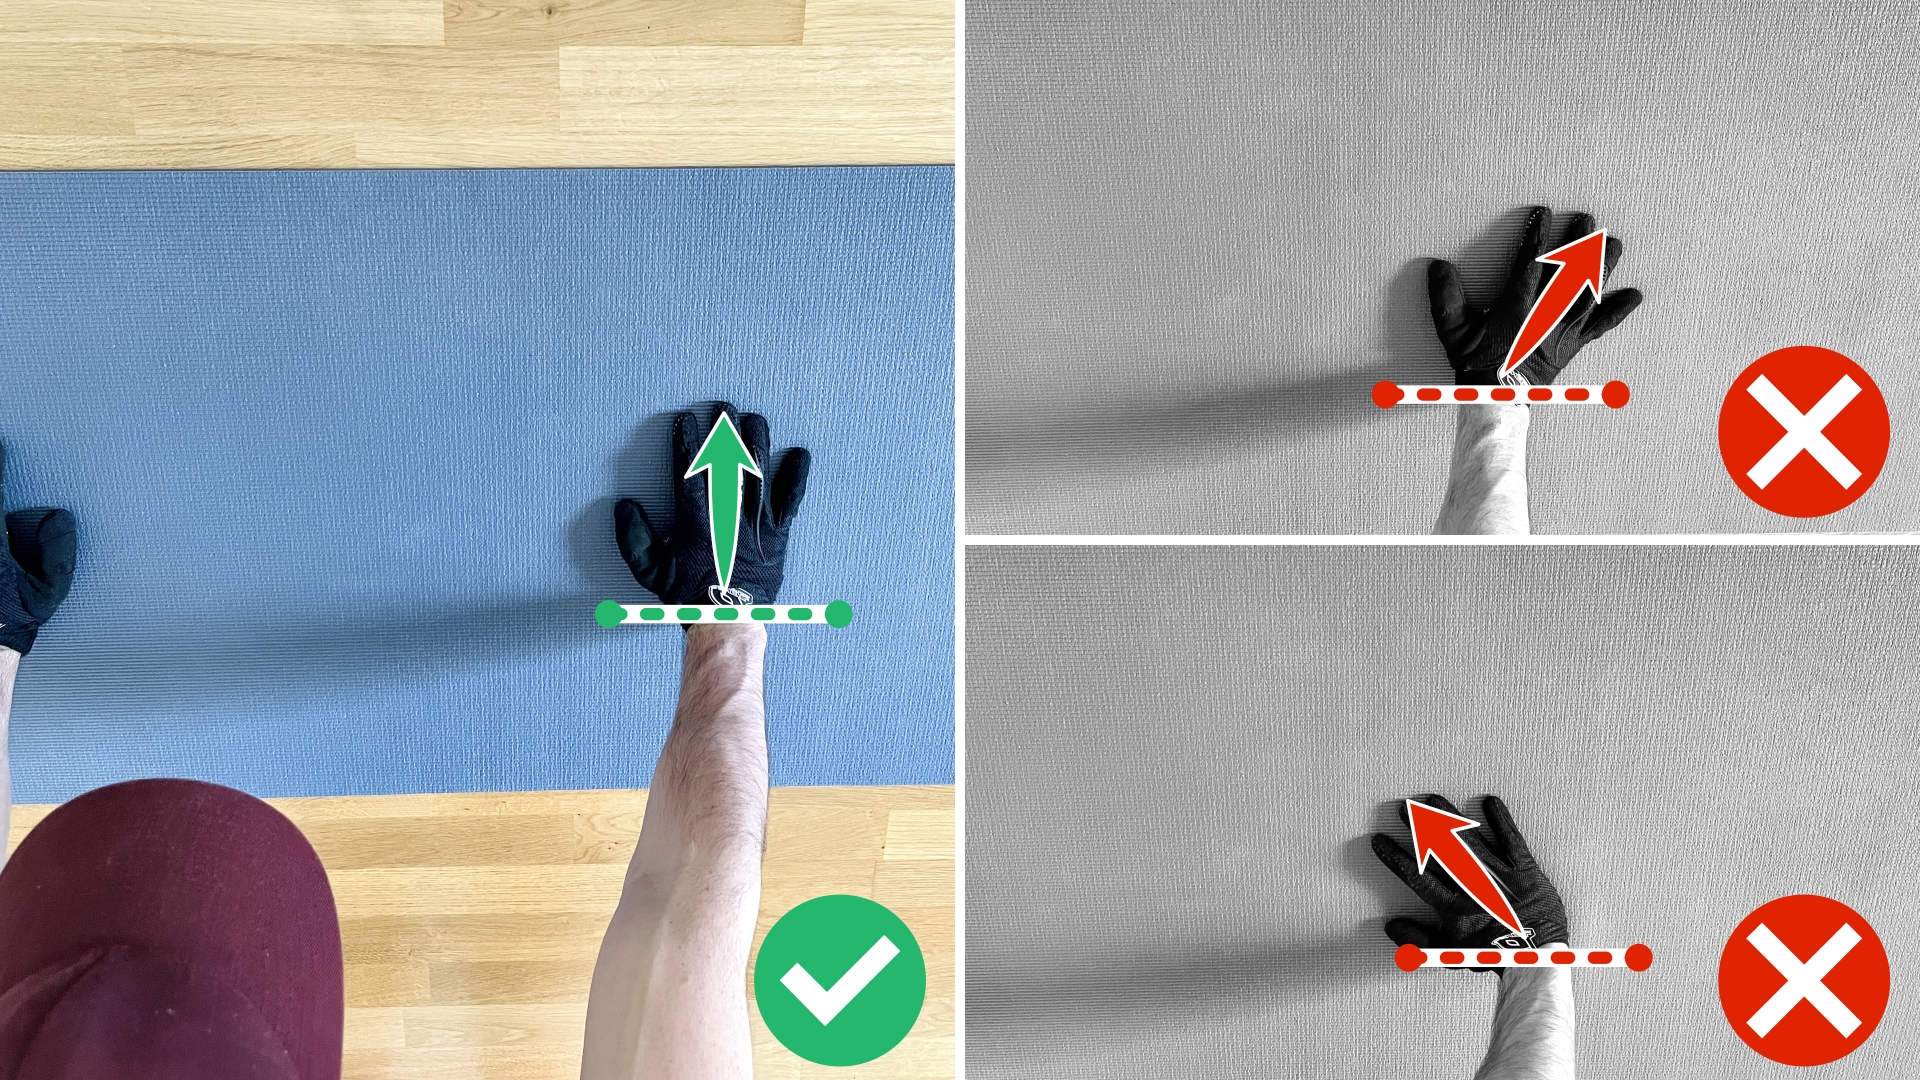
⓷ Be an Arrow, not a T – this is the most important point, and you should take your time to get it right. Often beginners position their hands way too far apart and this then results, on the way down, in the elbows going straight to the side. You might think that you are stronger in this position, but it is actually the complete opposite and in addition the shoulders aren’t having the best time here.
Instead, you want to move your hands closer together and have the elbows point back at an angle of around 45 degrees. 90 degrees is really not a good idea, a best practice is avoiding to go over 60 degrees. Anything closer than that is absolutely fine.

PushUpDDElbowPosition

⓸ Neutral Hand Orientation – a best practice is to have your hands in a neutral orientation. This means not having them rotated inwards or outwards. Especially the inward orientation is problematic, since it will promote your shoulders to be in an unstable position in the bottom part of the push-up. Have your hands in neutral orientations, fingers slightly spread, and put your weight rather on the outside of your palms instead of the inside.

PushUpDDHandOrientation

⓹ Move Down AND Forward – the push-up movement is actually not a straight up and down motion. If we have a look from a side view, your shoulders should move down AND forward. This will happen automatically if you follow number 3. This is another point to keep in mind to enforce the arrow body position and not the T.

PushUpDDDownForward

How To Do Push-Ups The Right Way With Resistance Bands?

A quick reminder: always warm up your body before doing any resistance exercises. It is even more important if you add additional resistance in your workouts. This way, your muscles and joints will be prepared for the added load and can actually work more efficiently. In addition, the risk of injury is minimized drastically.

Equipment wise, the only essential thing is a resistance band. Although, we highly recommend getting yourself a set from the get go. This way you will have bands with several resistance levels, and therefore you will be able to calibrate the resistance you are working against. The one right here is a good choice: Resistance Bands Set
An optional piece are gloves for hand protection (like these: Workout Gloves). When you stretch a band, it generates friction and after a while you will feel it on your hands. Gloves will create a protective barrier and in addition a better grip.

Alright, enough with the background details. With the help of resistance bands, you can make the push-up a more challenging exercise, or if you are not strong enough yet to do a body weight push-up, you can use resistance bands for assistance. Let’s have a look at how to set up each of these approaches.

Add Resistance With Bands

Once the body weight version gets too easy, it is a great idea to add resistance to the exercise. This way, you will challenge the pushing muscles and stimulate them to become stronger and increase muscle mass.

The following 6 steps is the recipe for a perfect push-up with resistance bands:

  1. Grab the band with both hands, bring it over your head and rest it on your upper back
  2. Place your hands shoulder width apart (or slightly narrower) and lift your knees off the floor
  3. Initiate the movement by bending your elbows (resist against the pull of the band)
  4. Lower your upper body until the chest almost touches the floor
  5. Reverse the movement by pushing your upper body up until reaching full extension in your arms
  6. Repeat for reps

Use Bands to Assist

This is what I love about resistance bands. You can use them with a little creativity in a variety of ways. If a body weight push up is still too hard, or you can only do one or two, and you want to build up the technique and the strength to be able to do more, this is the way to do it.

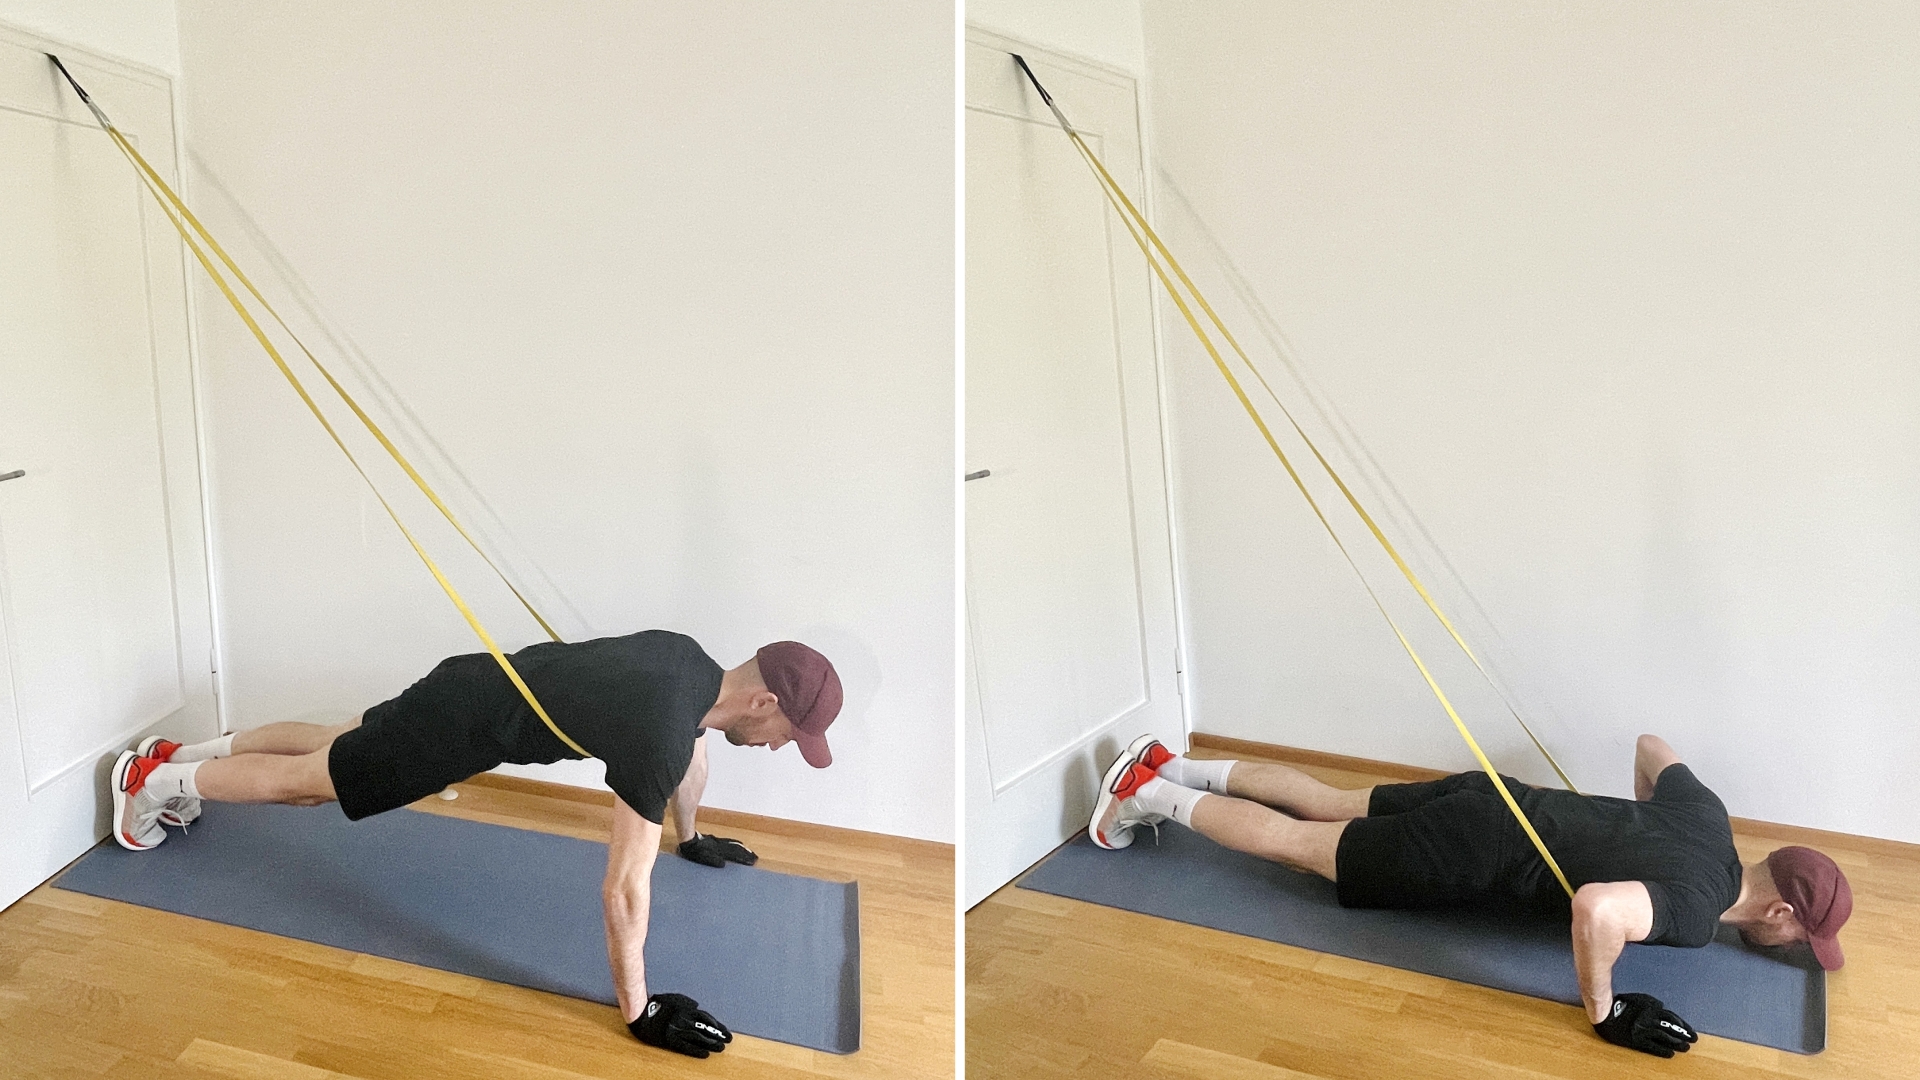
When using loop bands, you will need to anchor the band above you. The best way to do it is using a Door Anchor. Fix the door anchor at the top of a door and attach the band. Next, you will go inside the loop and place the band around your lower chest. Get down into a push-up position, and you will feel that the band is support you by pulling your body weight up. Basically, it makes you lighter. The further you lower your body, the more assistance the band will provide, and with further extension of the arms the assistance will become less. That’s the most effective way to build up your push-ups.

PushUpAssistedLoop

In case you’re using mini bands in your workouts, there is a great set up for assisted push-ups as well. Put both of your arms inside the loop of the mini band and place it right above your elbows. Now perform a push-up – you will find that your upper body will stretch the band the further down you go. On the way up, the band will release that tension and help you in getting up. This set up is also great because it will help you to keep your arms in the right position and not let those elbows flare out.
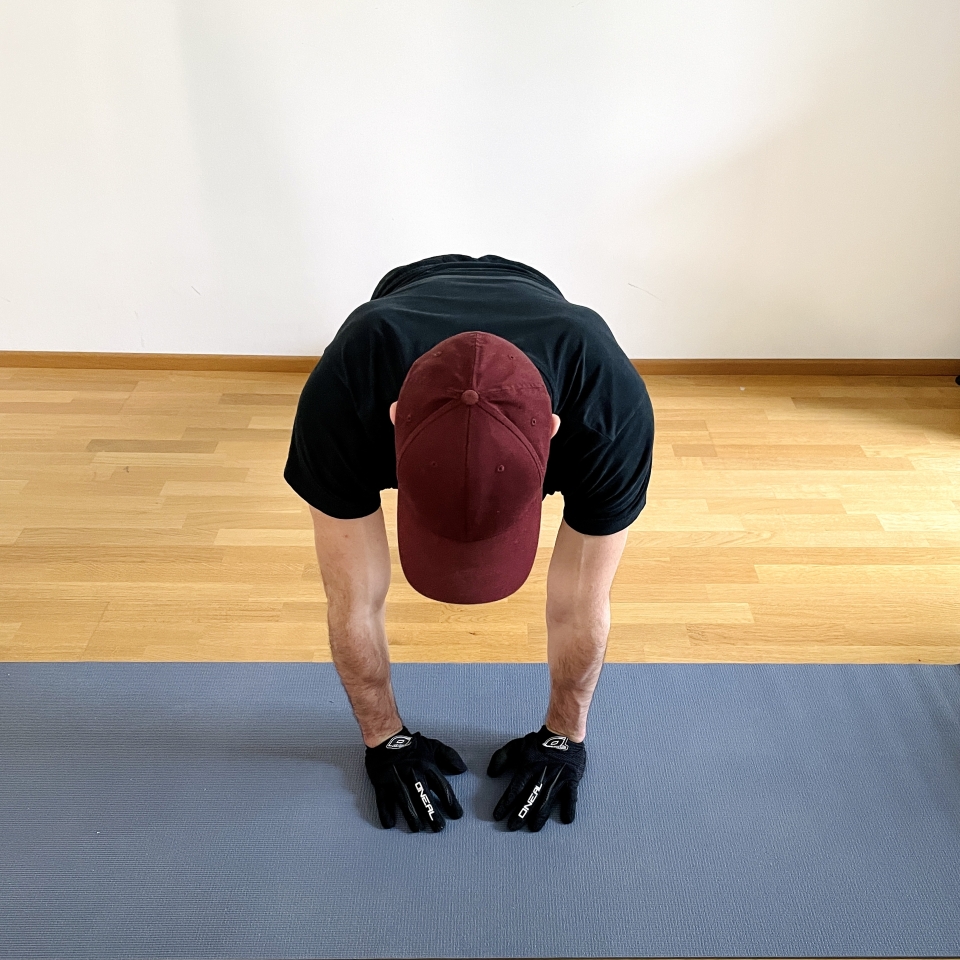
The BIQ App

Take training with resistance bands to the next level with our free app.

  • 800+ Exercises
  • all band types
  • different training goals & workouts
  • challenges
  • much more

Push Up Variations With Resistance Bands

There are quite some very fancy variations to the push-up out there, however I find most not being really practical. In my opinion, there are two very great and effective ways to change the standard push-up – by changing the hand position and by elevating your feet. Let’s have a closer look at each of these methods.

Changed Hand Position

In every push-up, all pushing muscles (chest, triceps, shoulders) will be active, but you can put an emphasis on specific muscles by changing your hand positioning, especially the hand distance plays a huge role. The smaller the distance between your hands, the more the focus will be on your triceps and shoulders. With greater distance, the focus shifts more and more towards the chest.

PushUpDiamondGrip

Diamond Push-Up

Get your hands very close together, and you don't actually have to form a diamond with your fingers. Personally, I like to have my thumbs in a neutral position. On the way down, keep your elbows close to the upper body and don't let them flair to the side. The triceps will be challenged in this variation.
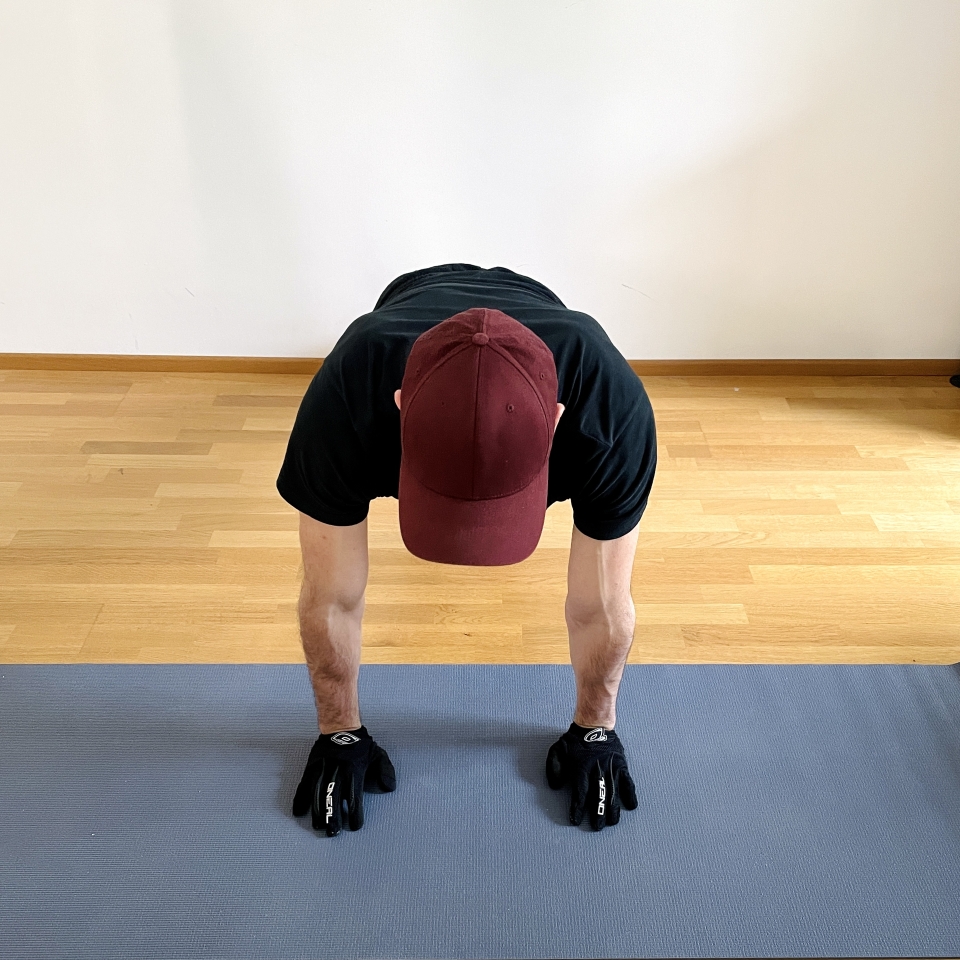
PushUpCloseGrip

Close-Grip Push-Up

Place your hands right underneath your shoulders - basically shoulder width apart. Your elbows will point straight backwards and not to the side in the down motion of the push-up. The muscle focus will be on the triceps and the shoulders.
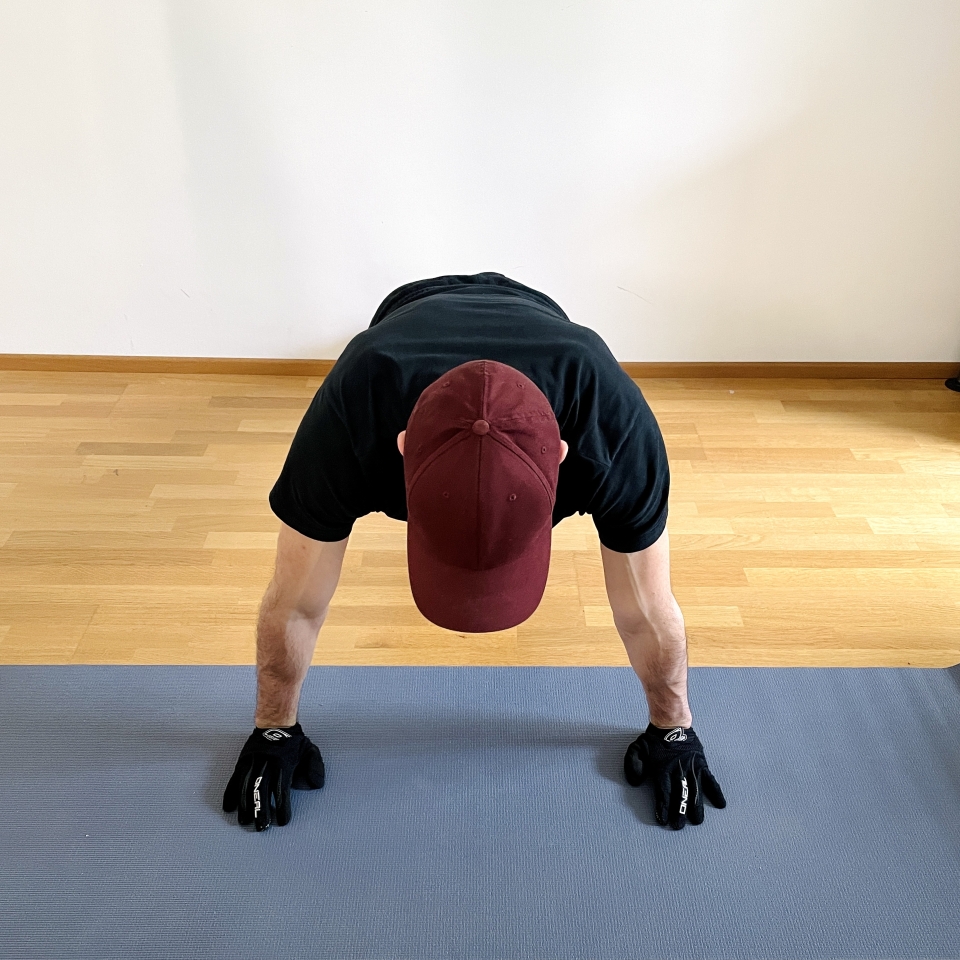
PushUpStandardGrip

Standard Push-Up

This is the hand placement for the standard push-up, which we covered in the previous sections. Your elbows will point backwards in around a 45-degree angle on the way to the bottom position. The chest and triceps will be working primarily.
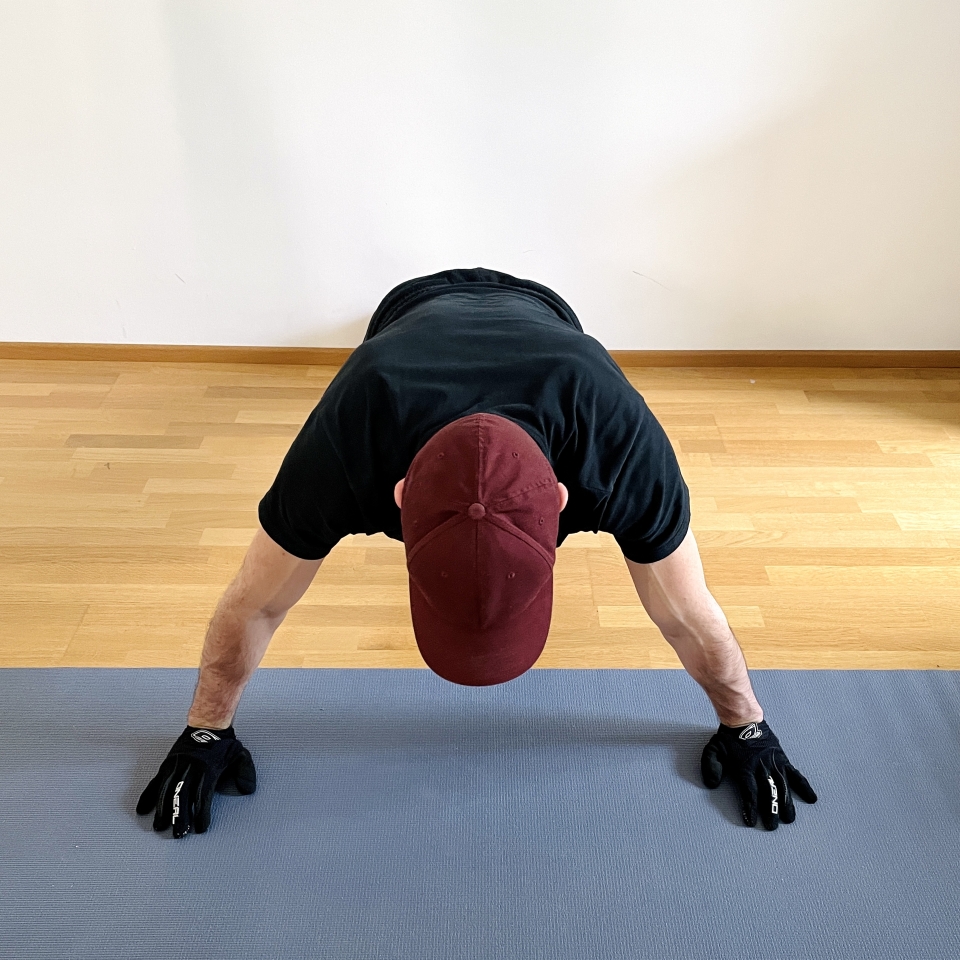
PushUpWideGrip

Wide-Grip Push-Up

Move your hands even further apart than in the standard set up. However, don't over do it, otherwise the form can be very straining on the shoulders. The elbows should still point in around a 60-degree angle backwards while you lower your chest towards the floor. The chest will be doing most of the work in this version.

Increased Feet Elevation

The other contact point with the floor are your feet. This is the other place where we can do adjustments and change the focus of the muscles working. Placing your feet on a higher plane than your hands will make the push-up into an “incline push-up”. It’s basically the same thing as bench press and incline bench press. I think this is easier to picture.

This will change a couple of things. First, your shoulders will have to work harder in this set up, also the upper part of your chest will be much more active. The second point is the increased load you have to move. The higher you will have your legs, the more of your body weight is shifted to your arms.

PushUpElevatedFeet

A quick extra point here: Like you see in the previous images, I did change the set-up of my band. Instead of having it on my shoulders and on the upper back, I chose to have it on the inside of my arms, basically in my arm pits. This way, I don’t risk the band slipping from my shoulders if I have a higher incline in my push-up.

How To Adjust The Intensity

Usually, you wouldn’t switch variations every time you will have push-ups in your workouts. But you will become stronger over time, and you will need to increase the intensity if you want to continue making progress. Using resistance bands gives you some unique methods of adjusting the resistance and therefore the intensity, which you wouldn’t have with other tools like weights.

The best methods for push-ups are:

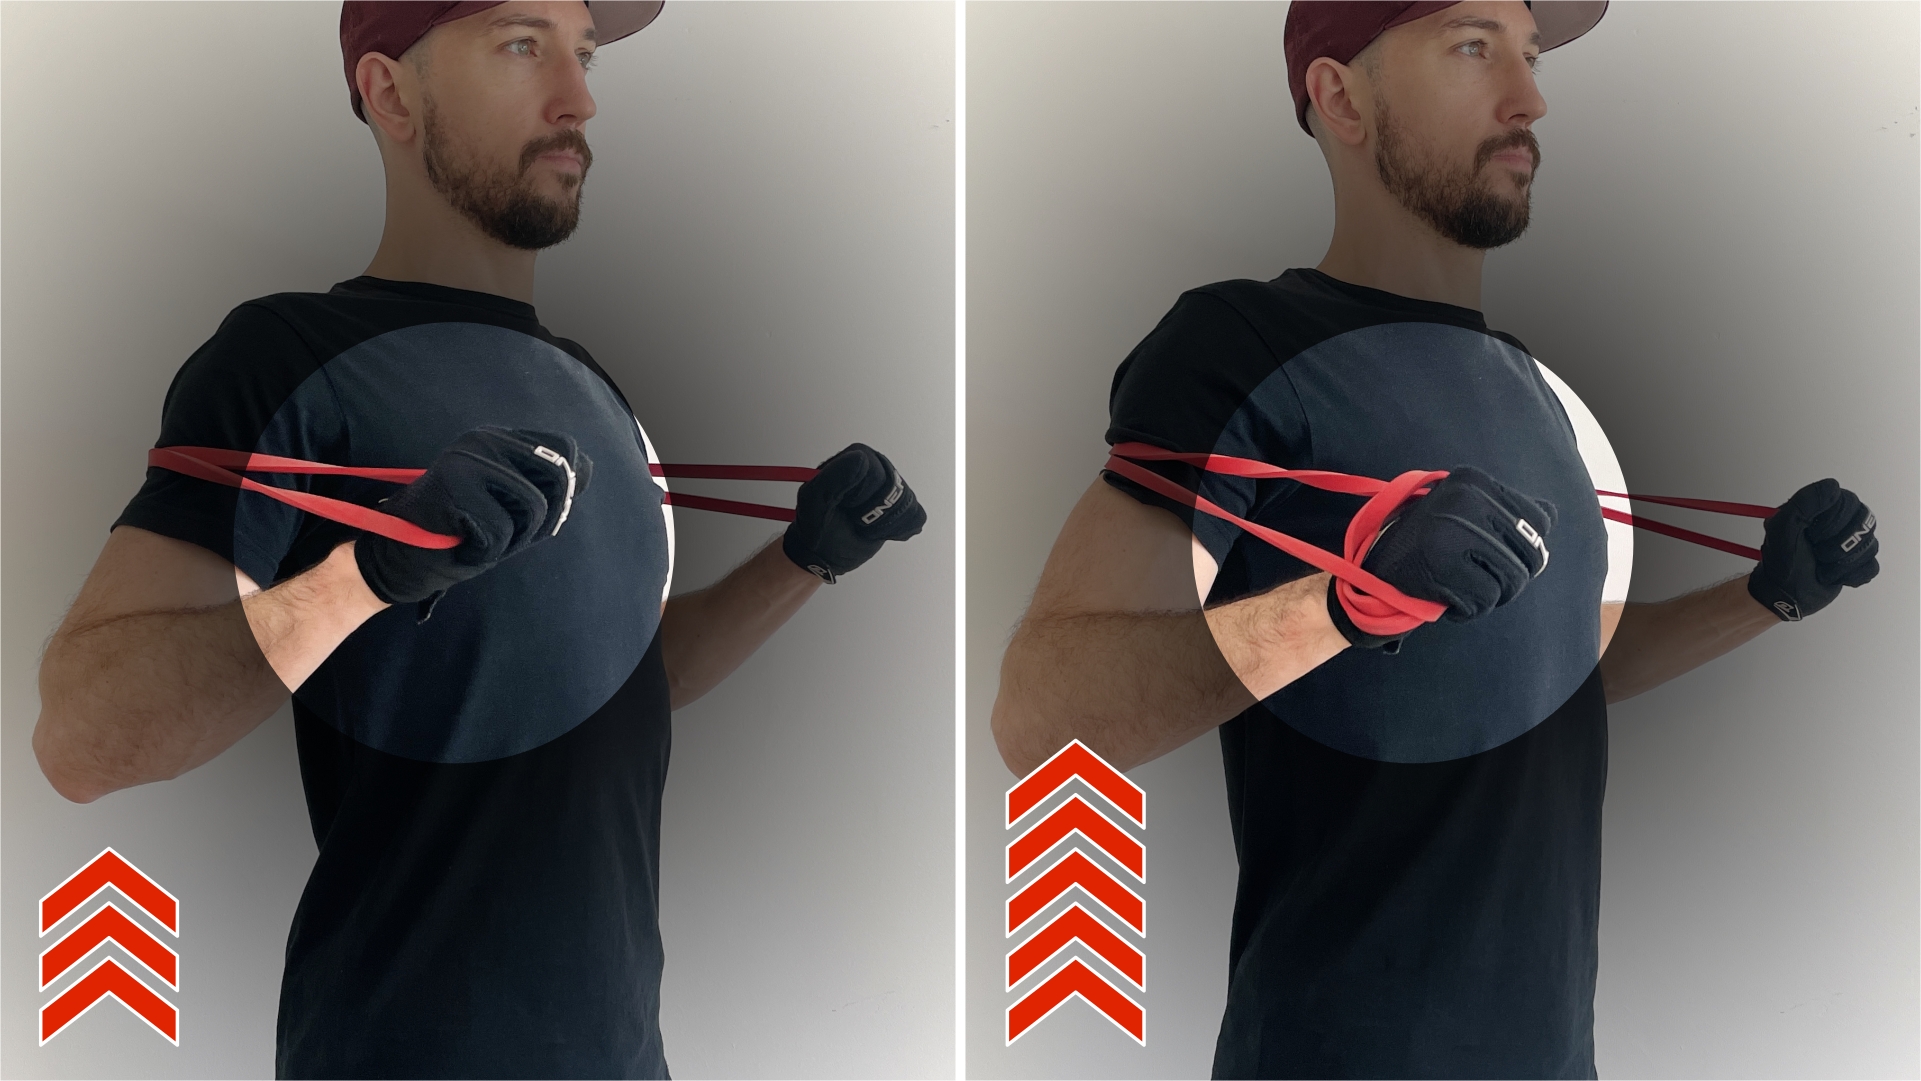
Shorten the band – One of the biggest benefits of resistance bands, by simply reducing the length of a band, you can increase the resistance you will have to move against. The easiest way to do if for push-ups is wrapping the band around one or both of your hands. Do it before going down in the push-up position.

ChestPressRAHandWrap

Use more than one band – You are not limited to only using one band at a time. By using more than one band, you will be able to adjust the resistance much more precise. That’s where having a set of bands with different resistance levels comes in very handy.

Lower the exercise speed – Increasing the resistance is only one way to pump up the intensity of a set. The other method is keeping the resistance the same and performing each repetition with slower speed. This will result in a greater total time under tension, which is a great stimulus for your body to become stronger. You might even have to lower the resistance with this approach.

Add a pause – This is a cousin of the previous method. Instead of slowing down your whole movement, you can only add a pause in certain positions in the movement. When it comes to push-ups, I like to add pauses in the bottom position (chest close to the floor). That’s where the chest muscles are fully lengthened and have to really work hard. But since we use resistance bands, adding a pause in the top position is a great idea as well. In this position, the band will have the most pull, and it is a challenge for your whole body to keep stationary against that pull.

Try a high rep count – Sometimes increasing the intensity through adding resistance or make each rep more and more challenging, is actually not the best tool for making progress. If you are struggling to increase your push-up numbers with a certain resistance, and you’re simply stuck on a plateau, you can try taking a step back. Actually lower the resistance and increase the rep count for each set. This will strengthen all the supporting muscles and tissues like joints and tendons.

Can You Train Your Chest Effectively With Resistance Bands?

Especially when combined with push-ups, resistance bands are a great tool to make chest training more effective. At some point you will hit a wall when it comes to progress, if you train outside a gym without any helping equipment. Usually, people join a gym break through that wall. A set of resistance bands is more than sufficient to do the same as a gym membership for a small fraction of the cost. This way, you will be able to challenge your chest and the other pushing muscles with the right load to make progress. Being it by increasing the load of a regular body weight push-up, or by using bands to assist the movement by making you lighter.

The short answer is: Absolutely!

Why Does Training With Resistance Bands Work

If you think about it, it’s actually quite simple and straight forward. Muscles can’t tell if they have to work a load which is generated by weight and gravity or by stretching a resistance band. All they experience is “Well there is a load, and I’m moving it”. Is that challenging enough, it will result in increased strength and muscle mass, so the next time it will be easier. A more detailed explanation to that question, you can find in this article: Why Does Training With Resistance Bands Work

Benefits Of Training With Resistance Bands

  • Versatile! You can use bands to train every muscle in your body, and even implement them in cardio or HIT workouts to make them more challenging.
  • Affordable! Compared to a gym membership or getting everything for a traditional (basically weights) home gym, a set of resistance bands is very cheap and last forever.
  • Mobile! In addition, resistance bands need very little storage space and are very light. You can put them in any drawer and have a tidy home, but still have a killer workout, or you can throw the set in any bag and bring them anywhere with you. Therefore, you are not limited anymore to working out in a gym or at home.

Want to learn about more benefits resistance bands have? Check out our full list in this article: Benefits Of Resistance Band Training

What Muscles Are Used In A Resistance Band Push Up?

A push-up is a full upper body exercise. A lot of muscles will be active while you lower your chest to the floor and bring it back up. However, primarily the pushing muscles will be trained in this movement. The main pusher in the upper body is the chest muscle – also called Pectoralis, or pecs – it will generate the most force. The shoulders, or deltoids, are involved in pushing motions as well. The more you push “up” and not “forward” the more shoulder involvement there will be – also the more the upper portion of the chest will be active. And finally, in every arm extension, the triceps plays a big role.

Main Working Muscles:

  • Pectoralis
  • Triceps
  • Deltoids

Supporting Muscles:

  • Core (Abs, lower back, glutes)

Workout Routine

Nicely done, you made it to the end and added the push-up to your personal exercise list. Now the questions remain “How often should I do push-ups in a week?” as well as “How many reps and sets do I do?” or “What other exercises to combine the push-up with?”. The answer to all these questions is, “You need a workout program.”.

Aright, but where to get one or how to create one? Having a good workout routine is the best and the only way to reaching your goals. Unfortunately, there are so many very poorly designed workout programs out there, which often are a waste of time. Especially when it comes to using resistance bands. Our missing is to change that and provide you with effective workouts and give you a routine which is fun, engaging, sustainable and of course which gives you results.

We think the best way to deliver this information is by making it easy to access at any time. Therefore, we created a workout app specifically for resistance band training. The centerpiece of our approach is a workout program generator, where you will get a program suite to your fitness goals, the equipment you have and your available time. Besides that, you will find various single workouts you can do whenever you like, as well as challenges to test yourself. Oh, one more thing, we put a full exercise library in there as well.

Want to find out more and try it for free? Have a look here: BIQ Training App

The BIQ App

Take training with resistance bands to the next level with our free app.

  • 800+ Exercises
  • all band types
  • different training goals & workouts
  • challenges
  • much more

Leave a Reply

Your email address will not be published. Required fields are marked *

Log In

Forgot password?

Forgot password?

Enter your account data and we will send you a link to reset your password.

Your password reset link appears to be invalid or expired.

Log in

Privacy Policy

Add to Collection

No Collections

Here you'll find all collections you've created before.