The 10 Worst/Common Mistakes You Can Do When Training With Resistance Bands

There shouldn’t be any doubt in your mind that using resistance bands is very effective to reach any fitness goal – be it building muscles, increase strength or loose body fat. All this is possible by training with resistance bands and of course time. Change does not come overnight.

But there are some guidelines you have to follow when using resistance bands. Especially when starting out or simply not getting enough information beforehand people do a lot of mistakes and judge resistance bands as not being effective. We don’t want that to be you! That’s why we collected the top 10 worst and sadly common mistakes when it comes to resistance band training. Fix them today!

#1

Having Slack / Overstretching​

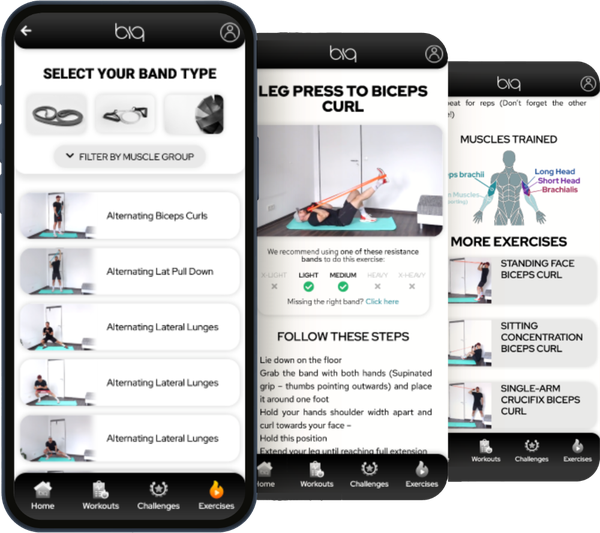
This is the most common mistake and the one which will be destroying your progress if you don’t fix it. Having slack in the staring position means that there is no tension in the band. And if there is no tension in the band there is no resistance. Without resistance your muscles don’t have to do any work. And this means there is no trigger for improvement.

Let’s have a look at the chest press as an example. In the starting position – when your arm are bent – it is very easy to have slack where there is no tension in the band.

Slack example

Overstretching is a less common mistake but still worth to be mentioned. Resistance bands can’t be stretched infinitely. Depending on the thickness of the band there is a maximum length of possible elastic stretch. If this length is exceeded the band will tear. Make sure to check this maximum possible stretch length for the bands you’re using.

Fix It!

So how do you eliminate slack and have the perfect setup for your exercise? The general approach is having the right position or adjusting the length of the band. What does that mean?

The Right Position – Having the right position means that you position yourself far enough from the anchor point, so the band will have already some stretch and therefore tension in the starting position.

Slack fixed

The Right Length – Having the right length means that you shorten the band to a level, so there is tension in every position of a given exercise. You can achieve that by wrapping the band around your hands, feet or doubling it.

Hand Wrap

#2

Not Following A Workout Program

When it comes to fitness training it is not one single workout session what makes the difference. Constancy is key when it comes to changing or make progress in the big picture. The most effective way to reach your fitness goals is following a good structured workout program which was specifically designed for this goal – be it building muscles, burn fat or increase general fitness.

But finding a good workout program or creating one yourself is time-consuming or requires a basic to advanced understanding of the science behind resistance training. That’s why we did all that for you and integrated everything in an easy to use mobile app. Interested? Get more details right here: BIQ Workout App

#3

Not Using The Full Potential Of A Resistance Band

In contrary to dumbbells or weights in general resistance bands don’t have a fixed resistance. Resistance bands have what is called “linear variable resistance”. This basically means that the more you stretch a band the more resistance it will produce. So every band has a range and not a fixed resistance. But people still often treat bands like weights they know from the gym and once an exercise gets a bit easier, they jump to the next heavier band. But remember bands have a range and the next heavier band can be just way too much resistance. This can result in form breakdown and even in injury.

Fix It!

There are several methods to increase the resistance of a given resistance band without having to grab the next heavier one.

Check them out:

Adjust the length of the band – Changing the length of a resistance band is the most basic form of adjusting the resistance. The easiest way is to wrap the band around your hands or your feet.

Distance between Feet – another great way to make the effective length of a band shorter is to change the distance between your feet.

Deadlift stance

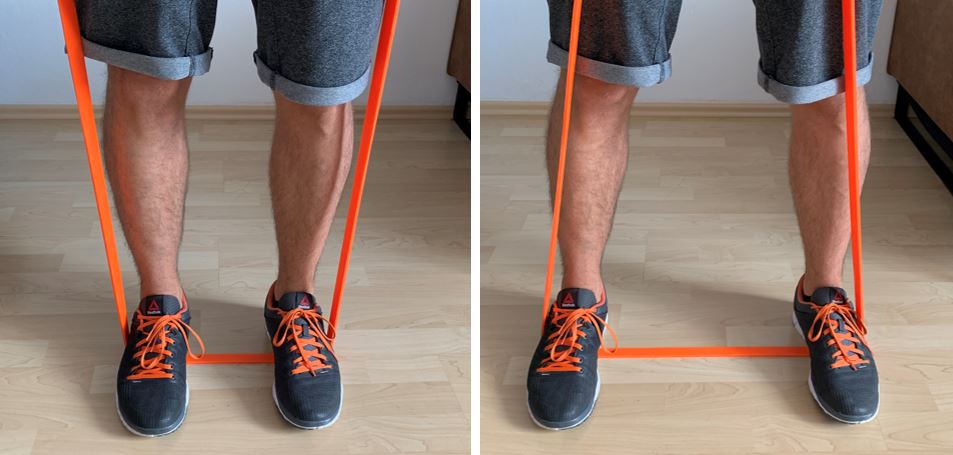
Changing the Distance to Anchor point – whenever you use a door anchor you can simply take a step towards or away from the anchor point and therefore increase the effective resistance of the band you’re using.

Combine bands – this requires you having a set of resistance bands and not a single band (check out #5). Use multiple bands of different resistance levels to get the perfect resistance.

Double the Band – simply doubling up the band is another great method to increase the resistance. But be careful the jump in resistance is quite big.

Slow it down – slowing down your reps is a method which is often overlooked. Simply by increasing the total time under tension of a set will force you to reduce the resistance you’re using.

#4

Not Checking Your Bands for Damages

This one is for your own safety. A lot of people forget that resistance bands can take damage and this can lead to snapping of the band. Usually nothing happens when a band tears but do you wanna take the risk?

Checking your resistance bands for any damage should be a routine before starting working out. And if you find any damage you should stop using the band immediately and replace it straightway. They are cheap… Don’t expose yourself to injury for a couple of bucks.

To check a band for a tear or a cut simply examine the band with your eyes and your hands. You will feel and see a damaged spot straight away. Pulling the band apart might reveal the damage more noticeable.

Stretch band tear

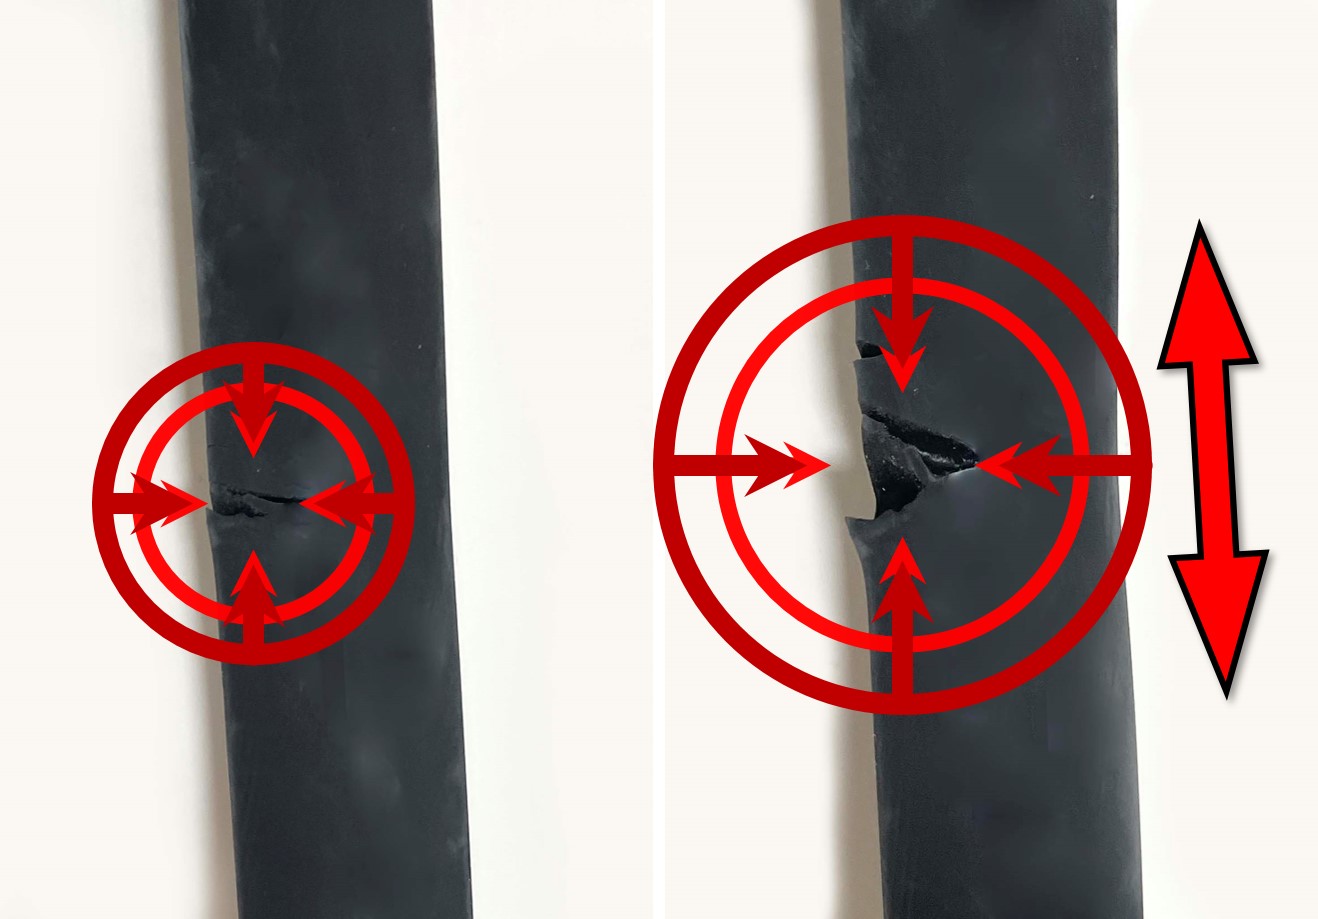
A cause for damages besides heavy or incorrect use of the bands can also be the way of storage. Since most resistance bands are made of rubber (latex) they have a certain level of moisture in them. Having the bands exposed to direct sunlight for an extended period of time can damage them significantly by removing this moisture which is needed to keep resistance bands elastic. 

#5

Not Having a SET of Resistance Bands

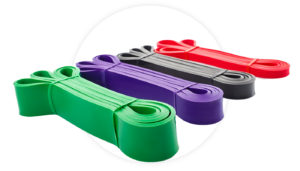
Getting a Set of resistance bands instead of a single band is the one of the biggest favors you can do for yourself. This way you will have the right resistance level for every body part, and therefore you will be able to effectively train your whole body. In case you still don’t have a set – check out this one: Resistance Band Set

biq resistance bands product page

The BIQ App

Take training with resistance bands to the next level with our free app.

  • 800+ Exercises
  • all band types
  • different training goals & workouts
  • challenges
  • much more

#6

Ego Lifting - Compromising Correct Exercise Form

This mistake is not limited to resistance bands. Sometimes we simply want to prove something to ourselves our to others, and we make stupid decisions. When it comes to resistance training it is often using more load than we can actually handle. This often leads to form breakdown and can result in injury.

You don’t have to prove anything to anyone, and you should always be hones to yourself. Everybody has to start at some point and if you have to use the lightest band in the beginning so be it. Just keep doing it, and you will make progress and eventually become stronger, fitter, leaner or whatever your goal might be.

In every exercise article we cover the corresponding important Dos and Don’ts to get the exercise form 100% correct. Check out our exercise section: All Resistance Band Exercises

#7

Anchoring the Band Incorrectly

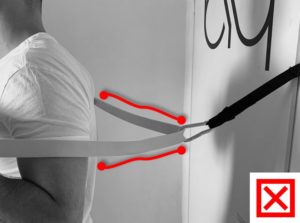
There are several ways to anchor a resistance band. The two most common ones are using a door anchor or looping the band around an object. But there are still ways to do it incorrectly.

Door Anchor – when using a door anchor there are quite some guidelines to follow. We even wrote a whole article on this topic because it that important to do it right: How to use a door anchor with resistance bands.

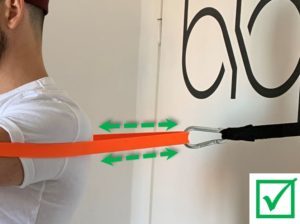
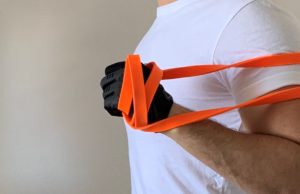
Looping the Resistance Band – Looping the band around an object is also a great and safe way of anchoring a resistance band. The technique is quite simple and is demonstrated in the following picture:

Anchor - loop

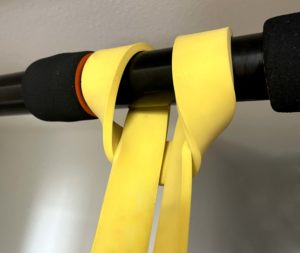
You have to keep two things in mind when using this method.

  1. The object hast to be smooth!
    This means that objects with sharp edges are a no-go. It’s like anchoring the band to a knife… not a great idea. I mostly use pull up bars or smooth metal poles as anchor point for my band.
  2. The object has to be stable!
    Remember that resistance bands can have a tension of several tens or even hundreds of pounds (or kilos). This means that the abject you anchor your band to has to be able to withstand this force without getting loose and flying in your face.
    Using radiators, door knobs or small furniture is not a good idea and can lead to unnecessary accidents.

#8

Not Using The RIGHT Resistance

What is the RIGHT resistance you might ask… Well whenever you follow a training program you will find certain repetitions to be achieved for a given set. But what does that actually mean? If my training plan tells me to do 10 reps in my first set, can I just grab the lightest band and do 10 easy repetitions, although I could actually do 50? Of course, you can, but you already know that this wouldn’t be a really effective use of your time.

When you aim for 10 reps you should choose a resistance that makes it possible to achieve these 10 reps and at the same time you shouldn’t be able to do 11, 12 or more. This is not specific to resistance band training. It is the same with weights.
Choosing a resistance which is too high will lead to bad exercise form and might result in injury. On the other side a resistance which is too small won’t result in a sufficient stimulus for your muscles to adapt.

Well now how do you choose the right resistance? This depends on you! Every one of you is different. Different strength level, different training experience and different goals. And in addition to that you can move more weight with your quads compared to your biceps. So the resistance further depends on the body part and the specific exercise. The only solution is determining the right resistance for a specific rep count for a specific exercise and keep a journal to remember (trust me it is easier to write stuff down than memorizing – you will forget anyway).

#9

Not Protecting Your Hands and Feet

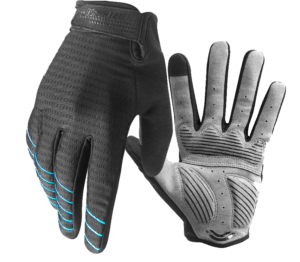
When a resistance band is stretched there will be friction between the band and any surface it is in contact with. Specifically these contact point will be your hands and your feet.

Feet are not a huge problem since shoes or even socks will be enough to protect your skin, and you will be wearing those anyways. When it comes to your hands it’s a different story. But there is a solution for this problem as well, and it is simple – gloves. Workout gloves to be specific. I personally use the full finger version, like these right here: Workout Gloves

#10

Using Cheap Equipment

This mistake is not resistance band specific but is true all the same. You probably heard the expression “Buy cheap, buy twice.”. We don’t want to sell you any expensive equipment. It is just a friendly advice not to get the cheapest stuff out there and actually investing a little into equipment which will last and be safe to use.

Conclusion

Working out with resistance bands is easy and straight forward for the most part. Probably you’re already doing most of the points right and have great workouts. If not you have now a list of point to keep in mind for your next workout and get better and faster results with resistance band training.

And always remember the absolute biggest mistake is not having fun while working out!

Have Fun!

The BIQ App

Take training with resistance bands to the next level with our free app.

  • 800+ Exercises
  • all band types
  • different training goals & workouts
  • challenges
  • much more

Leave a Reply

Your email address will not be published. Required fields are marked *

Log In

Forgot password?

Forgot password?

Enter your account data and we will send you a link to reset your password.

Your password reset link appears to be invalid or expired.

Log in

Privacy Policy

Add to Collection

No Collections

Here you'll find all collections you've created before.