Deadlift With Resistance Bands

The mother of all exercises! The Deadlift. And an exercise you simply can’t skip in a good lower body workout. Especially nowadays when we sit quite a lot, it is a must to take care of your posterior chain and keep your lower back strong. Bands are a great tool to even do heavy exercises like the deadlift.

All you will be needing is a resistance band. Although we recommend getting a set of resistance bands from the start. In this way you can adjust the resistance and have the possibility to do a lot of different exercises. If you don’t have a set yet, check out ours right here: Resistance Bands Set

After reading this article you will know how to perform a deadlift with perfect form. You will learn what kind of mistakes to avoid and how you can adjust the resistance to your needs.

You always asked yourself if it is actually possible to train effectively with resistance bands only? The short answer is: YES! But we will also answer why and what benefits you will reap.

Last but not least we will show you our most favorite variations of the conventional deadlift and a way to incorporate deadlifting in a workout routine.

How To Deadlift The Right Way With Resistance Bands?

Make sure to warm up before start doing deadlifts or any other exercise. This will ensure to minimize the chance of injury by getting your muscles and joints prepared for the workout. Also leave the ego out of training. Start with a resistance band with lower tension and really get the form right before increasing the load.
Bands generate friction with every contact point when they are stretched. To protect your feet and hands from this stress, we highly recommend wearing shoes and workout gloves. In case you don’t have any gloves yet, check these out: Workout Gloves

To help you really nail the form we collected important Dos and Don’ts right after this section. Don’t forget to keep them in mind while practicing your deadlifts!

The right step-by-step guide of how to get a correct deadlift done with resistance bands is as follows:

  1. Double up the band and grab each end of the loop with one hand
  2. Step with both feet shoulder width apart on the band
  3. Lift your chest up, straighten your lower back and fix a point on the ground 6 feet in front of you
  4. Brace your core and drive your hips forward while extending your legs at the same time
  5. Return slowly to the starting (bottom) position (resist against the pull of the band)
  6. Repeat for reps

Important Dos & Don’ts!!!

⓵ Keep a straight lower back and a neutral neck!The most common mistakes a lot of people do when beginning to learn the deadlift is rounding the lower back and having a bad neck position.
Since with time you will be handling heavier and heavier loads it is very important to avoid having bad posture while performing the deadlift. With bad posture the chance of hurting your lower spine or having problems with your neck is getting higher and this is simply unnecessary.

DeadliftDDBackRounding

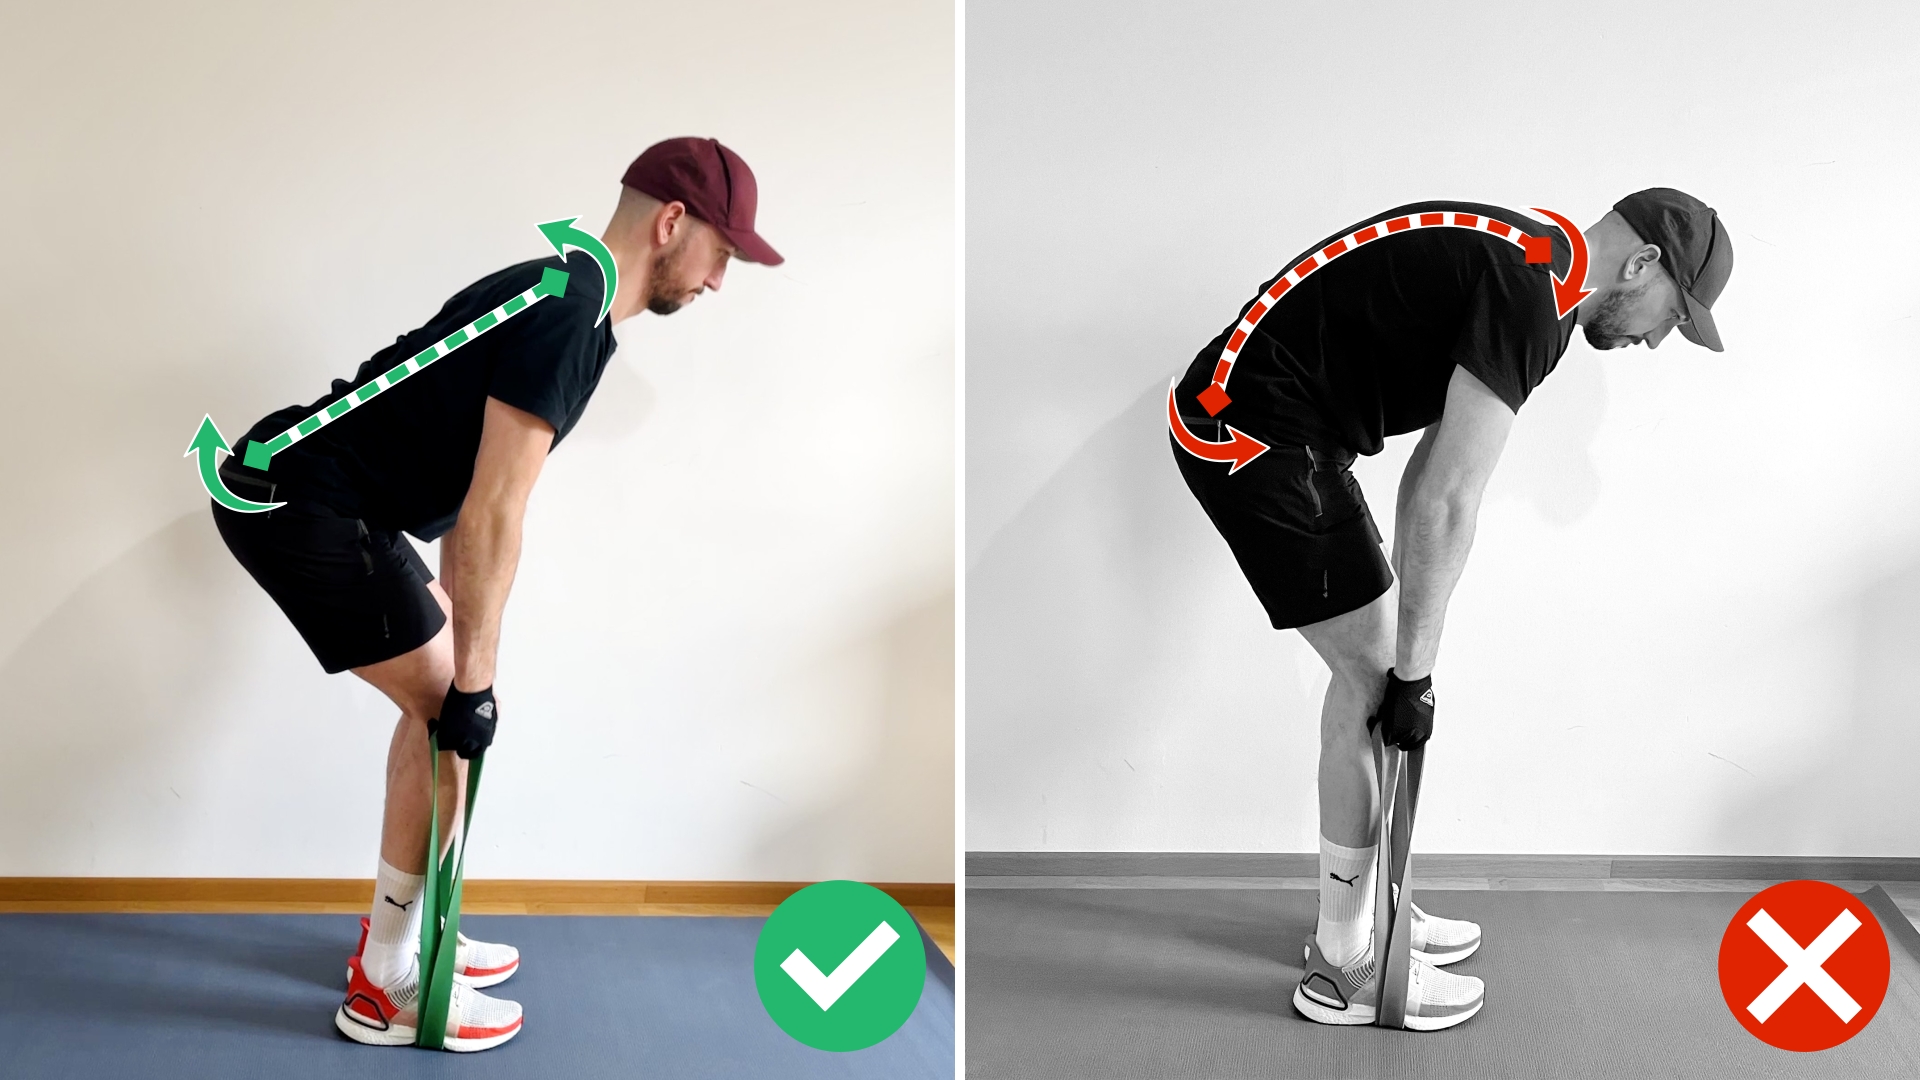
To keep your lower back straight, actively stick your butt out, roll your shoulders backwards and stick your chest out.

The second point is keeping your neck in a neutral position by looking at a point on the ground around 6 feet in front of you. This will also help keeping your lower back straight.

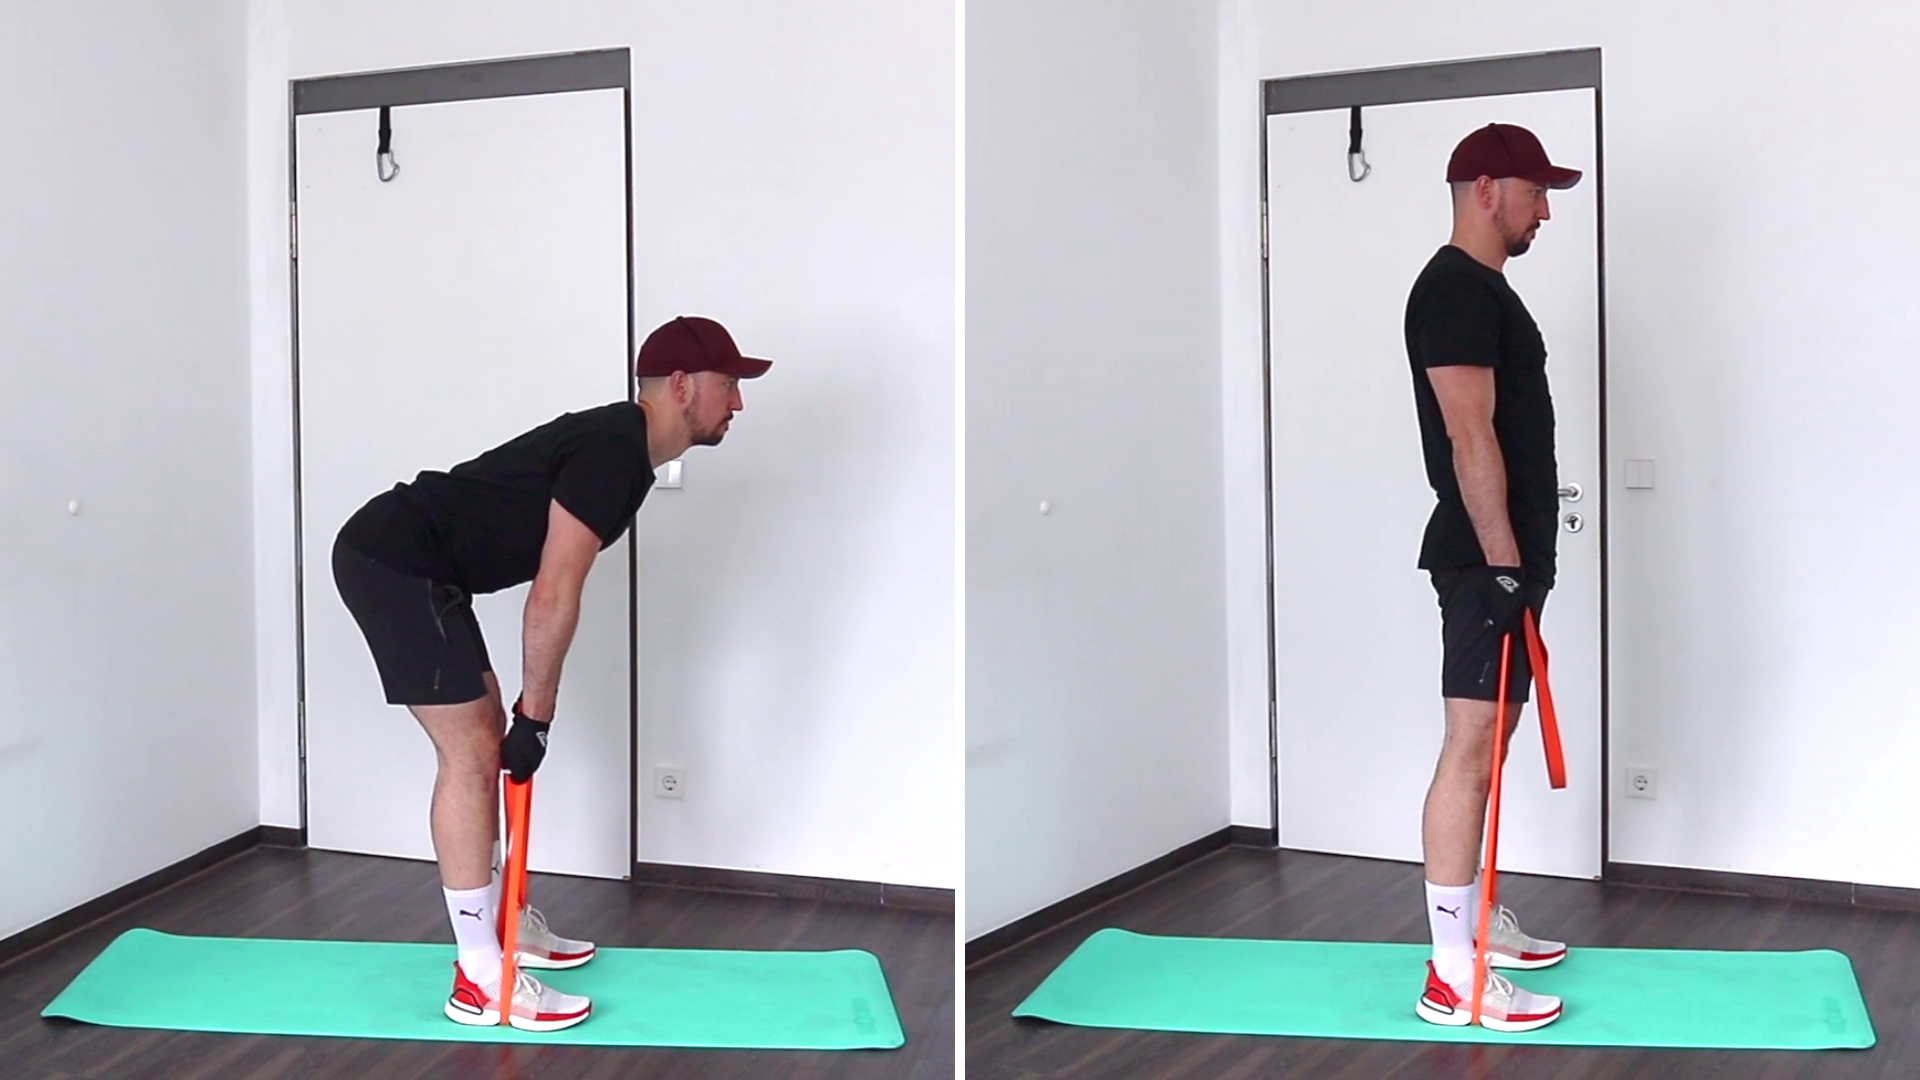
⓶ Keep the band stretched in the bottom position – No Slack!When you’re in the starting (bottom) position of your deadlift, there shouldn’t be any slack in the band. You should feel the band pulling slightly on your arms. This will make sure that you will have resistance throughout the whole movement which will result in a longer time under tension and this will lead to faster results.

DeadliftDDBackSlack

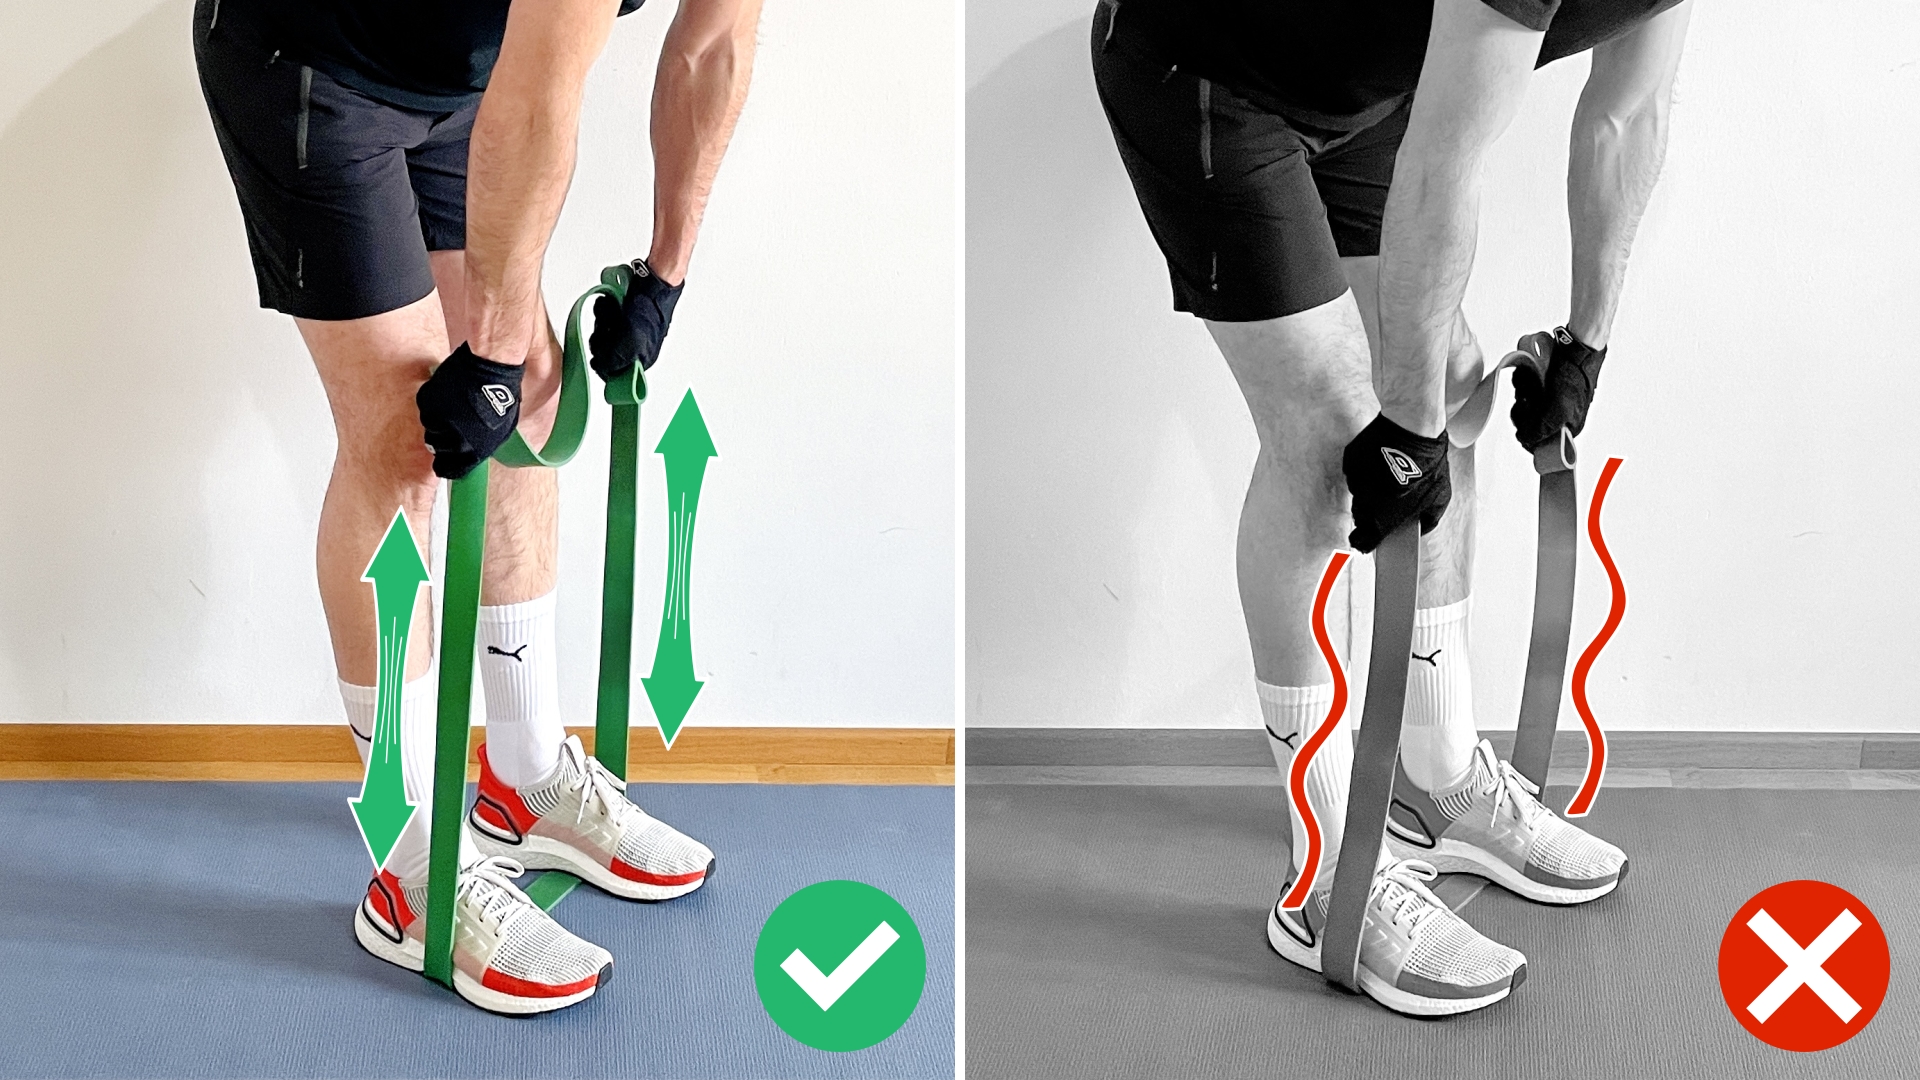
If it is not possible for you to get into the full upright position without having slack in the band at the bottom position you need to use a lighter resistance band. In the following section we collected techniques how to change the resistance of a given band. This will help you to get the most out off one single band and not jump to quickly to the next heavier one.

There are much more mistakes you can do when starting out to train with resistance bands. We want to make sure that you are not doing any of them. That’s why we collected the worst ones in an extra article as well as how to avoid them:
The Worst Mistakes You Can Do When Training With Resistance Bands

How To Adjust The Resistance

When it comes to training with resistance bands, people very often jump to the next heavier band when they feel that the exercise gets easier with the band they are using right now. This quick transition to the heavier band can be quite a mistake. Because typically the jump is too big and too early. And this regularly leads to form breakdown, cheated reps and sometimes injury. All this can easily be avoided!

A better way is first getting the most out of one band and then switch to the next heavier one. For deadlifts we collected techniques we personally use to adjust the resistance of a given band.

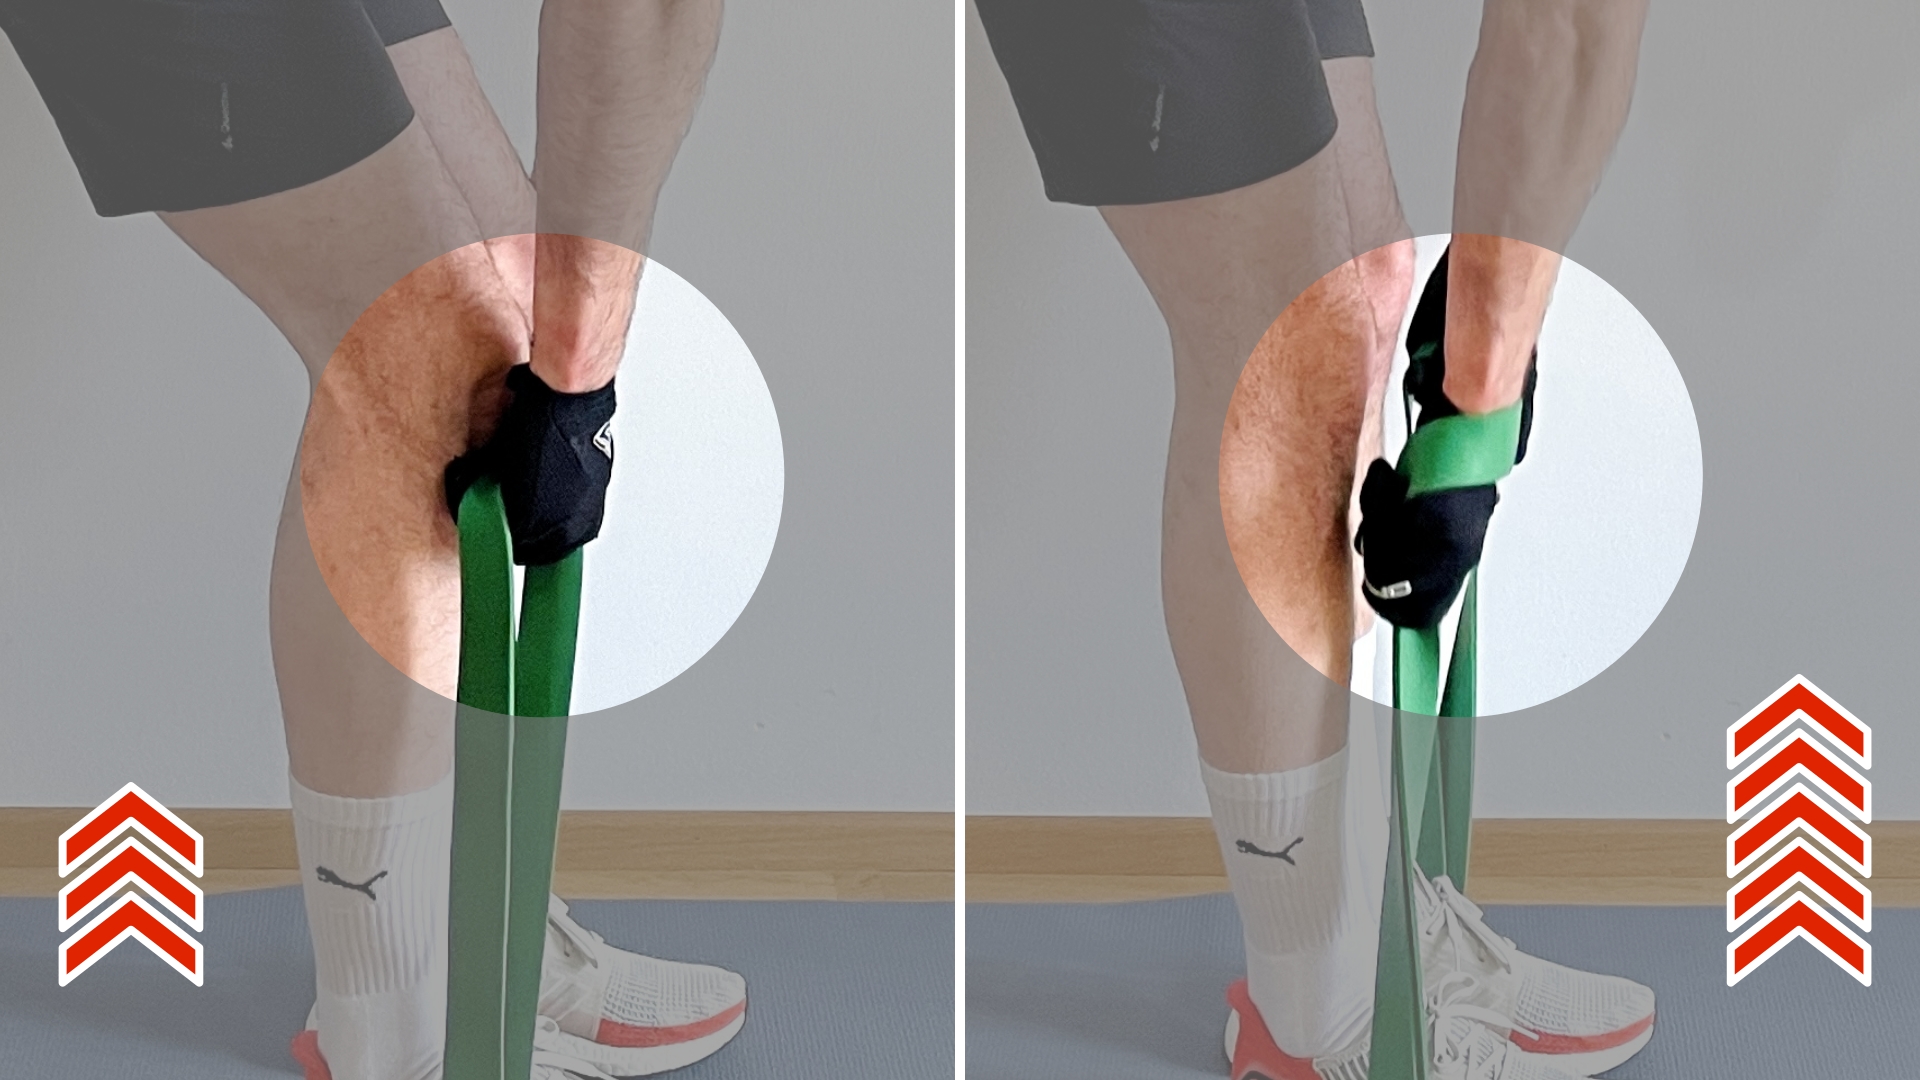
Adjust the length of the band –This is the bread and butter approach to adjusting the resistance of a band. Make it shorter. The shorter a band is, the more resistance it will have. The opposite is also true, the longer you have it, the less resistance you will have. But remember: No Slack throughout the full range of an exercise!

Personally, I like to go with my hand inside the loop and grab the band further down towards my feet. This will make the effective length of the band shorter, and therefore I will have to work against a higher resistance. In addition, the grip in this method is very secure and stable.

DeadliftRAGrip

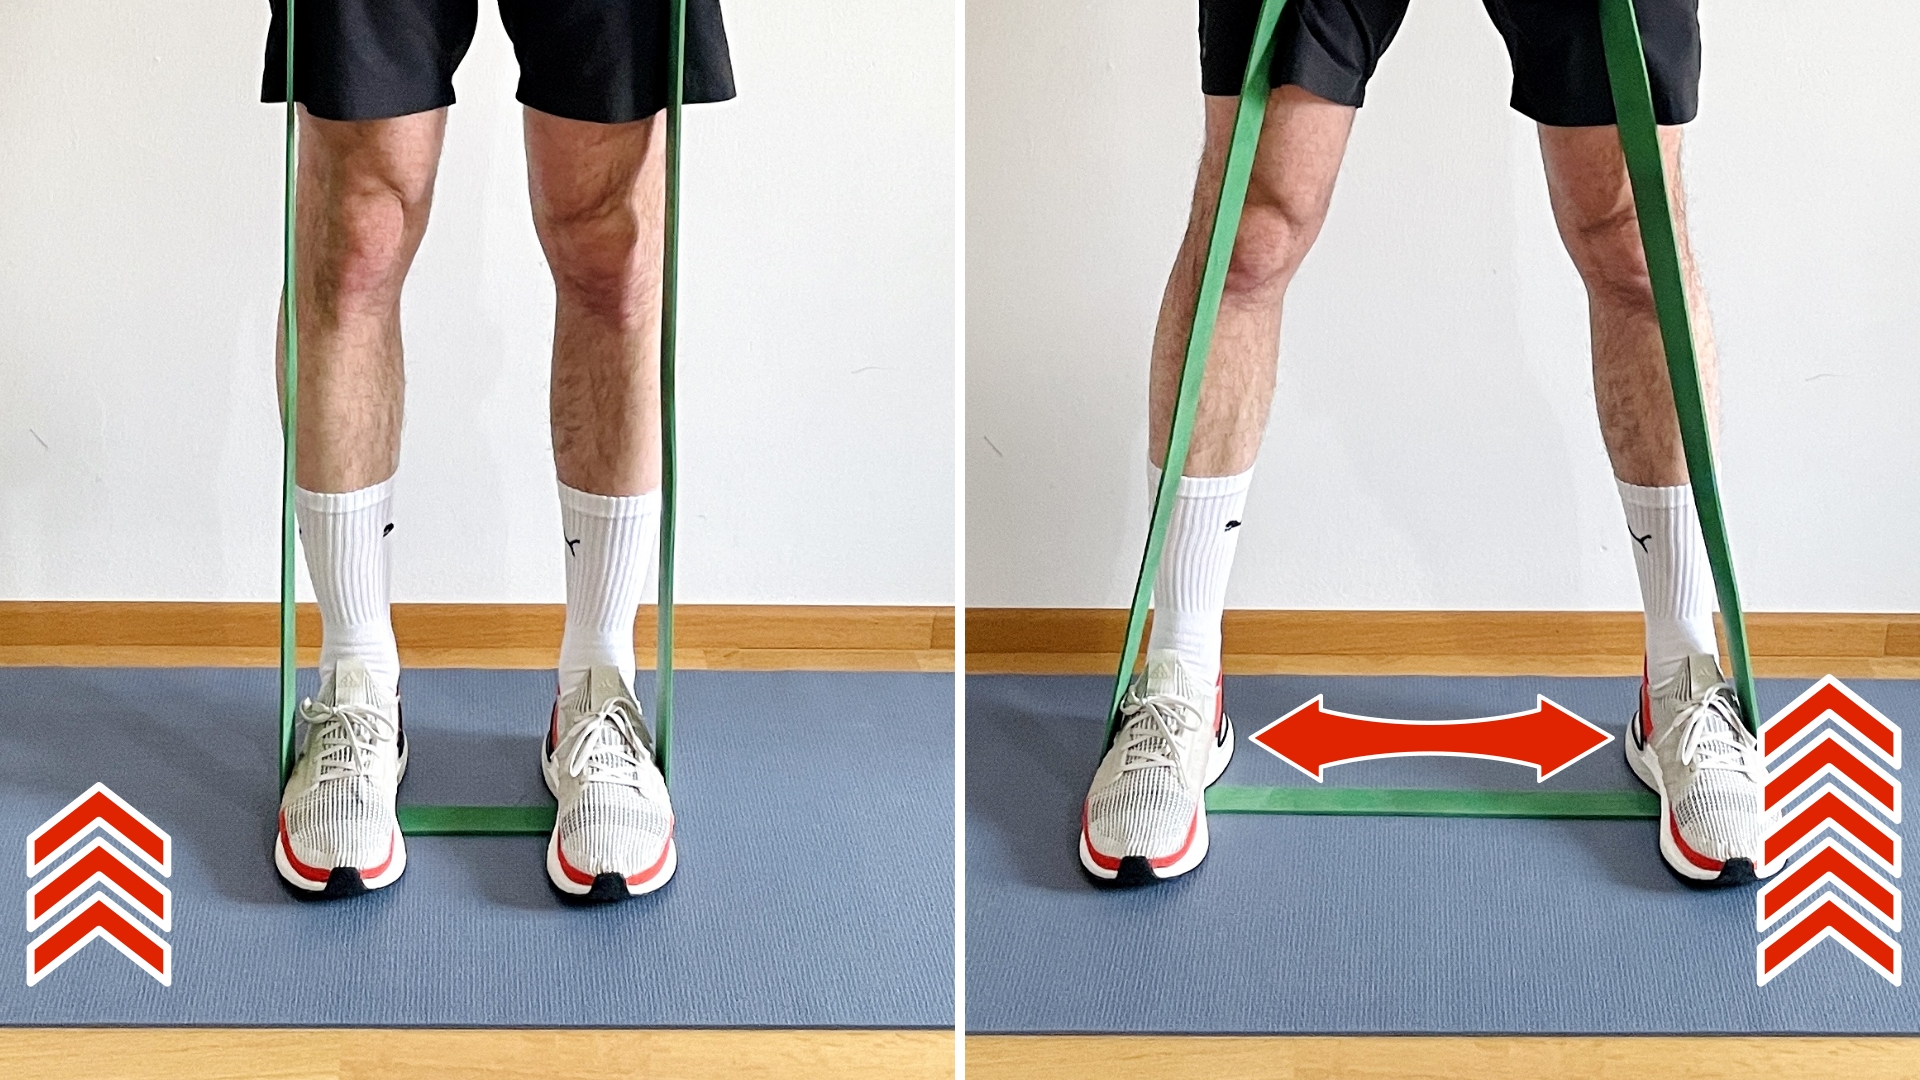
Change the feet width – a no-brainer but often forgotten. By adjusting the distance between your feet, you will change the length of the band and therefore change its resistance. Wider stance – More resistance. Narrow stance – less resistance.
The best thing about this technique: You can do it in the middle of a set. If you feel the resistance is a bit too high – simply move your feet slightly towards each other.

DeadliftRAFeetWidth

Combine bands – If you have a set of different band strength (highly recommended for effective workouts!) you can stack bands to get a higher resistance. What I like to do is adding the lightest band to my usual band and see how well I manage the extra resistance.

Slow it down – This is a different approach compared to the ones above. By slowing down your movement, you don’t add resistance, but instead you increase the total time under tension of the set. This means your muscles have to work a longer time period against the resistance the band is creating, and this will result in progress!

And keep in mind that you can mix and match these techniques. Wrap the band to make it shorter and slow down your reps. Add a light band to the band you usually use, and place your feet further apart. Get creative!

The BIQ App

Take training with resistance bands to the next level with our free app.

  • 800+ Exercises
  • all band types
  • different training goals & workouts
  • challenges
  • much more

Alternative Ways To Deadlift With Resistance Bands

Every exercise has variations which slightly change the exercise and put a focus on a specific muscle. With deadlifts, it is no exception. We collected a few variations you should definitely try. This will make sure that you will have variety in your workouts, and therefore doesn’t get boring.

Keep in mind: The basic steps and important Dos and Don’ts of the conventional deadlift we discussed in the previous sections are still valid for all following variations.

Sumo Deadlift – This variation moves the focus from your lower back to your legs. Due to a wider stance, your upper body will be more upright in the bottom position, and you do more work with your legs and glutes. The lower back will be working less compared to the conventional version of the deadlift.

L0153-SumoDeadlift

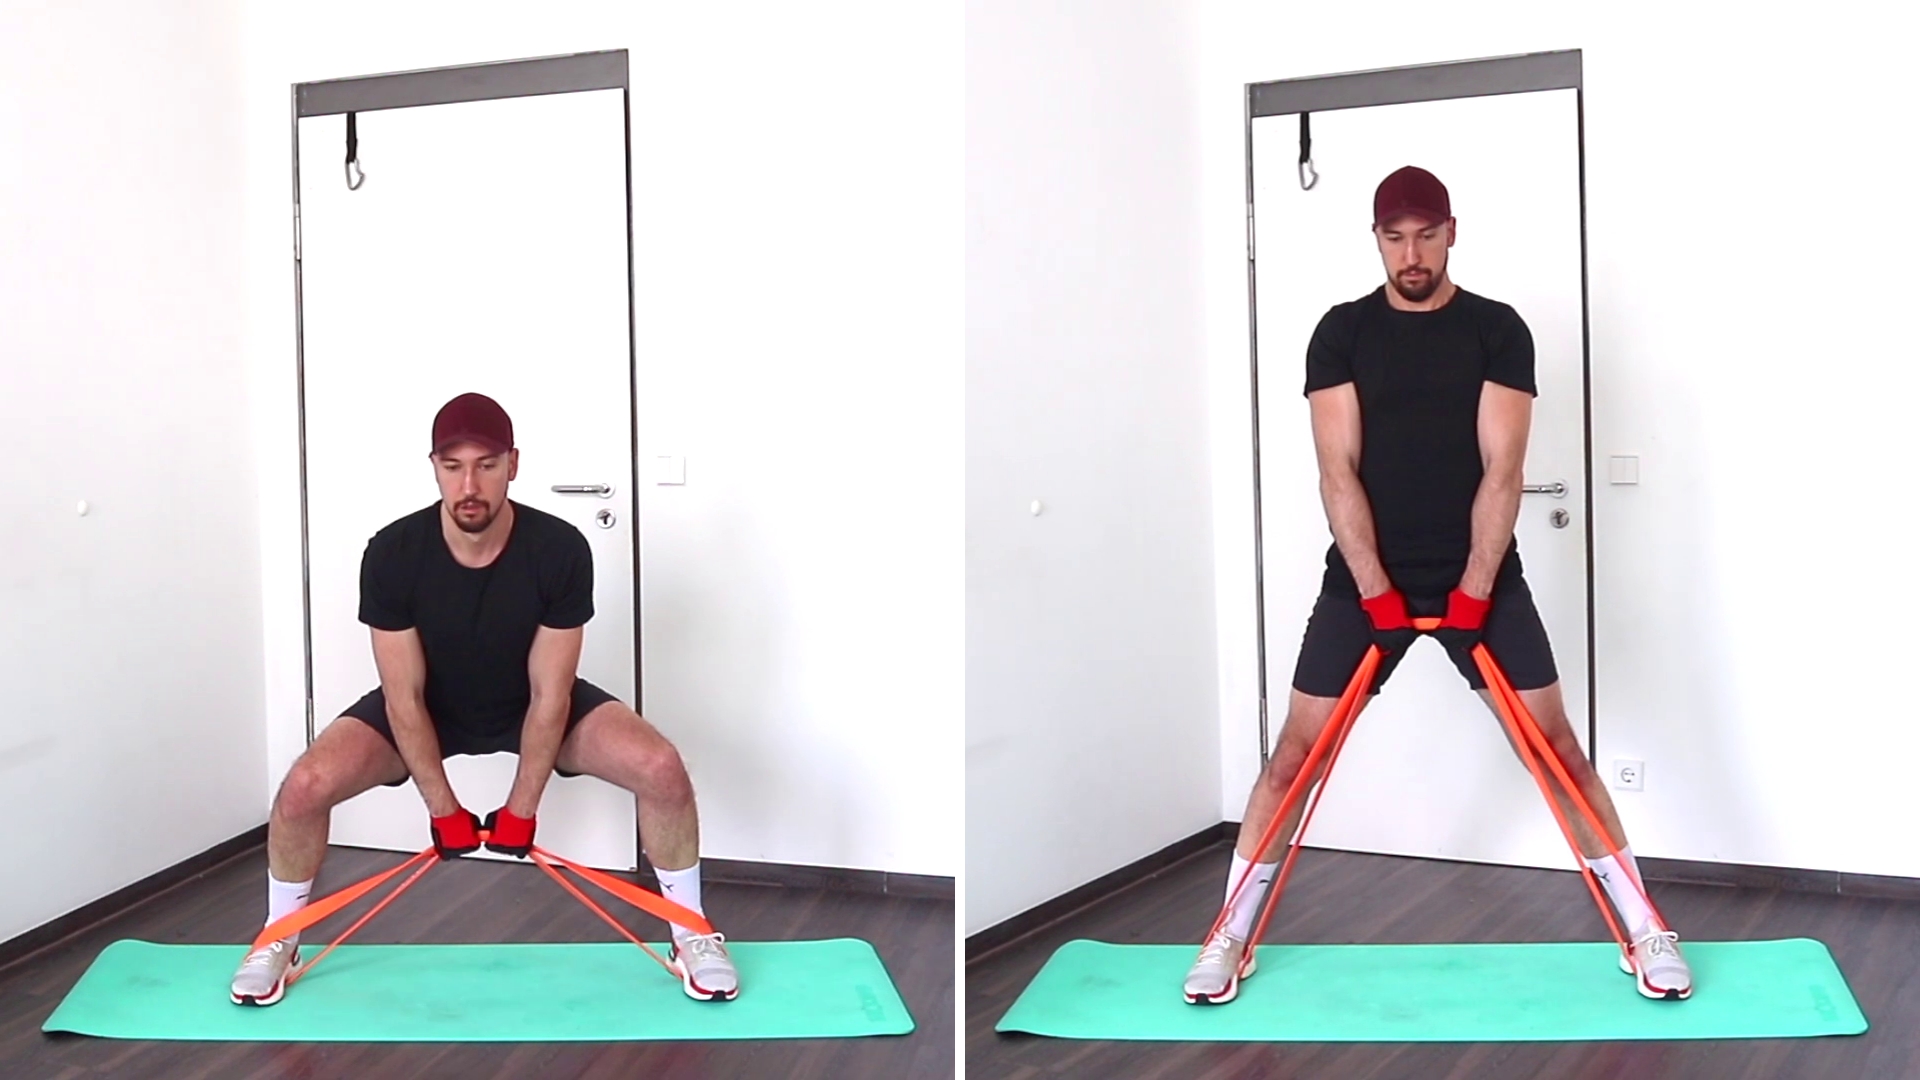
How to do it: Compared to the conventional deadlift version, step your feet more than shoulder wide apart. Step with both feet in the band (inside the loop) and grab the band with both hands between your legs (knuckles facing forward). You will notice that your upper body will be more upright in the bottom position, and it might even feel like a squat.

Single Leg Deadlift -The unilateral variation is great to challenge yourself and to incorporate some extra stabilization work in your workout. You will have to balance on one foot, which will make all the small muscles in your feet and legs work overtime.

L0156-SingleLegDeadlift

How to do it: Step with one foot on the band and lift the other one off the floor. Do the basic deadlift steps. To keep your balance, move the leg which is in the air backwards while going down with your upper body.

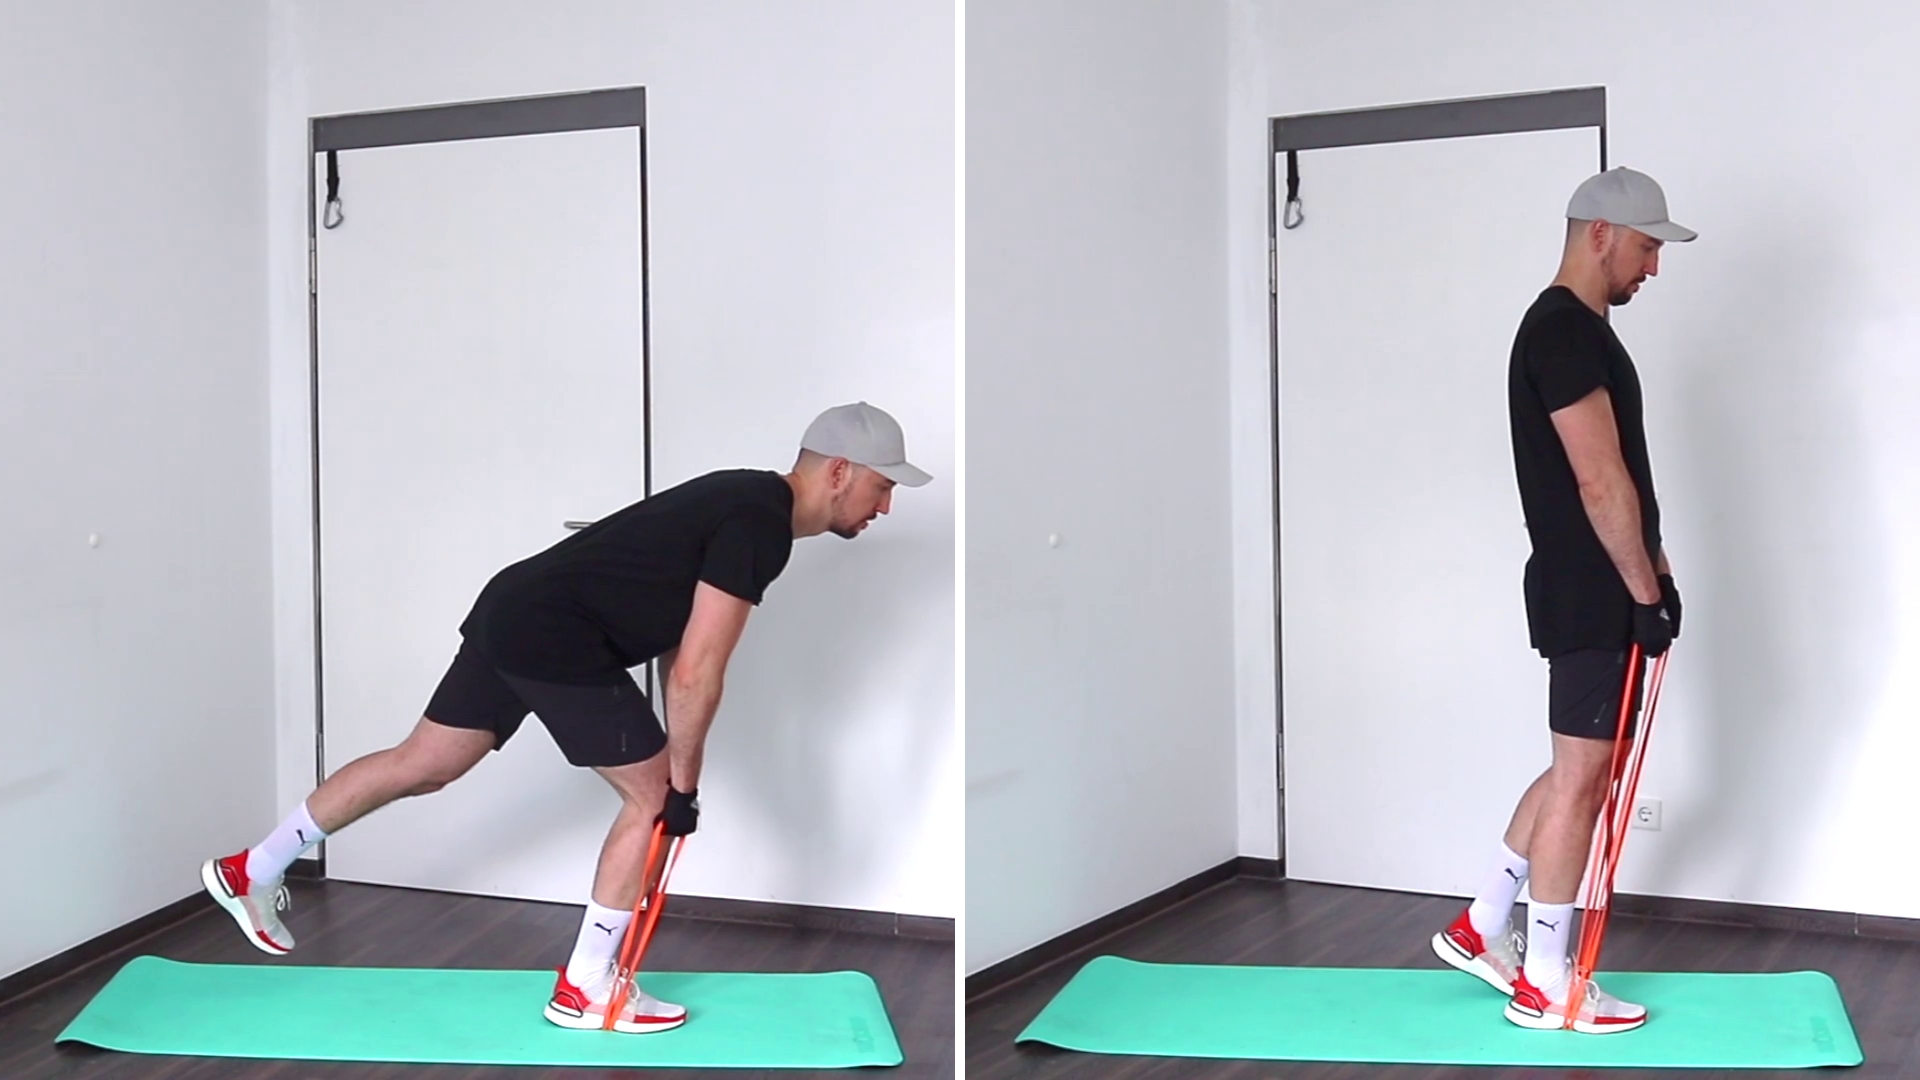
Stiff Leg Deadlift – With this variation, you will put an emphasis on the posterior chain of your lower body. That means that the hamstrings have to work extra hard. The glutes and the rest of your leg muscles will work less in comparison to the conventional deadlift. Also, the lower back muscles are much more activated, since your upper body is much more parallel to the floor and therefore there is a greater moment arm.

L0155-StiffLegDeadlift

How to do it: In this variation, bend your knees only a little while going to the bottom position. The main movement will take place by bending at the hips. Bend over until your upper body is almost parallel to the ground. From here, drive your hips forward and lift your upper body until you reach a full stand.
Since there is a higher stress on the lower back muscles, keep in mind to have a straight lower back to keep the risk of injury to a minimum!

Can You Train Deadlifts Effectively With Resistance Bands?

A lot of times resistance bands are used to complete small exercises or to do some isolation work. There seems to be a big misconception about resistance bands and their effectively in resistance training. May it be for building muscle, strength or burning fat.

Most people who will tell you that resistance bands are only a toy and there is no replacement for weights never actually used bands. Once you tried training with resistance bands with the right technique, you will know how hard it actually is.

So don’t let be fooled! Resistance bands are a great tool to become more fit and make progress. Keep on reading, and you will find out why and benefits you can reap by using them.

Why Does Training With Resistance Bands Work

Resistance bands are small, light and not very impressive looking. Comparing them to heavy weights it is easy to start thinking that bands are inferior to weights. But our muscle don’t know the difference between dumbbells, barbells, machines, body weight or bands.

All our muscle know and respond to is resistance.

When training with weights the resistance is created by gravity. Moving weights against gravity results in resistance. When using bands, gravity takes a break. The resistance is created through the elastic characteristic of resistance bands. When you stretch a band, it wants to get back to its unstretched state. This is the resistance you feel.

To get in depth information about this topic, check out our full article: Why Does Training With Resistance Bands Work

Benefits Of Training With Resistance Bands

What benefit do I have when training with resistance bands? – You might ask…Our answer: There is not only one! Some are:

  • Follow the natural strength curve of your muscle! The resistance of a band will always increase the more you stretch it, and that’s also the natural strength curve of our muscles, having the most power in the full contraction.
  • Fewer Injuries! Resistance bands are easier on the joints compared to weights. This will reduce the chance of injury.
  • Home Workout! Small, handy and light. You can work out anywhere and save time by not having to go to the gym. And the gym fees!
  • Versatility! With one band you can simulate a variety of resistances depending on the stretch.

You want to find out what other advantages bands have over weights and machines? Check out our full article on this topic: Benefits Of Resistance Band Training

What Muscles Are Used In A Resistance Band Deadlift

The deadlift is one of the biggest compound exercises out there. It targets the whole posterior chain of your lower body, including the hamstrings, glutes and spinal erectors as well as the quads. In addition to the main player muscles, you will be using a lot of upper body and core muscles to support the movement. Especially, your upper back muscles will be working isometrically throughout the movement.

Main Working Muscles:

  • Hamstrings
  • Glutes
  • Lower back – Spinal Erectors
  • Quads

Support Muscles:

  • Core Muscles
  • Upper Back Muscles
  • Calves

Workout Plan

The Deadlift is a great exercise which should be part of any workout, but only doing deadlifts is not a workout routine. You should strive to train your whole body on a weekly basis with different exercises and variations.

So if you are not sure which deadlift variation is right for you and how to incorporate it in a workout routine which will make sure you’re reaching your goals… We have a solution for you!

In the BIQ Training App you will find a library of all exercises you can do with resistance bands with a step by step in depth description as well as full workouts and challenges. Give it a try! Find out more here: BIQ Training App

The BIQ App

Take training with resistance bands to the next level with our free app.

  • 800+ Exercises
  • all band types
  • different training goals & workouts
  • challenges
  • much more

Leave a Reply

Your email address will not be published. Required fields are marked *

Log In

Forgot password?

Forgot password?

Enter your account data and we will send you a link to reset your password.

Your password reset link appears to be invalid or expired.

Log in

Privacy Policy

Add to Collection

No Collections

Here you'll find all collections you've created before.