Lateral Raises With Resistance Bands

Pressing movements are a part of almost every workout routine, and the shoulder muscles are always involved in any pressing exercise. A huge problem is that most people have overdeveloped front delts and are neglecting the side and the rear delt. This leads to posture problems and imbalances. We don’t want that to happen to us – that’s why we are talking about the lateral raises (or side raises) to target our side or medial delts. A great thing is that the resistance band version works perfectly and even better than the weight or cable alternative.

This article will cover a step-by-step how-to guide followed by important mistakes to avoid and ways of adjusting the resistance of a given band to get the most out of it. We will show you different variations of the basic lateral raise and have a look at what muscles are involved in this exercise. In the end, we talk about workout incorporation and programs.

MuscleMapSideRaises-Details

How To Do Lateral Raises With Resistance Bands?

Especially when it comes to shoulder training, it is really important to have a good warm up and get the muscles ready for the resistance. Shoulder injuries are a huge pain in the a** and take quite long to heal properly. So do yourself a favor…prepare your shoulders by warming up and make greater progress in the long run!

You will be needing resistance bands and your body to do lateral raises. We highly recommend getting a set of band with different resistance levels (like these: Resistance Bands Set) to have light bands and some heavier ones to progress.

Wearing shoes and workout gloves is also a good idea to protect your skin from the friction of the band. We recommend getting full finger gloves for resistance bands training. These are the ones I use: Workout Gloves.

The best way to perform lateral raises with loop bands is to simply bend your arms to a 90-degree angle or slightly larger. Now you won’t have the band pull your arms together, then you lift your arms. Now imagine your forearm and your upper arm are fixed, and you can only lift them up and down. Key here is that you don’t have any rotation in your shoulder, but just do the up and down movement.

Follow these 5 steps to nail the lateral raise:

  1. Step on the band with both feet (shoulder width apart) and place the band on your wrists
  2. Bend your arms 90 degrees, so your forearms are parallel to the floor
  3. Keep your arms bend and raise your elbows to the side
  4. Return slowly to the starting position (resist against the pull of the band)
  5. Repeat for reps

It is very easy to start using the front delts in this exercise. The front delts are stronger, and the exercise becomes easier this way. But we want to target the side delts and don’t want that our body sabotages that goal. The following form tips will make sure that you only have the side delts invited to the party.

Nail The Exercise Form!
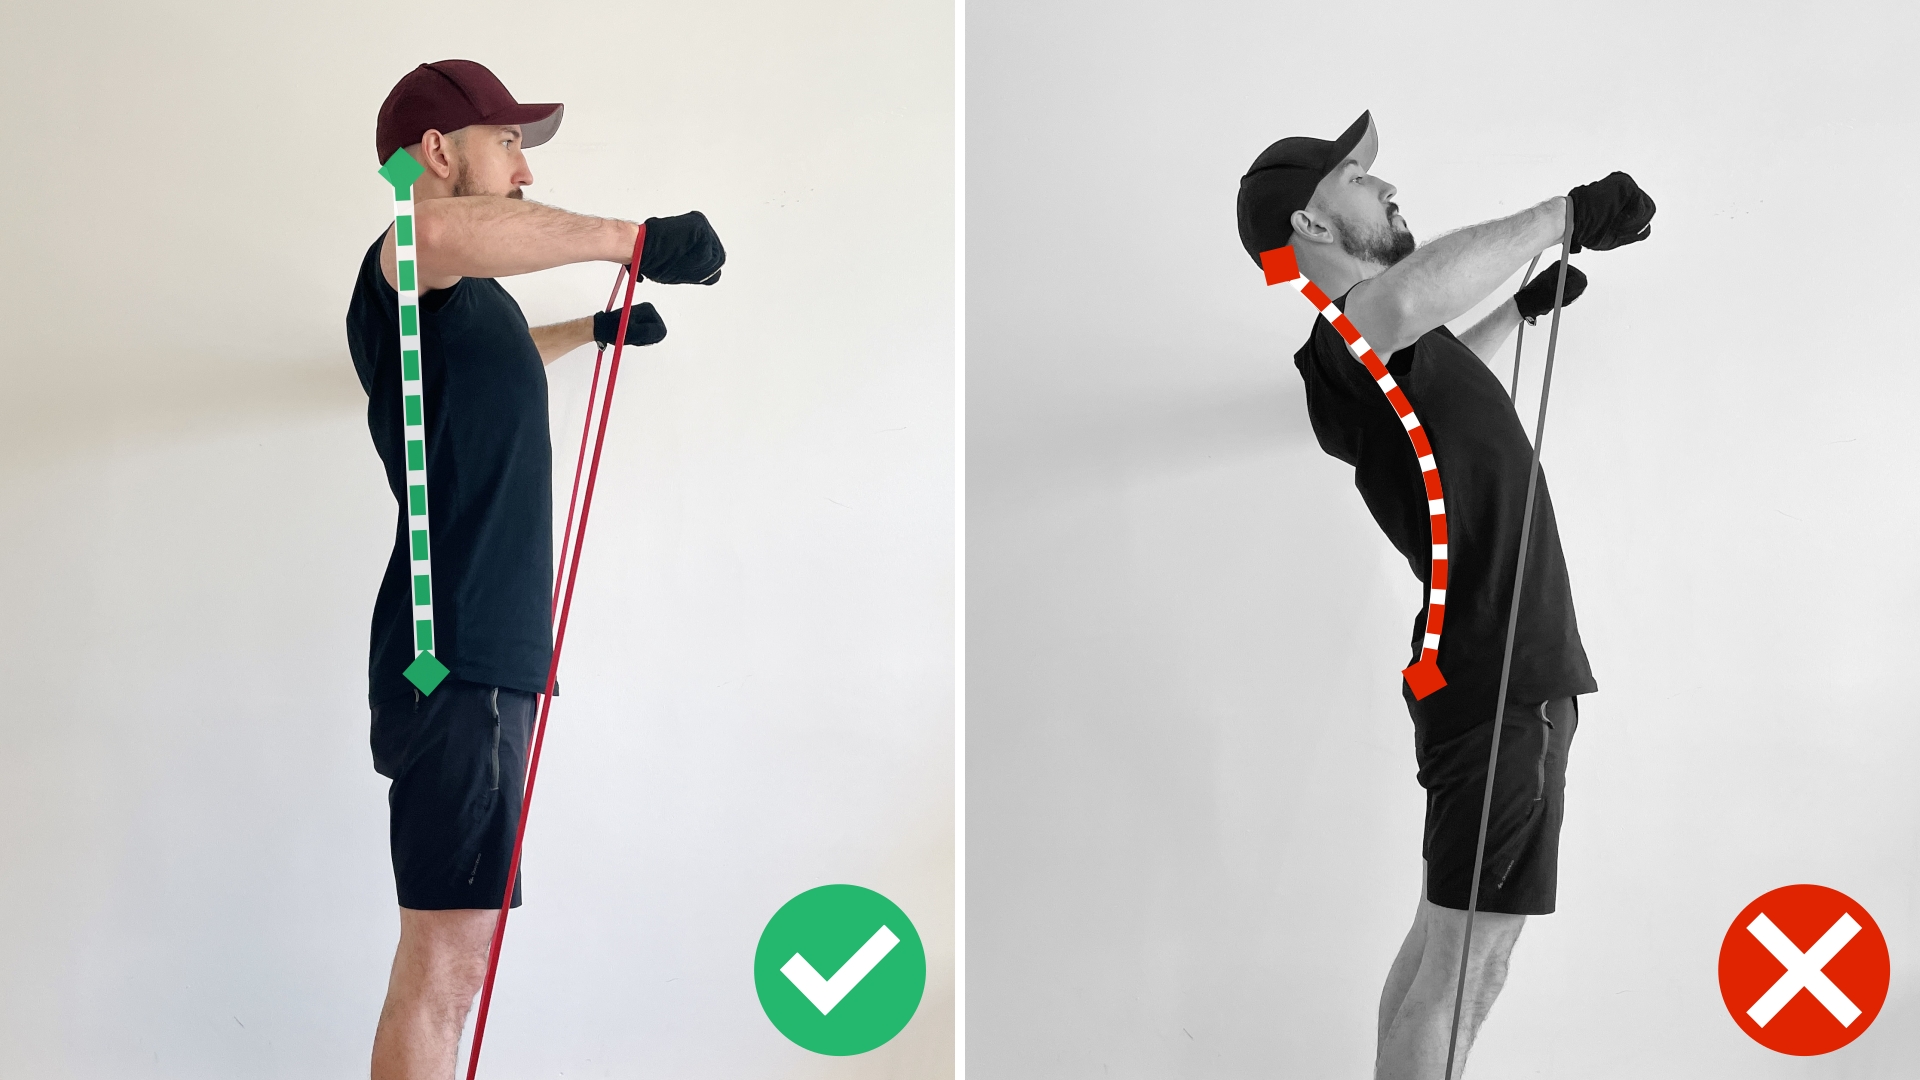
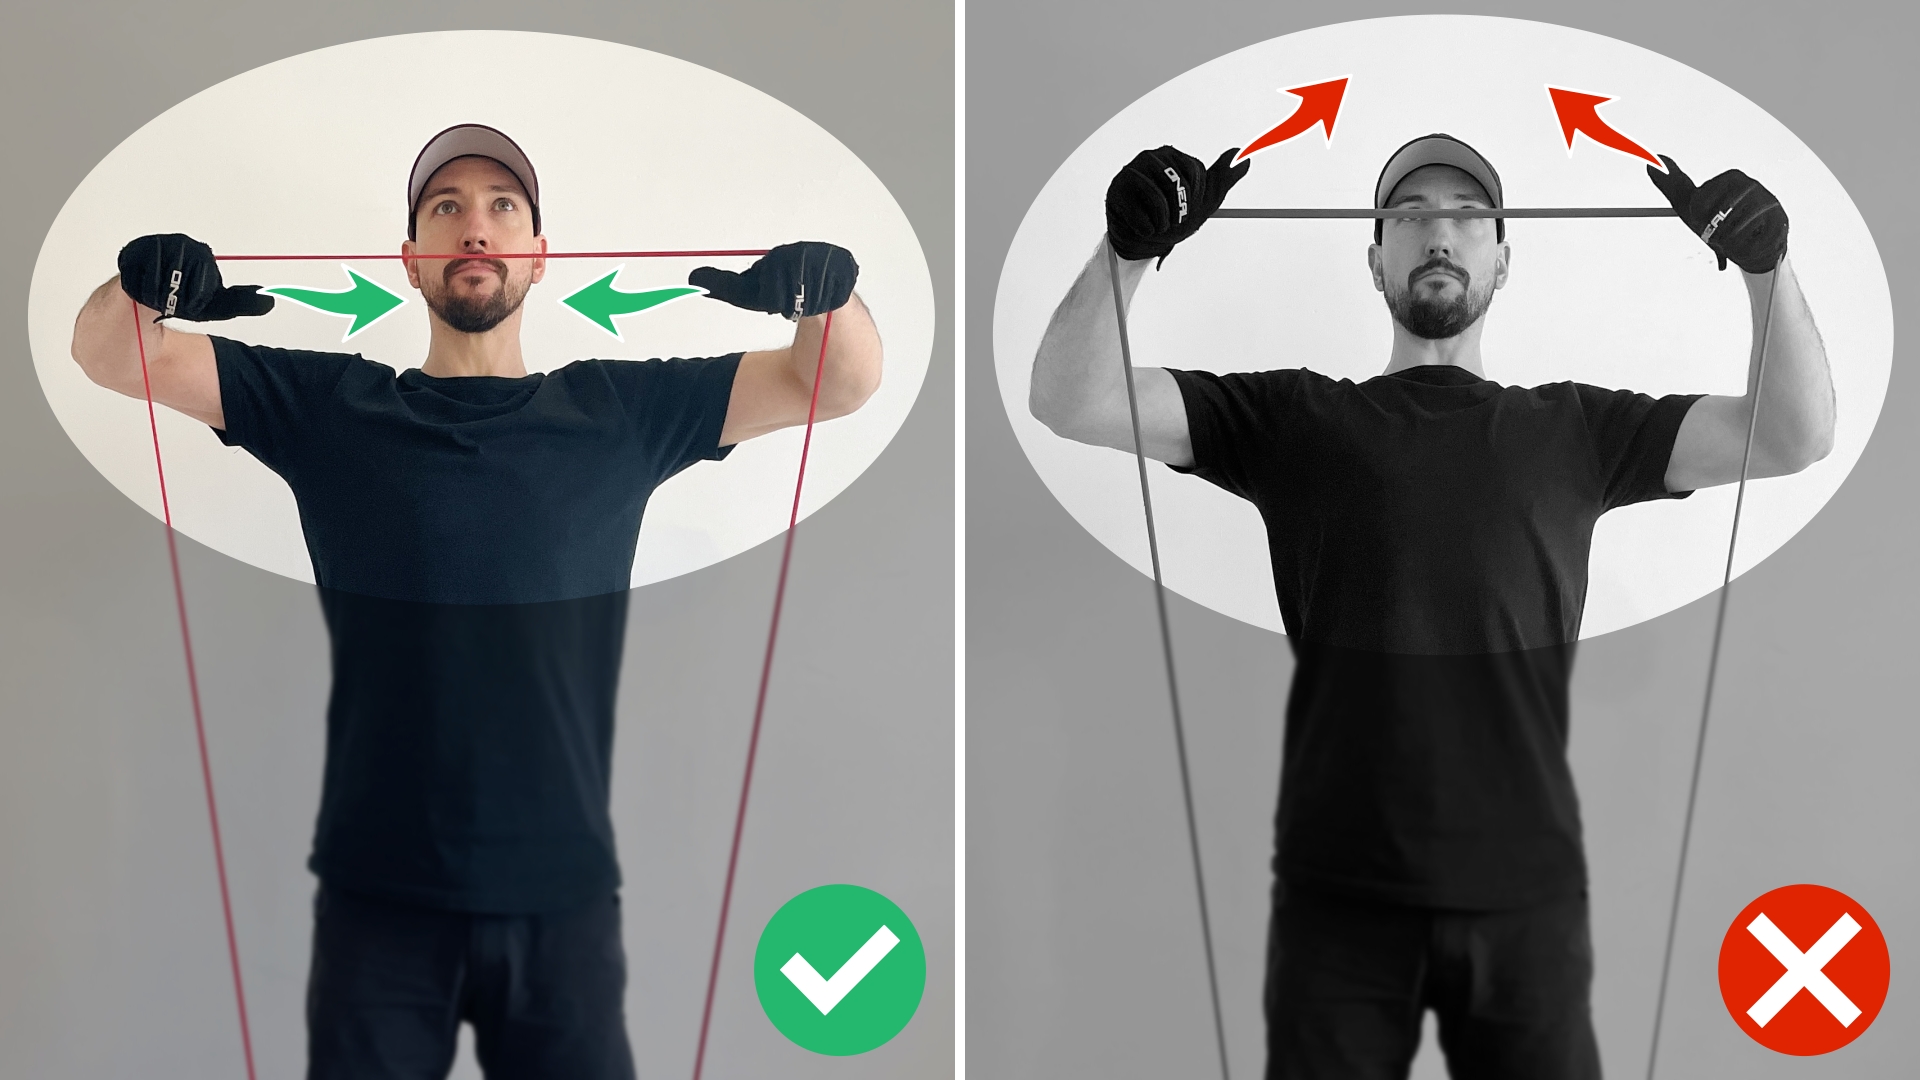
Neutral Upper Body Position – the most import thing about lateral raises is doing actual lateral raises and not turning it into a front delt movement. How do we do that? Simply keep in mind two things. Don’t lean backwards with your upper body, and don’t let the thumbs rotate upwards in the top position. Have your upper body in an upright position and pay attention that your thumbs are pointing to each other in the top position.

LateralRaisesDDRoundBack

⓶ No Slack! – Make sure that there is tension in the band in the starting position. If you have slack in the band at any point in the exercise, your muscles are basically taking a break.

Clean Reps > Ego – after a few reps, you will start to feel how your side delts will fatigue quite fast. If you feel that you can’t raise your arms fully anymore, step your feet a little closer together to lower the resistance and get some more reps in. It’s about progress, not about your ego using a stronger band. Use the lightest band if you must and work your side delts.

⓸ Control each repetition! – This is actually the most important point when it comes to resistance training in general. Always control your movements throughout the full motion. This means: don’t simply let the band snap back when your arms are on the way back down. Really control the negative part of the movement! In this part of the movement is actually the progress.

More Mistakes To Avoid: To learn even more about common mistakes people do when using resistance bands and how to avoid them, check out our full article on this topic: The Worst Mistakes You Can Do When Training With Resistance Bands.

How To Adjust The Resistance

Often people tend to use a band which is actually too heavy for lateral raises. This usually leads to form breakdown and can even result in injury or simply not working your side delts properly. When it comes to using resistance bands, it is better to get a lighter band and use its full potential by adjusting the resistance.

The best methods for the lateral raises are:

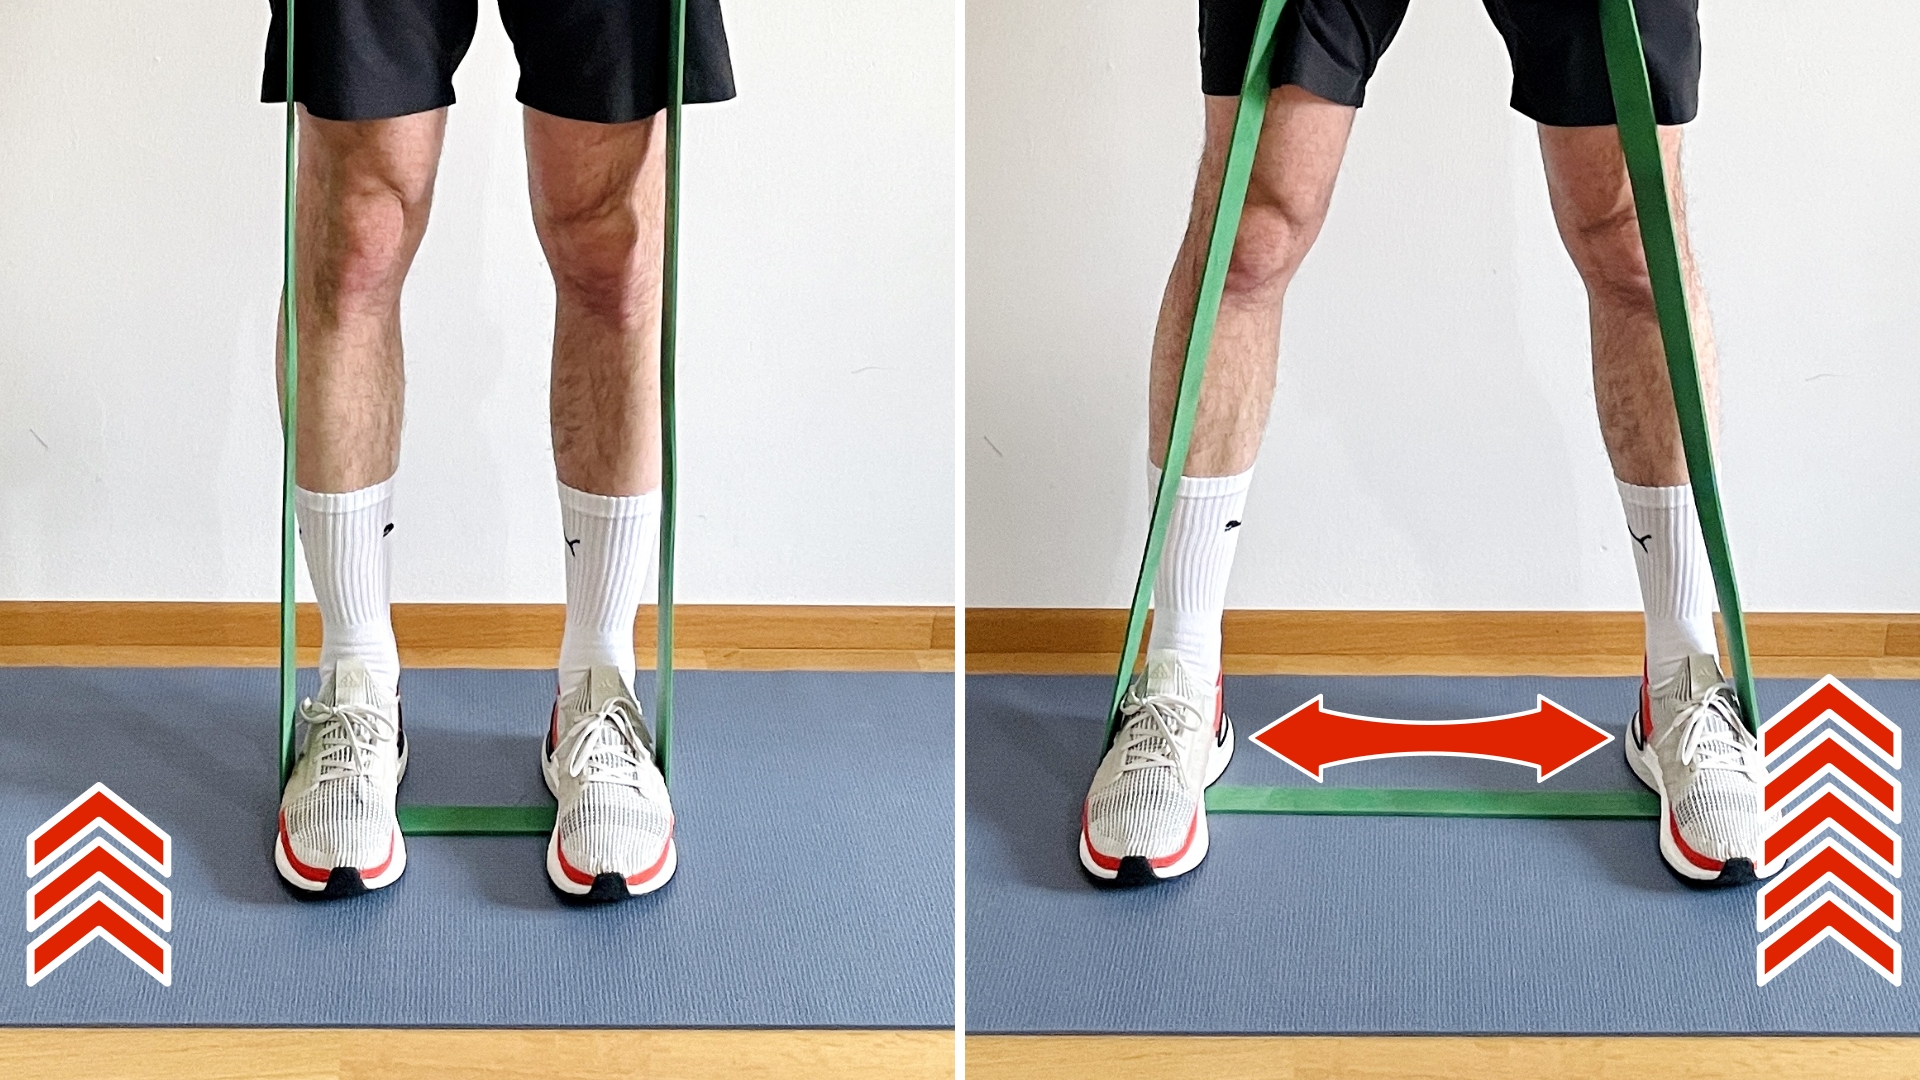
Changing the foot position – This is my favorite way to adjust the resistance. And it is so simple. Just increase the distance of your feet to each other to get a higher resistance. Or step them together to lower it. The best thing is that you can do that in the middle of a set. Especially towards the end of a set, I like to step my feet together and get a few additional reps in.

DeadliftRAFeetWidth

Adjusting the length of the band – This is the most basic method to increase the resistance of a band. By wrapping it around your palm or foot, you can make it shorter. This way, you will have a larger starting and end resistance in your lateral raises. This approach is especially suitable when you do the lateral raises unilaterally – Check out the next section to find out how it is done.

Slowing down the reps – Often it is simply not possible to get the next heavier band when it comes to shoulder training, because the jump in resistance would be too great and the delts are very small muscles. To increase the intensity, you can also keep the resistance level as is and simply slow down your reps. This way you will have more time under tension.

The BIQ App

Take training with resistance bands to the next level with our free app.

  • 800+ Exercises
  • all band types
  • different training goals & workouts
  • challenges
  • much more

Side Raise Variations With Resistance Bands

Variations are great to just change it up and get more variety into your workouts to keep it interesting and fun.

Unilateral Lateral RaisesUni lateral work is awesome to focus on only one side at a time and really feel the muscles working. Also, if you have any imbalances between your right and left side, you can correct them by working one side at a time. Loop bands are especially great for this variation.

L0091-SingleArmSideRaise

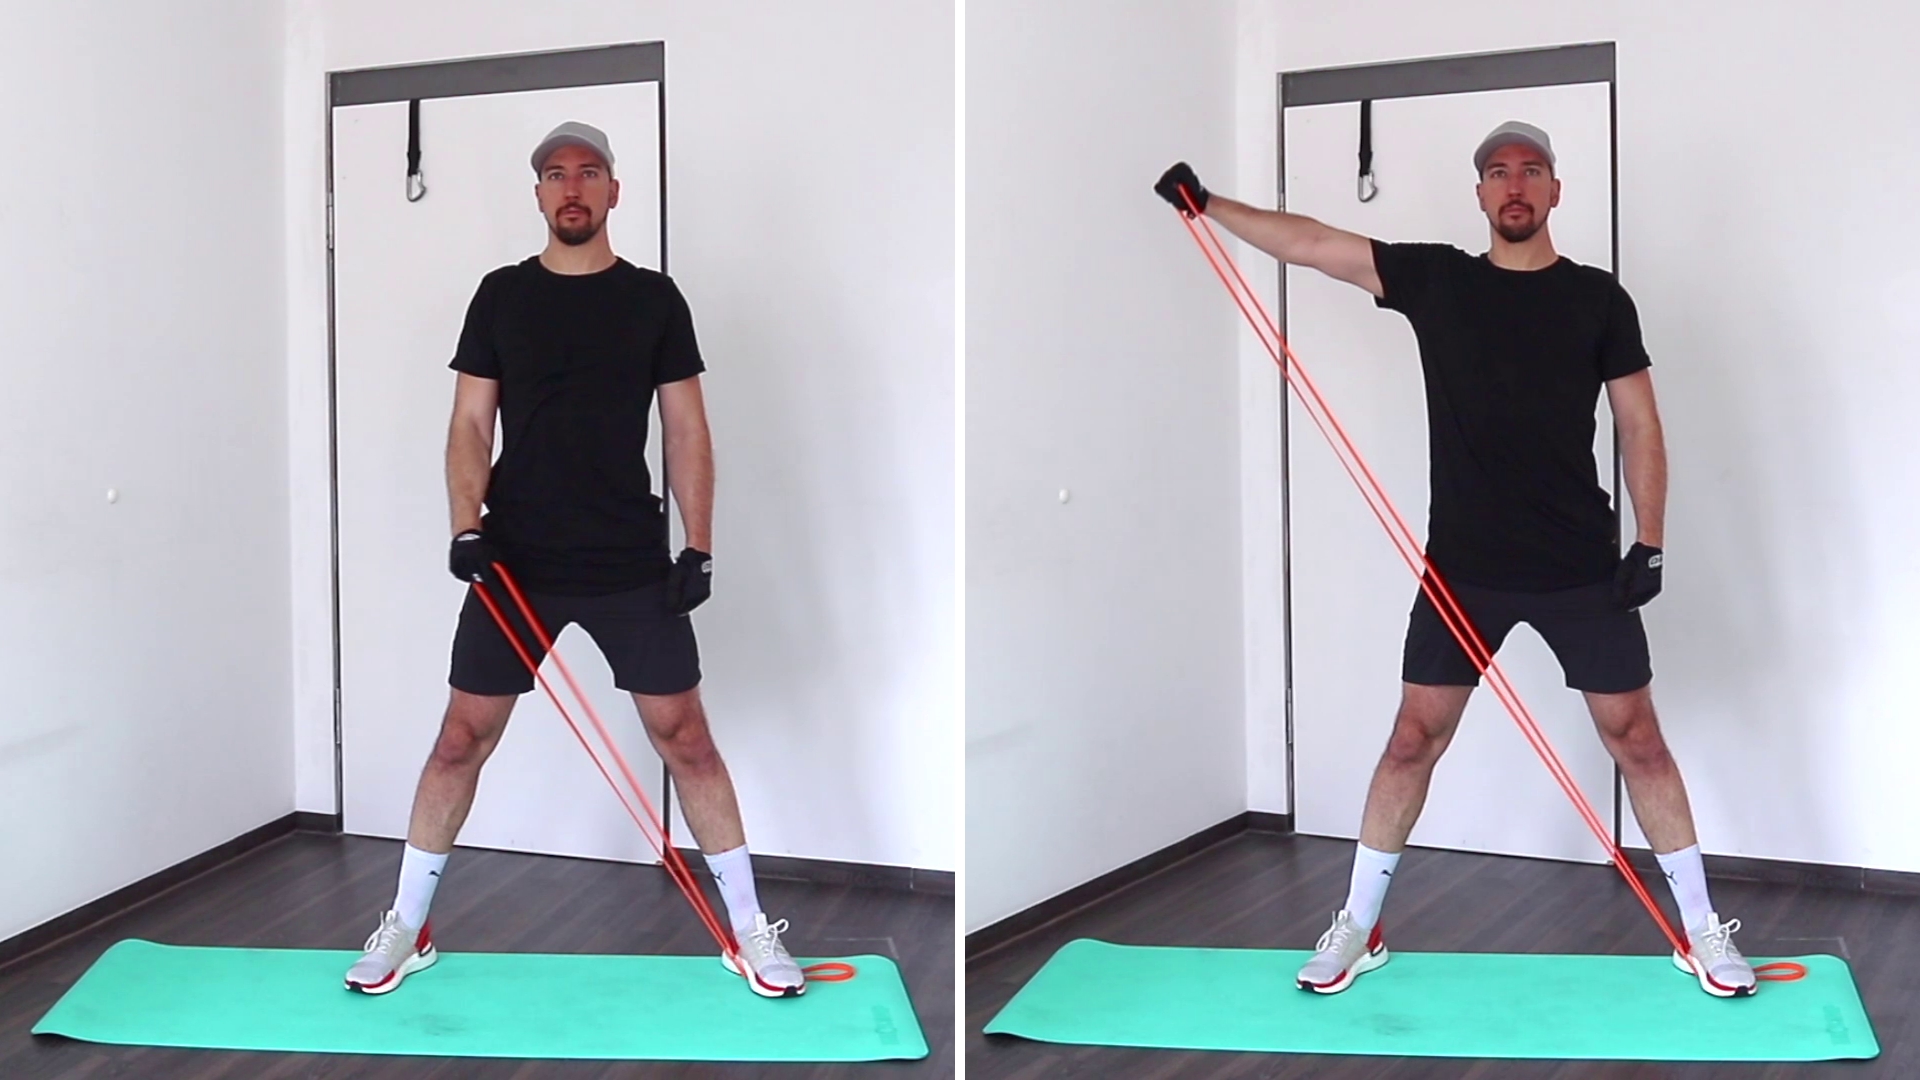
You will step on the band with one foot and grab the other end with your hand. From here, you will perform the raise with a straight arm. Make sure that your thumb is pointing forwards as you raise your arm. You can use your left or your right foot to anchor the band. If you work your right shoulder and use your right foot as the anchor, you will have less resistance. If you use your left foot, you will have more resistance. You can adjust the resistance even further by moving your feet further outside. Play around and let us know what you think.

Front to Side Raises – Making a combo move of side and front raises is actually quite easy. Check them out:

Can You Train Your Shoulders Effectively With Resistance Bands?

Not only can you train your shoulders effectively 100% by using resistance bands, I would even argue that bands are superior to free weights and machines. I actually feel my side delts much more when I use bands, and the resistance level that bands can generate is more than enough to get the shoulders working. People who still say that resistance bands are only good for warming up or injury recovery are living under a rock or just never tried using them seriously. Building muscles and strength, lose body fat or simply increase your general fitness. Whatever your goal is – Resistance bands can get you as good or even better than conventional workout tools.

Why Does Training With Resistance Bands Work

For your and my body, there is only one trigger it reacts to, and it is resistance. It doesn’t matter if this resistance is generated through gravity and weights or by resistance bands and the elastic tension within them. It is simple, if your muscles have to work against a resistance over a certain time period, they will adjust by becoming bigger, stronger and more efficient. To learn more about the answer to this quest, have a look right here: Why Does Training With Resistance Bands Work

Benefits Of Training With Resistance Bands

As a sneak peek and because people still doubt resistance band training, here are some benefits bands bring along:

  • Perfect Resistance! Your side delts are not strong muscles, and you can work them to fatigue pretty fast. Especially with weights, you will often get to a point where you won’t be able to get into full contraction. With bands, you can easily adjust the resistance while you do the lateral raise and get some extra reps in.
  • No Cheating! Resistance bands prevent you from using momentum and cheat your reps. You will be forced to use proper form and therefore have a lower chance of injury.
  • Fewer Injuries & Home Workout! Recovering from an injury? Use bands! Want to build bigger and better triceps? Use bands! Since bands force you to perform the exercise with good form simply by using them, this will provide an automatic injury prevention. Nice!
  • Mobile! A home gym or even dumbbells need space, bands on the other hand can be stored in any drawer or in a small bag. Especially if you have little space for working out, bands are perfect.

Want to learn about more benefits resistance bands have? We got you: Benefits Of Resistance Band Training

What Muscles Are Used In A Resistance Band Lateral Raise?

The shoulders consist out of 3 distinct portions. The Anterior (front), the Lateral (side) and the Posterior (rear) Deltoid. It is quite straight forward what each of those delts does. Each of the delts is responsible for lifting your arm in the corresponding direction. That means if we want to target the medial delts we need to lift the arm straight to the side.

Independent of the direction you lift your arm – all delts will be involved in the movement, but one is always the main mover.

Main Working Muscles:

  • Lateral Deltoid

Supporting Muscles:

  • Anterior Deltoid
  • Posterior Deltoid
MuscleMapSideRaises-Details

Workout Plan

Knowing how to do side raises is great, but you probably have greater goals for your body than just training your side delts. The most effective way for that is having a workout program designed to reach exactly those goals – be it burning fat, building muscles, or simply being more fit in general. Finding a good workout plan can be a hustle, and you never know if it is actually any good.

We know that struggle, and we also know that most people are simply not interested in exercise science. They just want to have something that works and which is easy to understand. That is why we have done all the work for you, well almost. The workout itself and the sweating is still your job. But you don’t have to worry about when to do what and not knowing how an exercise is done correctly.

We put all our knowledge into an easy-to-use app where you can find a collection of all exercises, including a how-to video and steps. As well as workout programs depending on your goal and challenges to really get your heart pumping.

If you want to find out more – check it out here: BIQ Training App

The BIQ App

Take training with resistance bands to the next level with our free app.

  • 800+ Exercises
  • all band types
  • different training goals & workouts
  • challenges
  • much more

Leave a Reply

Your email address will not be published. Required fields are marked *

Log In

Forgot password?

Forgot password?

Enter your account data and we will send you a link to reset your password.

Your password reset link appears to be invalid or expired.

Log in

Privacy Policy

Add to Collection

No Collections

Here you'll find all collections you've created before.